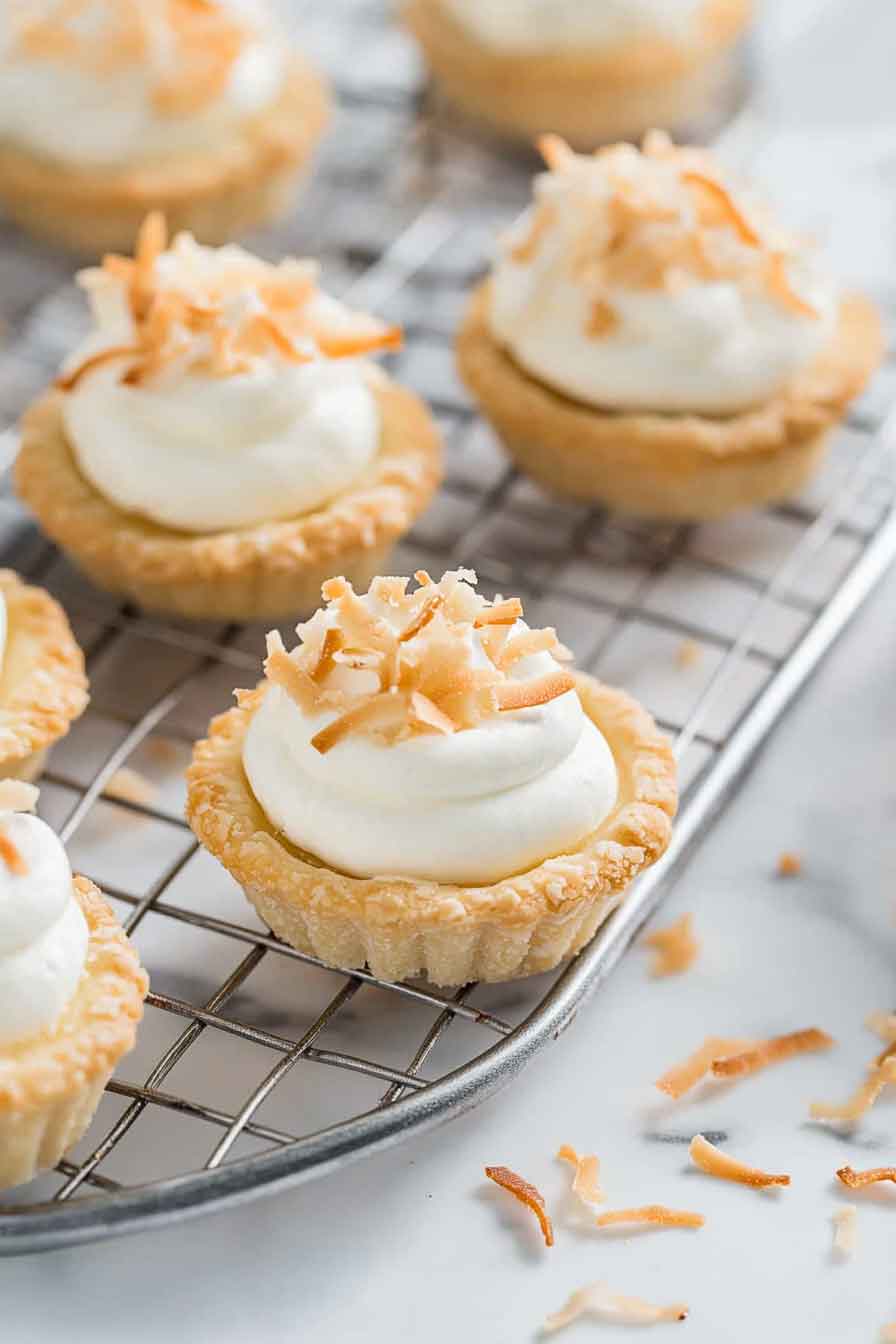
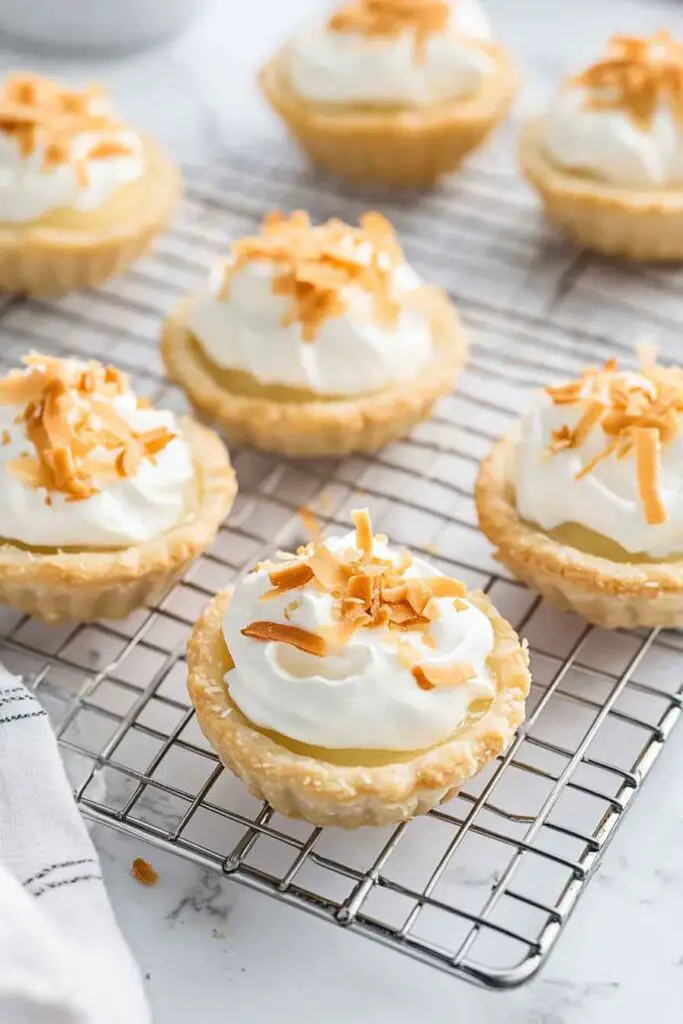
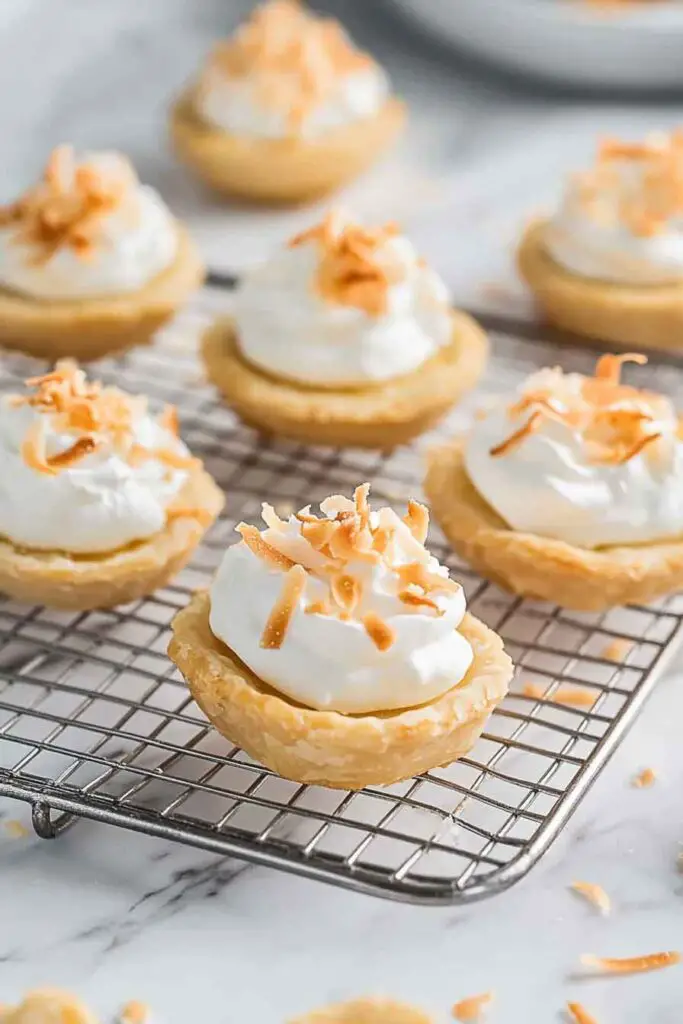
Mini Coconut Cream Pies (Classic, Creamy, and Comforting)
Alright, these Mini Coconut Cream Pies? They’re tiny, creamy, and full of sweet coconut goodness in every bite. Buttery crust, smooth coconut filling, and a fluffy whipped topping—so simple, so good.
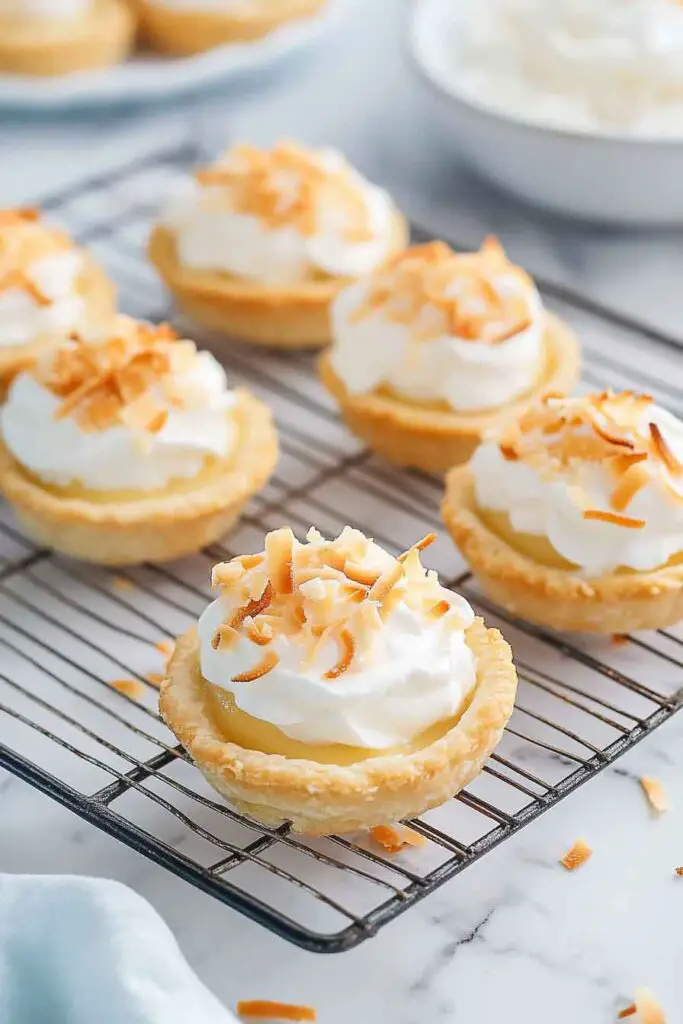
I made them for a little get-together, and everyone loved how cute (and tasty) they were. That creamy center with toasted coconut on top? Total dream.
They’re super easy to make—no stress at all. Just bake, fill, and chill. Let’s make them together—you’re gonna want more than one!

Why You’ll Love This Recipe
- Creamy, Classic Flavor: The filling is made from scratch with egg yolks, milk, and real shredded coconut, giving it that unmistakable homemade taste.
- Portion Control: Because they’re made in mini crusts, each person gets their own—no slicing required.
- Great for Parties: Easy to transport and serve at events, buffets, or picnics.
- Flexible and Foolproof: Use store-bought crusts for convenience or bake your own. The filling is cooked on the stovetop and sets in the fridge.
- Beautiful Presentation: Top with whipped cream and toasted coconut for a bakery-style finish.
What You Need to Know Before You Start
Prep Time: ~25 minutes (including filling and whipped cream)
Cook Time: ~10–12 minutes (only if you bake the crusts)
Chill Time: Minimum 2 hours (for filling to set properly)
Total Time: About 2 hours 45 minutes, start to finish
Yield: 12 mini pies (fits standard store-bought mini crusts or 12 muffin tin wells)
Skill Level: Beginner-friendly. The filling requires stirring and timing, but no special equipment or advanced technique.
Pro Tip Before You Begin:
Have all your ingredients measured out before starting the stovetop filling. Once the milk and eggs hit the heat, you’ll need to stir constantly to avoid lumps or curdling. Use medium heat, not high, to prevent burning.
Required Kitchen Tools
- Muffin tin or mini tart pans: For structure and uniform size. Silicone pans or aluminum muffin tins work best.
- Medium saucepan: For cooking the coconut custard.
- Whisk: To keep the filling smooth and creamy during cooking.
- Measuring cups and spoons: Accurate measurements are key for custard consistency.
- Mixing bowls: For separating eggs and whipping the cream.
- Hand mixer or stand mixer: Makes whipping cream quicker and fluffier.
- Spoon or piping bag: For topping each mini pie with whipped cream neatly.
- Cooling rack (optional): Helps cool baked pie crusts evenly before filling.
Ingredients for the Coconut Cream Pies
Here’s a deeper look at each component that makes up these pies. You’ll build this dessert in three layers: crust, coconut filling, and whipped cream topping.
Crust (Pre-Baked or Ready-Made):
- 12 mini pie crusts
Use store-bought for ease, or press your own pie dough into muffin tins and blind-bake. Let them cool before adding the filling.
Coconut Custard Filling:
- 3 cups whole milk (divided)
This forms the base of your custard. Whole milk gives the richest, smoothest texture. - 5 large egg yolks
They add structure, color, and richness to the filling. Save the whites for another recipe. - 5 tablespoons cornstarch
Essential for thickening the custard. Be sure to whisk it well with milk before adding to heat. - ¼ teaspoon salt
A tiny pinch balances sweetness and enhances flavor. - ½ cup granulated sugar
Just the right amount to sweeten without making it cloying. - ½ cup sweetened shredded coconut
Adds real coconut flavor and a bit of chewy texture. If you like it smoother, you can pulse it briefly in a food processor. - 1 teaspoon vanilla extract
Use real vanilla extract for the best depth of flavor.
Whipped Cream Topping:
- 2 cups heavy whipping cream
Whips into soft, fluffy peaks. Chill the bowl and beaters for best results. - ¼ cup granulated sugar
Just enough to sweeten the whipped cream. You can also use powdered sugar. - 1 teaspoon vanilla extract
Adds a pleasant aroma and enhances the cream’s flavor.
Optional Garnish:
- Toasted coconut flakes
Lightly toast in a dry pan or oven until golden brown for a crunchy, nutty finish.
Variations for Mini Coconut Cream Pies
Looking to switch things up? These variations let you tailor the pies to your preferences or dietary needs:
- No-Bake Crust Option: Skip the oven completely by using ready-made graham cracker tart shells or mini cookie crusts. Simply fill and chill.
- Gluten-Free: Use gluten-free mini pie crusts or press a mix of crushed gluten-free graham crackers and melted butter into muffin tins.
- Dairy-Free: Substitute the whole milk with canned coconut milk and use a plant-based whipping cream. Ensure the crusts are dairy-free, too.
- Extra Coconut Flavor: Add ¼ teaspoon coconut extract to the filling or whipped cream.
- Tropical Twist: Stir in a small amount of finely diced pineapple or mango to the filling after it cools.
- Chocolate-Lovers’ Version: Spread a thin layer of melted dark chocolate over the base of each crust before filling for a coconut-chocolate combo.
How to Make Mini Coconut Cream Pies – Step-by-Step Instructions
Step 1: Prepare the Pie Crusts
If using store-bought mini pie crusts, set them on a tray and move to the next step.
If making your own:
- Preheat oven to 350°F (175°C).
- Roll out your favorite pie dough and cut 4-inch circles.
- Press into lightly greased muffin tins or mini tart pans.
- Prick the bottom of each crust with a fork.
- Line with parchment and fill with pie weights or dried beans.
- Bake for 10–12 minutes until lightly golden.
- Remove from oven and let cool completely.
Tip: For extra crispiness, brush crusts lightly with beaten egg white before baking.
Step 2: Make the Coconut Cream Filling
- In a small bowl, whisk together 5 egg yolks, 5 tablespoons cornstarch, and 1 cup of the milk until smooth. Set aside.
- In a medium saucepan, combine the remaining 2 cups milk, ½ cup sugar, and ¼ teaspoon salt over medium heat. Stir constantly until it just begins to steam—do not boil.
- Slowly pour about ½ cup of the hot milk mixture into the egg yolk mixture, whisking quickly to temper the eggs. This prevents curdling.
- Pour the tempered yolk mixture back into the saucepan, whisking constantly.
- Cook over medium heat, whisking without stopping, until thickened. This may take 3–5 minutes. The mixture should be thick enough to coat the back of a spoon.
- Remove from heat. Stir in ½ cup shredded coconut and 1 teaspoon vanilla extract. Mix well.
- Transfer filling to a shallow dish and cover with plastic wrap pressed directly onto the surface (to prevent a skin from forming).
- Let it cool at room temperature for 15 minutes, then refrigerate for at least 1 hour, or until completely chilled and set.
Step 3: Make the Whipped Cream
- In a chilled mixing bowl, add 2 cups cold heavy cream, ¼ cup sugar, and 1 teaspoon vanilla extract.
- Using a hand or stand mixer, beat on medium-high speed until soft to medium peaks form. This takes about 3–5 minutes.
Tip: Don’t overbeat—stop once the cream holds its shape but still looks smooth.
Step 4: Assemble the Mini Pies
- Once the crusts are cool and the coconut filling is fully set, spoon or pipe the filling evenly into each pie shell.
- Top with a generous swirl of whipped cream. You can use a spoon for a rustic look or a piping bag for a neater finish.
- Sprinkle each pie with toasted coconut flakes for added texture and a golden touch.
- Chill pies for 30 minutes more before serving, or until ready to eat.
Serving and Decoration
Mini Coconut Cream Pies are best served cold. Once assembled, let them chill for 30 minutes so the whipped cream sets and flavors meld. When you’re ready to plate them:
- For a simple finish: A sprinkle of toasted coconut is enough.
- For a fancy touch: Garnish with a mint leaf or a small piece of dried pineapple on top of the whipped cream.
- For kids: Try mini chocolate chips or rainbow sprinkles on top to make it fun and colorful.
These individual pies are ideal for parties and make a tidy, mess-free dessert for picnics, potlucks, or afternoon tea.
How to Store Mini Coconut Cream Pies
- Refrigerator: Keep the assembled pies in the fridge, covered with plastic wrap or in an airtight container. They’ll stay fresh for up to 3 days.
- Freezer (Filling Only): The coconut custard can be made ahead and frozen in an airtight container for up to 1 month. Thaw overnight in the refrigerator before using.
- Freezer (Assembled Pies): Not recommended. The whipped cream may separate, and the crusts can become soggy.
Tip: If making ahead, keep the crusts and filling separate. Assemble just before serving for the best texture.
Tips and Tricks for Success
- Temper the eggs: This step is crucial to avoid scrambled eggs in your custard.
- Use full-fat milk: For a creamy, smooth texture that holds its shape once chilled.
- Whisk constantly: While cooking the filling, never stop stirring—it thickens fast.
- Chill completely: The filling must be cold and set before assembling, or it will run.
- Toast the coconut: It brings out a deeper flavor and adds crunch on top.
Nutrition
Here is the approximate nutritional information per mini pie (based on 12 servings):
| Nutrient | Amount per serving |
|---|---|
| Calories | 295 kcal |
| Carbohydrates | 28 g |
| Protein | 4 g |
| Fat | 19 g |
| Saturated Fat | 12 g |
| Fiber | 1 g |
| Sugar | 17 g |
| Sodium | 105 mg |
| Cholesterol | 120 mg |
| Calcium | 90 mg |
Note: Nutrition values are estimates and may vary depending on exact ingredients used.
Mini Coconut Cream Pies (Classic, Creamy, and Comforting)
Course: Easy Homemade Desserts12
mini pies2
minutes10
minutes295
kcal2+
hourIngredients
For the Crusts:
12 mini pie crusts (store-bought or homemade, baked and cooled)For the Coconut Cream Filling:
3 cups (720 ml) whole milk, divided
5 large egg yolks
5 tablespoons (40g) cornstarch
¼ teaspoon salt
½ cup (100g) granulated sugar
½ cup (43g) sweetened shredded coconut
1 teaspoon vanilla extractFor the Whipped Cream Topping:
2 cups (480 ml) heavy whipping cream
¼ cup (50g) granulated sugar
1 teaspoon vanilla extractOptional Garnish:
Toasted coconut flakes
Directions
- Prepare Pie Crusts:
If using homemade crusts, bake in muffin tins for 10–12 minutes at 350°F (175°C). Cool completely. - Make Filling:
Whisk yolks, 1 cup milk, and cornstarch in a bowl.
Heat remaining 2 cups milk, sugar, and salt in a saucepan over medium heat. When hot (but not boiling), slowly whisk into yolk mixture to temper.
Return all to saucepan and cook over medium heat, whisking constantly until thickened (3–5 minutes).
Remove from heat, stir in coconut and vanilla.
Cover surface with plastic wrap and chill until fully cooled and thickened (at least 1 hour). - Make Whipped Cream:
Beat heavy cream, sugar, and vanilla until soft peaks form (3–5 minutes). Do not overmix. - Assemble Pies:
Spoon or pipe chilled coconut filling into mini crusts.
Top with whipped cream and toasted coconut.
Chill another 30 minutes before serving.
FAQs
Q: Can I make the filling a day ahead?
Yes. You can make the coconut custard up to 2 days in advance. Keep it tightly covered in the fridge.
Q: Can I use canned coconut milk instead of regular milk?
You can, but full-fat canned coconut milk will result in a heavier, more coconut-forward filling. Mix with a bit of regular milk or use half and half for balance.
Q: How do I toast coconut flakes?
Spread sweetened shredded coconut on a baking sheet and toast at 325°F (165°C) for 5–7 minutes, stirring halfway through, until golden.
Q: Can I freeze these pies?
It’s best not to freeze assembled pies, as the texture of the whipped cream and crust may suffer. You can, however, freeze just the custard filling.
Conclusion
Mini Coconut Cream Pies are a delightful twist on the classic dessert—perfect for gatherings, celebrations, or when you just want a little something sweet. The creamy coconut filling, buttery crust, and airy whipped topping come together to create a dessert that feels both indulgent and approachable. Whether you bake the crusts yourself or opt for store-bought, this recipe is flexible, rewarding, and full of flavor. Try making a batch and see how quickly they disappear from the table.