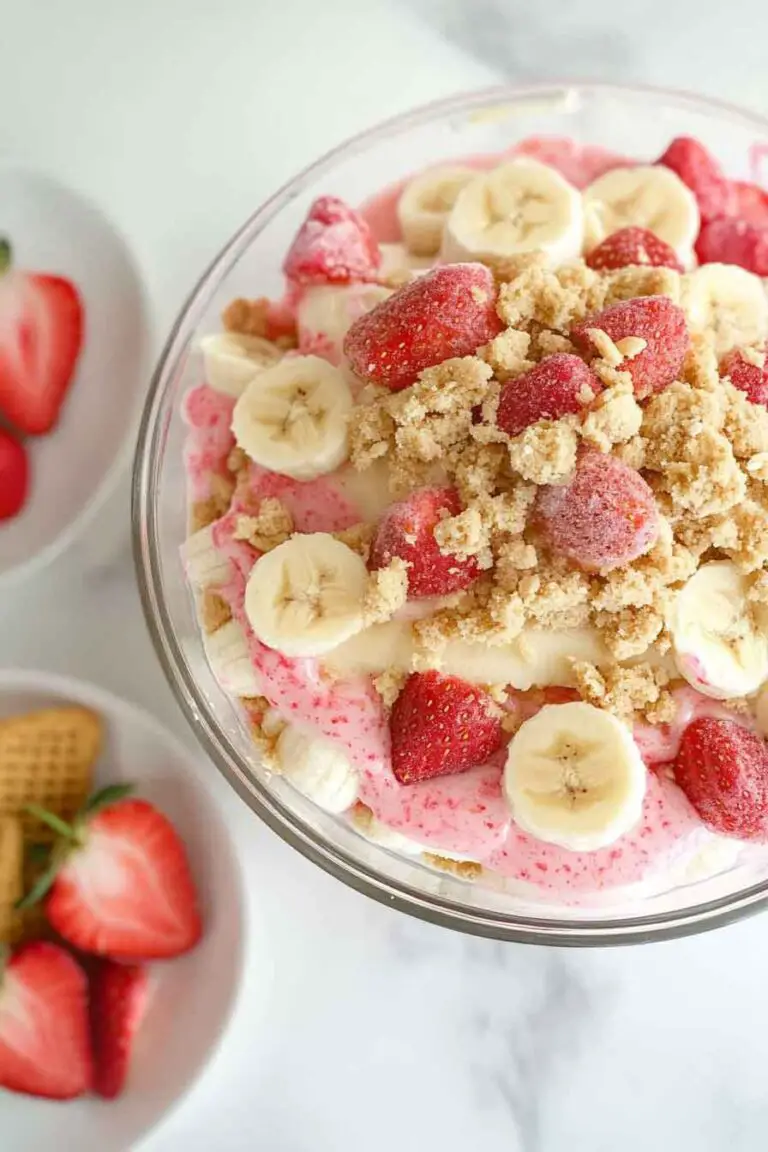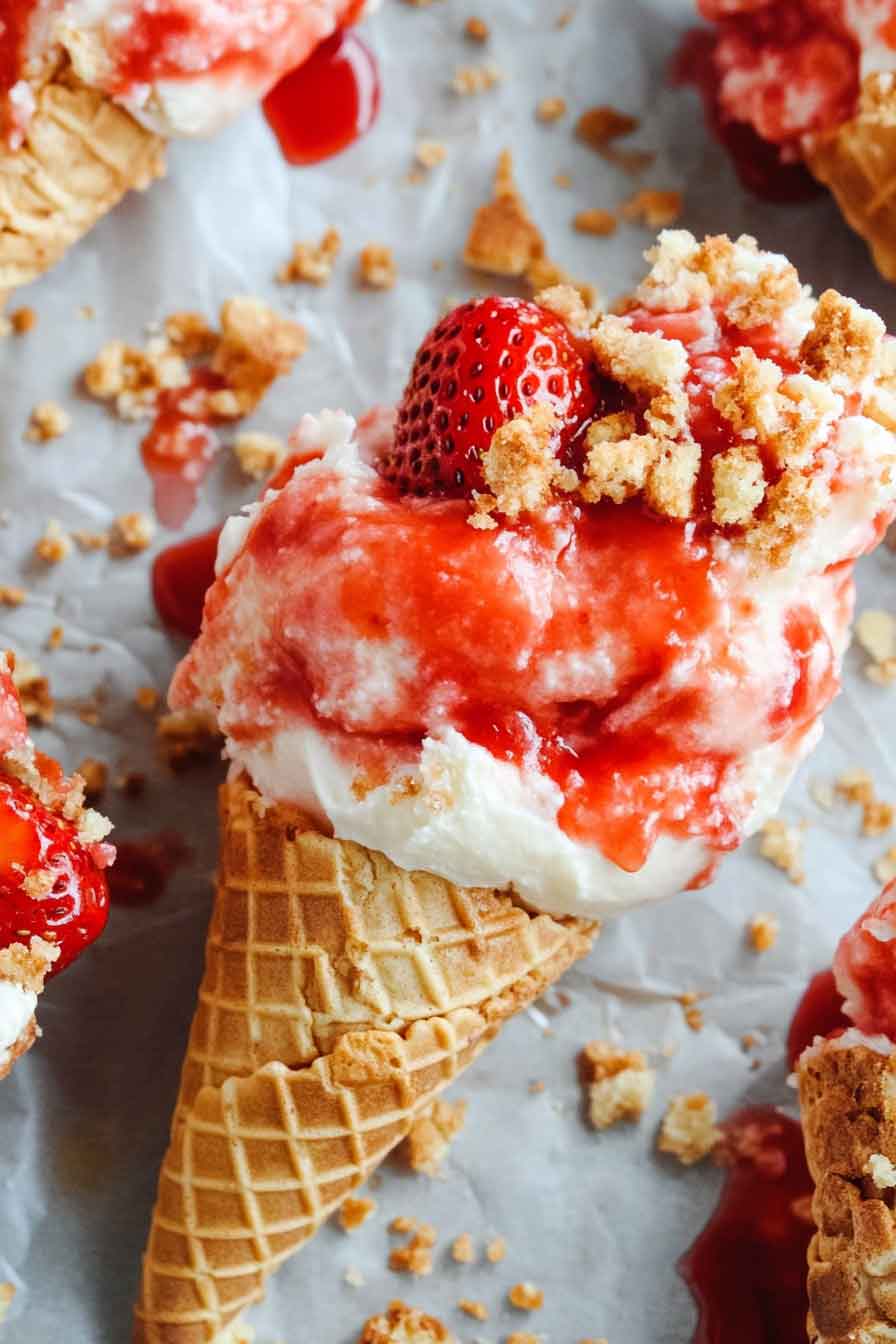
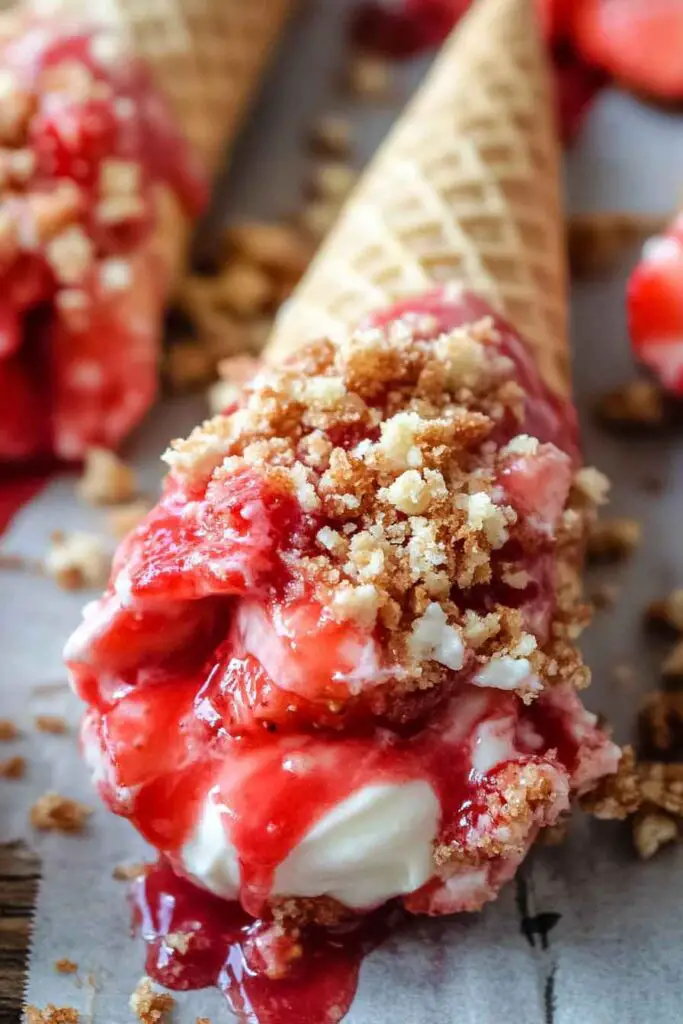
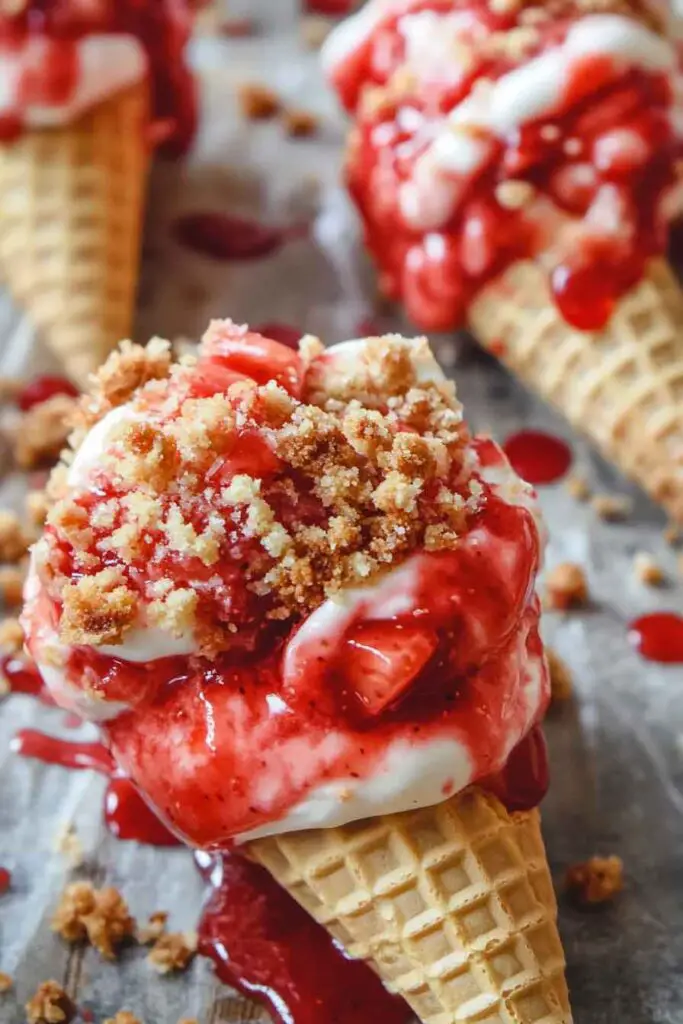
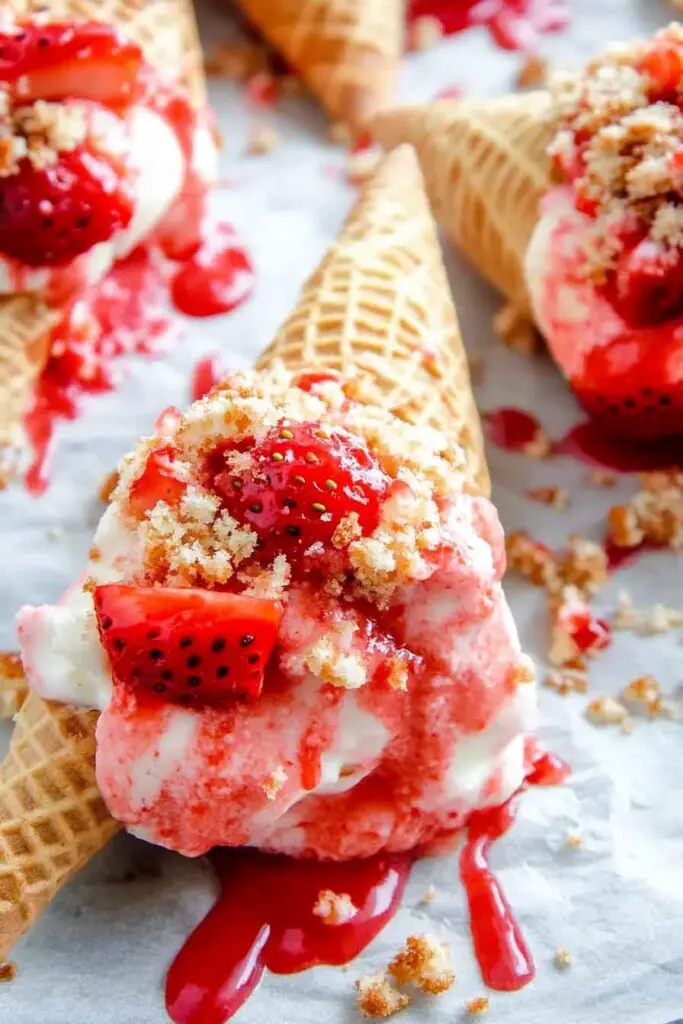
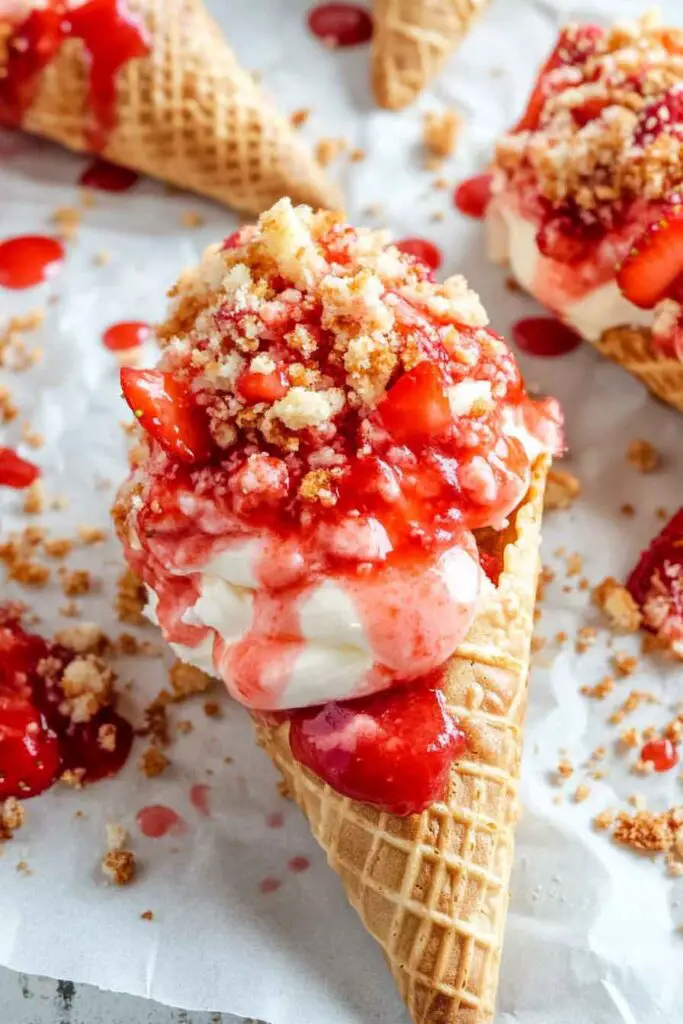
Strawberry Crunch Cheesecake Cones
Alright, these Strawberry Crunch Cheesecake Cones? They’re fun, creamy, and loaded with sweet strawberry flavor in every bite. Imagine a crispy waffle cone filled with rich cheesecake filling, swirled with strawberry sauce, and coated in that iconic strawberry shortcake crunch topping—yeah, that kind of good.
I made them for a summer birthday party, and everyone lost their minds. That cold, creamy center with the buttery cookie crunch and fruity swirl? It tastes like your favorite strawberry ice cream bar, but better—and handheld!
No baking, no fuss. Just whip up the filling, spoon it into the cones, and roll them in the crunch. Let’s make a batch together—you’re gonna love how easy, nostalgic, and totally addictive they are!

Why You’ll Love This Recipe
- No-Bake Convenience: No oven, no heat—just mix, chill, and assemble. Great for summer.
- Textural Contrast: Crisp cone, soft cheesecake, fresh strawberries, and a sweet, crunchy topping create layers of texture that keep every bite interesting.
- Visually Appealing: The pink-and-white strawberry crunch, glossy glaze, and pretty piping make them eye-catching—ideal for social media or dessert tables.
- Make-Ahead Friendly: Components can be made up to 24 hours in advance and assembled just before serving.
- Kid- and Crowd-Friendly: Easy for little hands to hold, and no fork or plate needed. Great for events and potlucks.
What You Need to Know Before You Start
Prep Time & Assembly Time
- Active Prep Time: 20 minutes
- Optional Chill Time: 30 minutes (recommended for firmer cheesecake texture)
- Total Time: About 20–50 minutes, depending on whether you chill the filling
While this dessert is easy, you’ll want to keep the cones upright while assembling. If you’re serving at a party, consider chilling the cones standing upright in a muffin tin or cone stand until ready to serve. The melted white chocolate acts as both a flavor booster and a barrier to help keep cones crisp.
Servings
This recipe makes 6 full-sized dessert cones generously filled with cheesecake and topping.
You can double or triple the batch for larger events. Each cone is about 4–5 inches tall and filled to the top with layers of filling, fruit, and topping.
Difficulty Level
This dessert is rated Easy.
You don’t need baking experience or special tools. Most steps involve basic mixing, melting, and spooning. A hand mixer can make the cheesecake filling fluffier, but even a whisk works in a pinch. Ideal for beginner cooks or anyone looking for a low-stress dessert recipe.
Required Kitchen Tools
To ensure smooth preparation and beautiful results, gather the following tools:
- Medium Mixing Bowl: For blending the no-bake cheesecake filling.
- Hand Mixer or Electric Whisk: To whip the filling until smooth and fluffy.
- Microwave-Safe Bowl or Double Boiler: For melting white chocolate.
- Small Saucepan (Optional): If making your own strawberry glaze instead of using store-bought.
- Piping Bag or Zip-Top Bag (Optional): For neatly filling the cones with cheesecake mixture.
- Spoon or Small Spatula: For spreading and layering ingredients.
- Serving Cups or Cone Stand: To hold the cones upright while assembling or chilling.
Having everything prepped before assembly makes the process cleaner and more efficient.
Ingredients Breakdown
For the Strawberry Crunch Topping:
You can make this at home by blending:
- Golden sandwich cookies (like Golden Oreos): About 12, crushed into crumbs.
- Freeze-dried strawberries or strawberry Jello mix: About ½ cup of freeze-dried berries or 2 tbsp of gelatin mix.
- Butter (melted): Optional, to help bind the topping for a sand-like texture.
For the Cheesecake Filling:
Use a premade no-bake cheesecake tub (24 oz) or make your own with:
- Cream cheese (softened): 8 oz
- Powdered sugar: ½ cup
- Vanilla extract: 1 tsp
- Heavy cream or whipped topping: ½ cup, whipped to soft peaks
Additional Ingredients:
- Fresh Strawberries: 6–8 large strawberries, diced small.
- White Chocolate: 5 oz, melted to coat cone rims and help adhere the crunch topping.
- Strawberry Glaze or Sauce: ¼ cup, store-bought or homemade (optional for drizzling).
- Waffle or Sugar Cones: 6 cones, preferably waffle-style for sturdiness.
Variations for Strawberry Crunch Cheesecake Cones
- Different Fruit Options: Try blueberries, raspberries, or chopped mango in place of strawberries for a fresh twist.
- Chocolate Dipped Cones: Instead of just white chocolate, dip cone rims in dark or milk chocolate before adding crunch topping.
- Mini Cones: Use mini cones or even serve in shot glasses for bite-sized party portions.
- Homemade Crunch Alternative: Blend graham crackers with freeze-dried strawberries and a touch of butter for a simpler, homemade-style crunch.
- Flavored Fillings: Add lemon zest, almond extract, or a swirl of jam to the cheesecake mixture to change the flavor profile.
How to Make Strawberry Crunch Cheesecake Cones
Step-by-Step Instructions
1. Prepare the Strawberry Crunch Topping
In a food processor, pulse 12 golden sandwich cookies until they become coarse crumbs. Add in freeze-dried strawberries (or strawberry Jello powder) and pulse again just to combine. If using butter, add 1–2 tablespoons melted butter and mix until the texture resembles wet sand. Set aside.
Tip: Keep the crunch topping dry if you’re prepping ahead—adding butter will shorten its shelf life.
2. Melt the White Chocolate
Place white chocolate chips or chopped bar chocolate in a microwave-safe bowl. Heat in 20-second intervals, stirring between each, until fully melted and smooth.
Dip the tops (rim) of each cone into the melted chocolate. Immediately roll or sprinkle the dipped edge in the strawberry crunch topping. Stand cones upright in a cone holder or muffin tin to let chocolate harden completely—about 5 minutes at room temp.
3. Make the Cheesecake Filling
If using a store-bought no-bake cheesecake tub, simply stir it until smooth and creamy.
To make it from scratch:
- In a bowl, beat softened cream cheese with powdered sugar and vanilla until smooth.
- In a separate bowl, whip cold heavy cream to soft peaks.
- Gently fold the whipped cream into the cream cheese mixture until fluffy and fully combined.
You can refrigerate the filling for 15–30 minutes to let it firm slightly before piping.
4. Fill the Cones
Transfer the cheesecake filling to a piping bag (or spoon it in carefully). Pipe or spoon the filling into each cone, filling about ¾ of the way.
Add a layer of diced strawberries on top of the cheesecake filling, gently pressing them in.
Then pipe another small swirl of cheesecake mixture on top to create a domed shape above the cone rim.
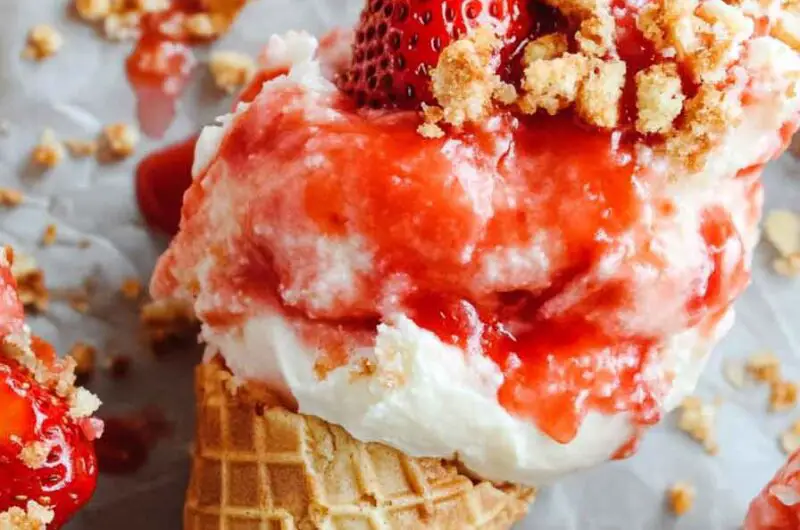
5. Garnish and Finish
- Drizzle a spoonful of strawberry glaze or sauce over the top swirl.
- Sprinkle more strawberry crunch topping over the glaze for a finished look.
- Optional: Add a strawberry slice or white chocolate drizzle as a final garnish.
Refrigerate cones upright for 15–30 minutes to let everything set. Serve chilled.
Serving and Decoration
These Strawberry Crunch Cheesecake Cones are best served cold. For presentation, place each cone in a small mason jar, dessert cup, or a pre-cut foam cone holder to keep them upright. They’re perfect for:
- Party dessert bars
- Picnic spreads
- Kid-friendly birthday treats
- Individual plated desserts with a scoop of whipped cream on the side
For extra flair, garnish the top with half a strawberry, mint leaf, or a white chocolate curl.
How to Store Strawberry Crunch Cheesecake Cones
Refrigeration:
- Once assembled, store cones upright in the refrigerator and consume within 24 hours for best texture.
- To prevent soggy cones, only assemble right before serving if storing ahead.
Make-Ahead Tips:
- Cheesecake filling can be prepared up to 2 days in advance and kept in an airtight container.
- Crunch topping can be made and stored in a zip bag for up to 1 week.
- Dipped cones can be prepped and stored in a cool, dry place for 2 days.
Avoid freezing once assembled, as cones and fruit will lose texture.
Tips and Tricks for Success
- Use firm cones: Waffle cones work better than sugar cones for weight and durability.
- Cool chocolate fully: Allow dipped rims to set before filling to prevent melting.
- Don’t overfill cones: Leave some room at the top so the final swirl doesn’t overflow.
- Chill your tools: Use a cold bowl for whipping cream and piping for neater filling.
- Assemble right before serving if you want the cones extra crisp.
Nutrition (Per Cone, Approximate)
| Nutrient | Amount |
|---|---|
| Calories | 390–420 |
| Total Fat | 22g |
| Saturated Fat | 12g |
| Carbohydrates | 45g |
| Sugars | 28g |
| Protein | 4g |
| Fiber | 1g |
| Sodium | 160mg |
Values vary slightly depending on ingredients used (store-bought vs. homemade filling).
Strawberry Crunch Cheesecake Cones
Course: No-Bake Desserts6
cones20
minutes420
kcal30
miniutesIngredients
Crunch Topping:
12 golden sandwich cookies (e.g., Golden Oreos)
½ cup freeze-dried strawberries (or 2 tbsp strawberry gelatin mix)
1–2 tbsp melted butter (optional, for texture)Filling (premade or homemade):
24 oz no-bake cheesecake filling
OR
8 oz cream cheese, softened
½ cup powdered sugar
1 tsp vanilla extract
½ cup heavy cream, whippedExtras:
5 oz white chocolate, melted
6–8 strawberries, diced
¼ cup strawberry glaze or sauce
6 waffle or sugar cones
Directions
- Make Crunch Topping: Pulse cookies and strawberries (or gelatin) in a food processor to make crumbs. Mix with melted butter if desired. Set aside.
- Dip Cones: Melt white chocolate and dip cone rims. Immediately coat in crunch topping. Let set upright.
- Prepare Cheesecake Filling: Stir premade filling or beat cream cheese, sugar, and vanilla until smooth. Fold in whipped cream if using.
- Assemble Cones: Pipe or spoon filling into each cone, layer with diced strawberries, then top with another swirl of cheesecake.
- Finish: Drizzle with glaze and sprinkle with crunch topping. Garnish if desired. Chill for 15–30 minutes. Serve cold.
FAQs
Can I make these with store-bought whipped cream?
Yes. You can use whipped topping like Cool Whip instead of whipping heavy cream if you’re short on time. Just fold it gently into the cream cheese mixture.
How do I keep the cones from getting soggy?
Coating the inside and top rim of the cone with melted chocolate creates a barrier. Also, keep the filling chilled and assemble shortly before serving.
Can I freeze the cheesecake cones?
Freezing is not recommended. The fresh strawberries and cone texture will degrade. However, you can freeze the cheesecake filling separately for future use.
What’s the best cone type to use?
Waffle cones are best—they’re sturdy and hold more filling. Sugar cones can work but are smaller and more fragile.
Conclusion
Strawberry Crunch Cheesecake Cones bring together nostalgic flavor and modern ease in one irresistible, no-bake dessert. Whether you’re making them for a weekend treat or a special gathering, they deliver creamy sweetness, vibrant berry flavor, and a perfect crunch with every bite.
The best part? They’re easy to personalize, simple to prep, and a joy to eat.