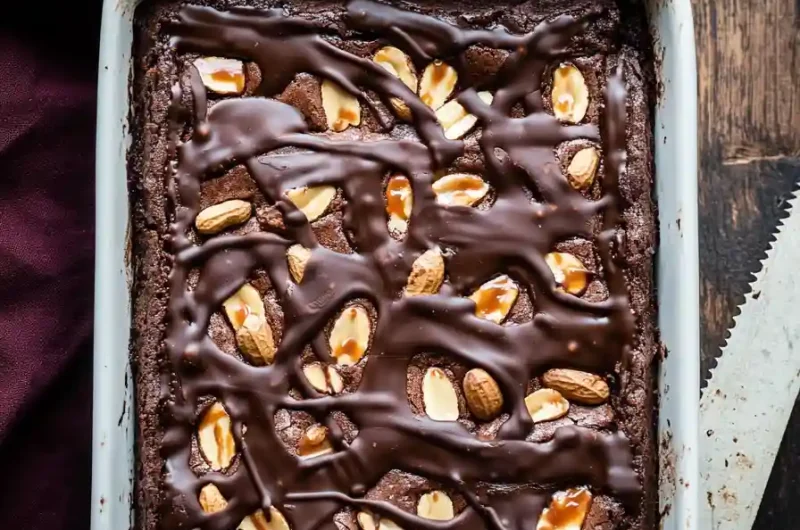
Snickers Brownies
Imagine biting into a brownie… and it tastes exactly like a Snickers bar.
That’s what these are. A fudgy cocoa brownie base, a creamy peanut butter marshmallow layer, a salted caramel peanut crunch, and a smooth milk chocolate top. Every single bite is chocolatey, nutty, salty, and sweet all at once.
Once you make these, people will ask for them every time.

Why You’ll Love This Recipe
- They disappear fast. Bring these to a party or bake sale and watch them vanish. Don’t say I didn’t warn you.
- Four layers, one incredible bite. Fudgy, creamy, crunchy, and silky — all together.
- No fancy tools needed. A mixing bowl, a saucepan, and a baking pan. That’s it.
- They taste better the next day. Seriously. Make them the night before and thank yourself later.
- Freezer friendly. Cut and freeze for up to 3 months. Perfect emergency dessert.
Before You Start — What to Know
| Prep Time | 30 minutes |
| Bake Time | 25–28 minutes |
| Chill Time | 2 hours |
| Total Time | About 3 hours |
| Servings | 16–20 bars |
| Difficulty | Intermediate |
Each layer is simple on its own. But patience is everything here. Rush it and the layers bleed into each other. Take your time and you get clean, beautiful bars.
Kitchen Tools You’ll Need
- 9×13 inch baking pan
- Parchment paper
- Two mixing bowls (one medium, one large)
- Electric hand mixer or stand mixer
- Small saucepan
- Rubber spatula
- Whisk
- Offset spatula or butter knife for spreading
- Measuring cups and spoons
- Kitchen scale (optional but helpful)
Ingredients
Four layers. Four sets of ingredients. Here’s everything you need:
Brownie Base:
- 1 cup (125g) all-purpose flour, spooned and leveled
- 2 tablespoons cornstarch
- ¾ cup (75g) Dutch-processed cocoa powder
- ½ teaspoon baking powder
- ½ teaspoon kosher salt
- 3 large eggs, at room temperature
- 1½ cups (300g) granulated sugar
- ¾ cup (170g) unsalted butter, melted and slightly cooled
- 2 teaspoons vanilla extract
- 2 tablespoons vegetable oil
Peanut Butter Marshmallow Layer:
- ¾ cup (190g) creamy peanut butter
- 1½ cups (about 85g) marshmallow fluff
Caramel Peanut Layer:
- 1 cup (about 170g) caramel bits
- 3 tablespoons heavy whipping cream
- 1 cup (about 145g) salted peanuts, roughly chopped
Chocolate Topping:
- 1½ cups (255g) milk chocolate chips
- 2 tablespoons vegetable oil
Want to Mix It Up?
A few easy swaps worth trying:
- Not a peanut fan? Use cashew butter or almond butter instead. Works just as well.
- Want less sweetness? Go with dark chocolate chips on top instead of milk chocolate.
- Love salty-sweet? Sprinkle flaky sea salt over the chocolate before it sets. Big difference.
- Want more crunch? Press crushed pretzels into the caramel layer before it firms up.
- Prefer thicker bars? Use a 9×9 pan and add 5–8 minutes to the bake time.
Step-by-Step Instructions

Step 1: Prep Your Pan and Oven
Preheat your oven to 350°F (177°C).
Line your 9×13 pan with parchment paper. Leave some overhang on the sides — this is how you’ll lift the bars out cleanly later. Lightly grease the parchment with butter or cooking spray.
Step 2: Make the Brownie Base
In a medium bowl, whisk together the flour, cornstarch, cocoa powder, baking powder, and salt. Set it aside.
In a large bowl, whisk the melted butter, granulated sugar, eggs, vanilla extract, and vegetable oil until smooth and slightly glossy. About 1–2 minutes by hand. The mixture should look thick and pale.
Now fold the dry ingredients into the wet using a rubber spatula. Stir until just combined.
Stop there. Overmixing is the enemy of fudgy brownies. Overmix and you get cake. Nobody came here for cake.
Pour the batter into your pan, spread it evenly, and bake for 25–28 minutes. You want a toothpick to come out with a few moist crumbs — not wet batter.
Then… wait. Let the base cool completely. At least 45 minutes. I know it’s hard. But it matters.
Step 3: Add the Peanut Butter Marshmallow Layer
Stir the peanut butter and marshmallow fluff together in a bowl until smooth. It’ll be thick and a little sticky — like trying to spread peanut butter on a cloud.
Spread it gently over the cooled brownie base using an offset spatula. Work carefully — the fluff tends to pull at the brownie surface if you’re too aggressive.
Once it’s spread evenly, pop the pan in the fridge for 20–30 minutes to firm up.
Step 4: Make the Caramel Peanut Layer
Add the caramel bits and heavy cream to a small saucepan over low heat. Stir continuously until it melts into a smooth sauce — about 4–5 minutes.
Take it off the heat. Let it cool for 3–4 minutes so it thickens slightly.
Why wait? Because pouring hot caramel straight onto the peanut butter layer will melt it. You’ve come too far for that.
Stir in the chopped salted peanuts, then pour and spread over the chilled peanut butter layer. Back into the fridge for another 20 minutes.
Step 5: Make the Chocolate Topping
Combine the milk chocolate chips and vegetable oil in a small saucepan over very low heat. Stir gently and constantly until melted and smooth.
Take it off the heat right away.
Pour it over the caramel peanut layer and spread to the edges using a spatula.
Step 6: Chill Everything
Refrigerate the whole pan for at least 1.5–2 hours. You want the chocolate topping fully set and firm to the touch before you even think about slicing.
Step 7: Slice and Serve
Lift the whole slab out of the pan using the parchment overhang. Set it on a cutting board.
Here’s the trick for clean cuts: warm your knife under hot water, then wipe it dry. Do this between every single slice. It sounds fussy. It makes a huge difference.
Cut into 16 or 20 bars and you’re done.
How to Serve These
Let the bars sit at room temperature for 10–15 minutes before eating. The layers soften just enough to make each bite melt in your mouth.
Some ways to serve them:
- On a platter: Sprinkle a little flaky sea salt over the chocolate top. Simple and stunning.
- With ice cream: Microwave a bar for 10–15 seconds and serve with a scoop of vanilla. Honestly ridiculous in the best way.
- As a gift: These hold their shape beautifully when wrapped individually in parchment.
- On a dessert table: Cut them smaller for bite-sized pieces. They go fast either way.
Storage Guide
| Storage Method | How Long | Notes |
|---|---|---|
| Room temperature | Up to 3 days | Airtight container, away from heat |
| Refrigerator | Up to 7 days | Layers stay firm, flavor deepens |
| Freezer | Up to 3 months | Wrap individually, thaw 1 hour before eating |
One important thing: don’t stack the bars directly on top of each other. The chocolate topping sticks. Put parchment between layers if you’re stacking them in a container.
Tips That Actually Make a Difference
- Use Dutch-processed cocoa, not natural. Dutch-processed gives a deeper, richer chocolate flavor. It holds its own against all those sweet layers on top.
- Don’t overbake the brownie base. Moist crumbs on the toothpick is what you want. An overbaked base turns dry and crumbly once chilled — and no amount of toppings can save a dry brownie.
- Cool every single layer before adding the next. This is the most common mistake. Rushing causes messy, blurred layers. Patience here is everything.
- Warm your knife before slicing. A cold knife cracks the chocolate topping. Hot water, dry wipe, repeat between every cut.
- Let the caramel cool before pouring. Too hot and it melts the peanut butter layer underneath. Give it those 3–4 minutes off the heat.
- Use room temperature eggs. Cold eggs can cause the melted butter to seize up in the batter. Leave them out for 30 minutes before you start.
- Measure your flour properly. Spoon it into the measuring cup and level it off with a straight edge. Scooping straight from the bag packs in too much flour and makes the brownies dense.
Nutrition Information
Per serving, based on 20 bars (approximate values)
| Nutrient | Amount Per Serving |
|---|---|
| Calories | 385 kcal |
| Total Fat | 22g |
| Saturated Fat | 9g |
| Cholesterol | 48mg |
| Sodium | 180mg |
| Total Carbohydrates | 43g |
| Dietary Fiber | 2g |
| Total Sugars | 31g |
| Protein | 6g |
Values are estimates and will vary based on specific brands and amounts used.
Snickers Brownies
Course: Brownie Recipes30
minutes25
minutes385
kcal2
hourIngredients
- Brownie Base:
1 cup (125g) all-purpose flour, spooned and leveled
2 tablespoons cornstarch
¾ cup (75g) Dutch-processed cocoa powder
½ teaspoon baking powder
½ teaspoon kosher salt
3 large eggs, room temperature
1½ cups (300g) granulated sugar
¾ cup (170g) unsalted butter, melted and cooled
2 teaspoons vanilla extract
2 tablespoons vegetable oil
- Peanut Butter Marshmallow Layer:
¾ cup (190g) creamy peanut butter
1½ cups (85g) marshmallow fluff
- Caramel Peanut Layer:
1 cup (170g) caramel bits
3 tablespoons heavy whipping cream
1 cup (145g) salted peanuts, roughly chopped
- Chocolate Topping:
1½ cups (255g) milk chocolate chips
2 tablespoons vegetable oil
Directions
- Preheat oven to 350°F (177°C). Line a 9×13 inch pan with parchment paper and grease lightly.
- Whisk dry ingredients (flour, cornstarch, cocoa, baking powder, salt) in a medium bowl.
- In a large bowl, whisk melted butter, sugar, eggs, vanilla, and oil until smooth. Fold in dry ingredients until just combined.
- Pour batter into pan. Bake 25–28 minutes. Cool completely.
- Stir peanut butter and marshmallow fluff together. Spread over cooled brownie. Refrigerate 20–30 minutes.
- Melt caramel bits with heavy cream over low heat, stirring. Cool slightly, stir in peanuts. Spread over peanut butter layer. Refrigerate 20 minutes.
- Melt chocolate chips with vegetable oil over low heat until smooth. Pour over caramel layer and spread evenly.
- Refrigerate 1.5–2 hours until fully set.
- Lift out of pan, slice into bars with a warm knife, and serve.
Common Questions
Can I use natural peanut butter? Stick with commercial creamy peanut butter — Jif, Skippy, that kind of thing. Natural peanut butter is too oily and the layer won’t hold its shape properly.
My caramel is too thick to spread. Now what? Add another tablespoon of heavy cream and stir over low heat until it loosens up. Work fast once it’s off the heat — it thickens quickly as it cools.
Can I make these gluten-free? Yes. Swap the all-purpose flour for a 1:1 gluten-free baking flour blend. The texture might be slightly different, but it works.
Why did the chocolate crack when I sliced it? The bars were too cold. Let them sit at room temperature for 10–15 minutes first, and always use a warm knife.
Can I double the recipe? You can — but use two 9×13 pans, not one bigger pan. Thick batter layers bake unevenly.
Do they need to stay in the fridge? They’re fine at room temperature for up to 3 days. But refrigerating keeps the layers cleaner and extends shelf life to a full week.
The Bottom Line
These Snickers Brownies look like something from a bakery window. But honestly? Once you understand the layering process, they’re pretty straightforward.
The only real skill required here is patience.
Cool each layer before adding the next. Warm your knife before slicing. And if you can manage to wait until day two to eat them… they’re even better.
Make them once and they’ll become a regular request from anyone lucky enough to try one.