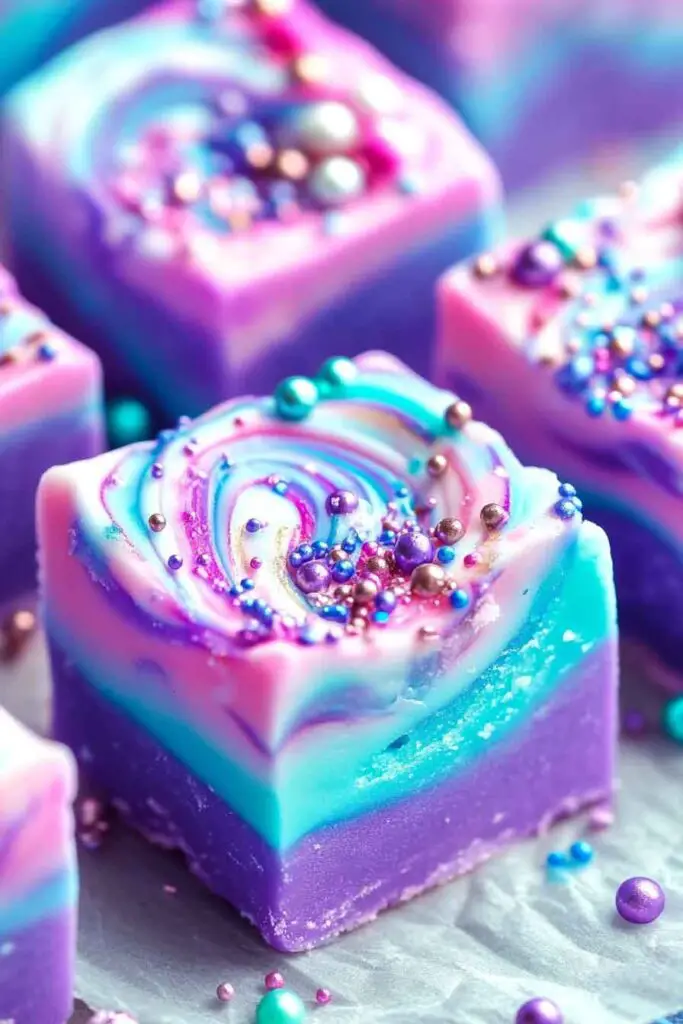
Mermaid Candy Fudge Recipe
Whoa, this mermaid candy fudge looks like ocean magic. Soft, sweet, and swirly with pretty colors. It makes me smile right away.
I love how simple it is to make. We melt, stir, and swirl. The sprinkles on top feel like shiny seashells.
Each bite is creamy and dreamy. The colors make it feel fun and special. Kids and grown-ups both ask for more.

Let’s make a small batch now. I’ll show you the easy steps. Then we chill, slice, and share.
Why You’ll Love This Recipe
- Easy to Make: Just melt, mix, swirl, and chill—no candy thermometer needed.
- Beautiful Presentation: The colorful swirls and sparkly sprinkles make every piece look special.
- Perfect for Parties: Kids and adults both love the fun mermaid theme.
- Quick Prep: Ready in under 15 minutes of active time.
- Great for Gifting: Package pieces in clear bags for sweet homemade presents.

What You Need to Know Before You Start
Prep Time & Cook Time:
- Prep Time: 10 minutes
- Chill Time: 2 hours
- Total Time: About 2 hours 10 minutes
Servings: This recipe makes about 36 pieces of fudge when cut into small squares. Need more for a big party? The recipe doubles easily.
Difficulty: Very easy—perfect for beginner cooks and a fun project for kids to help with.
Required Kitchen Tools
- 8×8 inch baking pan
- Parchment paper or aluminum foil
- Medium saucepan
- Wooden spoon or rubber spatula
- Small bowls for mixing colors
- Butter knife or toothpick for swirling
Ingredients for Mermaid Candy Fudge
Here’s what you’ll need to create this magical treat (exact measurements are in the recipe card below):
- White Chocolate Chips: The creamy base that holds everything together.
- Sweetened Condensed Milk: Makes the fudge smooth and sweet.
- Butter: Adds richness and helps the fudge set properly.
- Vanilla Extract: Brings warmth and depth to the sweet flavor.
- Teal Food Coloring: Creates the beautiful ocean blue color.
- Violet Food Coloring: Adds the pretty purple swirls.
- Mermaid Sprinkles: The finishing touch that adds sparkle and crunch.
Variations for Mermaid Candy Fudge
- Change the Colors: Use pink and purple for a different mermaid look, or green and blue for deeper ocean tones.
- Add Mix-ins: Fold in mini marshmallows or crushed cookies before chilling.
- Try Different Chocolate: Use milk chocolate chips for a sweeter taste.
- Add Flavor: Mix in a drop of peppermint or almond extract along with the vanilla.
- Use Different Toppings: Try edible pearls, sugar crystals, or crushed graham crackers instead of sprinkles.
How to Make Mermaid Candy Fudge Step-by-Step Instructions
1. Prepare Your Pan
Line your 8×8 inch pan with parchment paper or foil. Leave some hanging over the edges so you can lift the fudge out easily later.
2. Melt the Base
Put the white chocolate chips, sweetened condensed milk, and butter in a saucepan. Heat over low heat, stirring often, until everything melts together into a smooth mixture. Take the pan off the heat and stir in the vanilla extract.
3. Divide and Color
Pour about one-third of the white mixture into one small bowl and another third into a second bowl. Leave the rest in the pan. Add teal food coloring to one bowl and violet coloring to the other. Mix each one until the color spreads evenly through the fudge.
4. Create the Swirls
Pour the plain white fudge into your prepared pan first. Then add spoonfuls of the teal fudge in different spots. Do the same with the violet fudge. Use a butter knife or toothpick to gently swirl the colors together. Don’t mix too much—you want to see the different colors, not blend them into one shade.
5. Add Sprinkles
Scatter the mermaid sprinkles over the top while the fudge is still soft. Press them down gently so they stick.
6. Chill and Cut
Put the pan in the refrigerator for at least 2 hours until the fudge feels firm. Lift it out using the parchment paper edges. Cut into small squares with a sharp knife.
Serving and Decoration
How to Serve Mermaid Candy Fudge:
This colorful fudge works great for many occasions:
- At Parties: Arrange pieces on a platter with other treats for a dessert table.
- As Gifts: Stack pieces in clear cellophane bags tied with ribbon.
- For Movie Night: Serve alongside popcorn for a sweet and salty combination.
- At Beach Parties: Perfect for ocean-themed celebrations or mermaid birthday parties.
- With Ice Cream: Chop into bits and sprinkle over vanilla ice cream.
Decoration Ideas:
- Arrange pieces on a blue serving plate to look like ocean waves.
- Add small seashell candies around the platter.
- Dust with edible glitter for extra sparkle.
Storing Mermaid Candy Fudge
- Room Temperature: Keep in an airtight container for up to 1 week in a cool, dry place.
- Refrigerator: Store in a covered container for up to 2 weeks. The fudge will be firmer when cold.
- Freezer: Wrap pieces individually in wax paper, then store in a freezer bag for up to 3 months. Thaw at room temperature before serving.

Tips and Tricks for Success
- Stir Gently: When melting the chocolate, use low heat and stir often to prevent burning.
- Don’t Overmix: When swirling colors, just make a few gentle swoops. Too much mixing makes the colors muddy.
- Use Gel Colors: Gel food coloring works better than liquid because it won’t thin out your fudge.
- Let It Set: Give the fudge the full 2 hours to chill. If you cut it too soon, the pieces will be messy.
- Clean Cuts: Wipe your knife between cuts for neat, pretty squares.
- Room Temperature Ingredients: Let the butter soften a bit before starting so everything melts together smoothly.
Nutrition
| Nutrient | Per Piece (1 square) |
|---|---|
| Calories | 95 |
| Total Fat | 4g |
| Saturated Fat | 2.5g |
| Cholesterol | 8mg |
| Sodium | 25mg |
| Total Carbohydrates | 14g |
| Sugars | 13g |
| Protein | 1g |
Note: Nutrition information is approximate and based on 36 servings.

Mermaid Candy Fudge Recipe
Course: No-Bake Desserts36
pieces10
minutes95
kcal2
hourIngredients
3 cups (540g) white chocolate chips
1 can (14 ounces/396g) sweetened condensed milk
2 tablespoons (28g) butter
1 teaspoon vanilla extract
Teal food coloring (gel preferred)
Violet food coloring (gel preferred)
3 tablespoons mermaid sprinkles (or as desired)
Directions
- Prepare Pan: Line an 8×8 inch baking pan with parchment paper, leaving overhang on the sides.
- Melt Base: In a medium saucepan over low heat, combine white chocolate chips, sweetened condensed milk, and butter. Stir constantly until completely melted and smooth, about 5 minutes. Remove from heat and stir in vanilla extract.
- Divide Mixture: Pour one-third of the mixture into each of two small bowls. Leave remaining third in the saucepan.
- Add Colors: Mix teal food coloring into one bowl until evenly colored. Mix violet food coloring into the second bowl. Leave the mixture in the saucepan white.
- Layer and Swirl: Pour white mixture into prepared pan. Drop spoonfuls of teal and violet mixtures randomly over the white base. Use a butter knife or toothpick to gently swirl colors together, creating a marbled effect.
- Top with Sprinkles: Immediately sprinkle mermaid sprinkles over the surface. Gently press down so they stick.
- Chill: Refrigerate for at least 2 hours or until completely firm.
- Cut and Serve: Lift fudge from pan using parchment paper. Cut into 36 small squares with a sharp knife, wiping blade between cuts.
Mermaid Candy Fudge FAQs
Can I make this without food coloring?
Yes! The fudge will taste just as good in plain white. You can still add the sprinkles for decoration.
What if my fudge won’t set?
Make sure you used the right measurements and gave it enough time to chill. If it’s still soft after 3 hours in the fridge, try putting it in the freezer for 30 minutes.
Can I use dark chocolate instead?
Dark chocolate will work, but the colors won’t show up as brightly. White chocolate is best for showing off the pretty swirls.
How do I get clean cuts?
Use a large, sharp knife and wipe it clean with a paper towel between each cut. Warming the knife slightly under hot water also helps.
Can kids help make this?
Yes! This is a great recipe for kids. Adults should handle the melting step, but kids can help mix the colors and create the swirls.