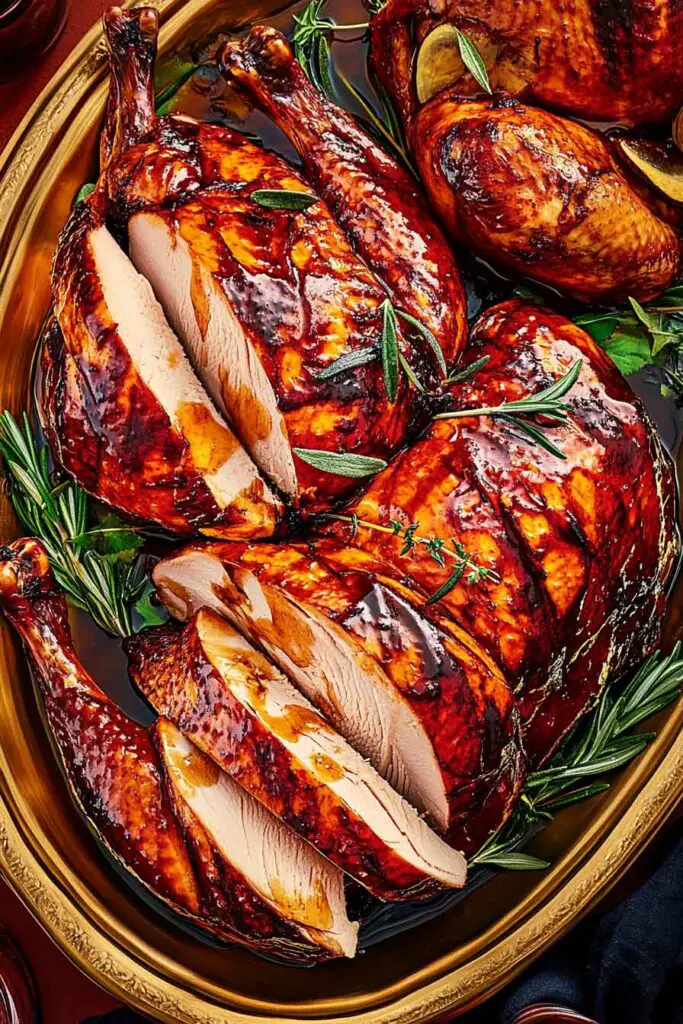
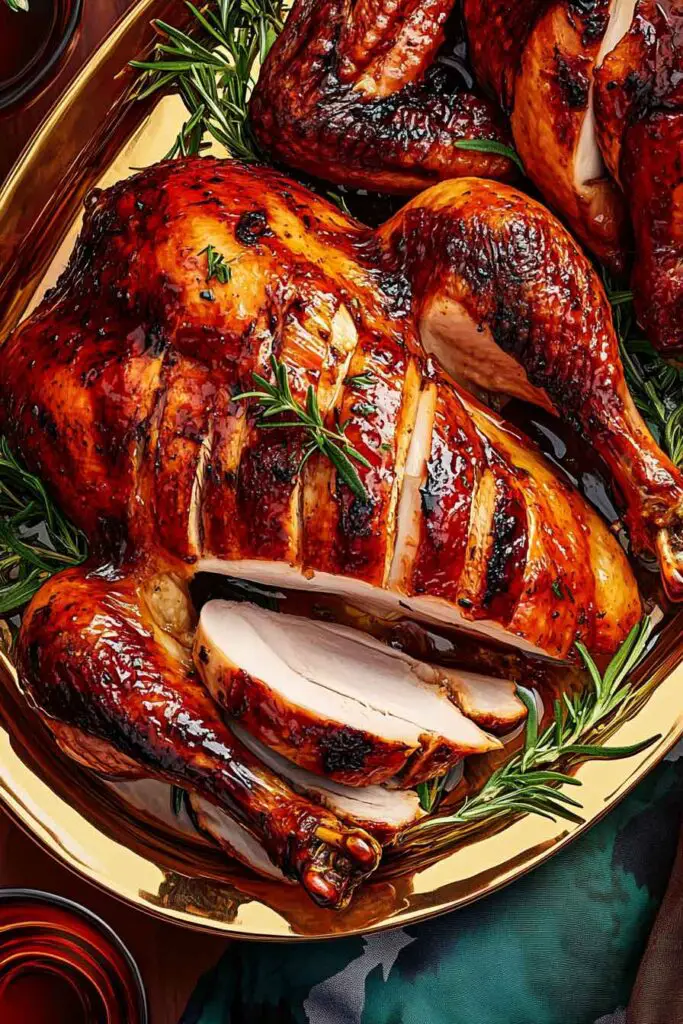
Maple Butter Glazed Turkey (Oven Roasted)
Alright, this Maple Butter Glazed Turkey? It’s juicy, golden, and packed with rich, sweet flavor that tastes like fall on a plate. The glaze is made with real maple syrup and creamy butter, then brushed over the turkey to create a gorgeous, sticky caramelized skin that’s so hard to resist.
I made it for Thanksgiving last year, and let me tell you—everyone was raving about that glaze. The butter keeps the meat tender and moist, while the maple syrup brings a deep, cozy sweetness that pairs perfectly with the savory herbs and spices I rubbed underneath. The smell alone filled the whole kitchen with warmth.
It’s easier than you think too. Just season the turkey, make the glaze, and keep basting as it roasts until it’s golden, glossy, and cooked to perfection. Let’s walk through it step-by-step—you’re gonna end up with the kind of turkey people actually remember.

Why You’ll Love This Recipe
- Balanced Flavor: The glaze isn’t overly sweet—the maple is softened by the butter, deepened by soy sauce, and brightened with vinegar for full-bodied flavor in every bite.
- Even Roasting: A simple rack setup and a few turns in the oven help cook the turkey evenly without drying out the breast.
- Crispy, Glazed Skin: The butter in the glaze helps crisp the skin while creating that signature glossy look.
- Approachable for Beginners: With a little patience and a few key tips, even a first-time turkey roaster can get this right.
- Holiday-Ready: Ideal for Thanksgiving, Christmas, or any celebration that calls for a classic centerpiece.

What You Need to Know Before You Start
Prep Time & Cook Time
- Dry Brine Prep Time: 15–20 minutes
- Resting (Dry Brine) Time: 12–24 hours in the refrigerator
- Glaze Prep Time: 5–10 minutes
- Turkey Roast Time: 3.5 to 4.5 hours (depending on weight)
- Resting After Roasting: 20–30 minutes before carving
- Total Time: About 6–7 hours including all stages
Servings
A 12–14 lb turkey generally serves 12 to 14 people, depending on side dishes and portion sizes. Leftovers store well for sandwiches, soups, or grain bowls.
Difficulty Level
Moderate. While the technique is straightforward, it does require timing, oven awareness, and a bit of patience. The glaze and brine do the heavy lifting—your job is to let them shine.
Required Kitchen Tools
You don’t need fancy gear, just a few essentials:
- Large roasting pan with a rack: Allows hot air to circulate around the turkey.
- Meat thermometer: Essential for monitoring doneness safely (target temp is 165°F in the thickest part of the thigh).
- Small saucepan: To simmer and infuse the glaze.
- Basting brush or spoon: For applying glaze during roasting.
- Paper towels: To pat the turkey dry before roasting.
- Sharp carving knife and fork: For neat slicing and serving.
- Aluminum foil: Helps tent the bird during resting and prevent over-browning during roasting.
Ingredients for Maple Butter Glazed Turkey
Here’s a breakdown of the ingredients, along with the role each one plays in flavor or texture:
For the Turkey & Dry Brine
- 1 whole turkey (12–14 lb): Choose a bird with no added salt or broth, as that can interfere with the brining process.
- ⅔ cup kosher salt (or 6 tbsp + ½ tsp Morton salt): Helps season the bird deeply and lock in moisture. Kosher salt is ideal for even coverage.
- 1 tbsp coarsely ground black peppercorns: Adds subtle warmth to the skin and balances the sweetness of the glaze.
- 2 tbsp garlic powder: Infuses the meat with savory depth without the bitterness of raw garlic.
- 2 tbsp light brown sugar: Introduces a whisper of sweetness and helps with browning.
- 1 tbsp olive oil or vegetable oil: Rubbed on before roasting to help the skin brown and crisp.
- 1 cup water: Added to the pan to maintain moisture and prevent drippings from burning.
For the Maple Butter Glaze
This glaze is brushed on during the last part of roasting and again just before serving. It’s a sweet-savory mix with buttery richness.
- ½ cup (1 stick) unsalted butter: Forms the base, giving the glaze richness and helping it cling to the skin.
- ¼ cup pure maple syrup: Adds warm, deep sweetness. Avoid imitation syrup; the real stuff makes a difference.
- 2 tbsp soy sauce or tamari: Adds saltiness and umami to balance the maple. Tamari is a good gluten-free option.
- 2 tbsp unseasoned rice vinegar or white wine vinegar: A touch of acidity keeps the glaze from feeling too heavy.
- 1 tbsp Worcestershire sauce: Deepens the glaze with tangy complexity.
- 2 sprigs fresh thyme: Infuses subtle earthiness and aroma into the glaze.
Variations for Maple Butter Glazed Turkey
This base recipe is adaptable to different preferences or dietary needs. Here are a few thoughtful twists:
- Spiced Version: Add ½ tsp cinnamon, ¼ tsp ground cloves, or a pinch of cayenne to the glaze for warmth and complexity.
- Citrus Twist: Add 1 tbsp orange juice and ½ tsp zest to the glaze for a bright contrast to the maple.
- Herb-Rich Option: Stir fresh chopped rosemary, sage, or parsley into the butter before glazing.
- Garlic-Forward Glaze: Sauté 2 minced garlic cloves in butter before whisking in the remaining glaze ingredients.
- Smoky Sweet: Use smoked salt in the dry brine and smoked paprika in the glaze for a barbecue-inspired version.
How to Make Maple Butter Glazed Turkey
Step-by-Step Instructions
1. Prepare the Dry Brine (12–24 Hours Ahead)
Why this matters: A dry brine seasons the turkey deeply and helps retain moisture during the long roast.
- Remove the turkey from its packaging. Remove the neck and giblets from the cavity and set them aside for gravy or discard.
- Pat the turkey completely dry using paper towels—inside and out.
- In a small bowl, mix kosher salt, black pepper, brown sugar, and garlic powder.
- Rub this mixture all over the turkey, including under the skin on the breast if you can gently loosen it. Also season the cavity.
- Place the turkey on a rack set over a baking sheet or roasting pan. Refrigerate uncovered for 12–24 hours. This dries the skin slightly for better crisping.
2. Bring the Turkey to Room Temperature (1 Hour Before Roasting)
- Take the turkey out of the refrigerator 1 hour before roasting. This helps it roast evenly.
- If needed, gently pat off any excess moisture or brine left on the skin—but don’t rinse.
- Rub the skin lightly with 1 tbsp oil to help promote browning.
3. Preheat the Oven and Set Up Your Roasting Pan
- Preheat your oven to 325°F (163°C).
- Set a rack inside your roasting pan. Pour 1 cup of water into the bottom to help keep the drippings from burning.
- If desired, you can loosely stuff the turkey cavity with aromatics like onion wedges, fresh herbs, or halved lemons. These add aroma but are optional.
4. Roast the Turkey (Initial Phase)
- Place the turkey breast-side up on the rack.
- Insert a meat thermometer into the thickest part of the thigh (but not touching the bone).
- Roast uncovered for 2.5 to 3 hours, depending on turkey size. During this time, do not glaze. Let the skin start crisping up naturally.
- If the skin begins to brown too quickly, loosely tent the top with foil.
5. Make the Maple Butter Glaze
While the turkey is roasting, prepare the glaze:
- In a small saucepan, melt ½ cup butter over low heat.
- Add maple syrup, soy sauce, vinegar, Worcestershire sauce, and thyme sprigs.
- Let the glaze simmer gently for 5–7 minutes, stirring occasionally. Remove from heat and set aside. Discard thyme sprigs before basting.
6. Glaze and Finish Roasting
Once the turkey reaches around 135°F–140°F (about 2.5–3 hours in):
- Start brushing the maple glaze all over the turkey. Use a basting brush or spoon to coat generously.
- Return the turkey to the oven. Baste every 15–20 minutes with more glaze until the internal temperature reaches 165°F in the thigh and 160°F in the breast.
- The skin should become dark golden and glossy. Be gentle when brushing—don’t tear the skin.
Note: If you run out of glaze, you can reheat a second batch quickly using the same glaze ingredients (halve the amounts for a small second batch).
7. Let the Turkey Rest
Once done, carefully remove the turkey from the oven and tent it loosely with foil.
- Let it rest for at least 20–30 minutes before carving. This helps the juices redistribute for moist meat.
8. Carve and Serve
- Transfer the turkey to a large cutting board.
- Carve using a sharp knife, slicing off the breast meat, thighs, drumsticks, and wings.
- Serve warm with your choice of sides—roasted vegetables, mashed potatoes, or stuffing pair beautifully.
Serving and Presentation Tips
How to Serve Maple Butter Glazed Turkey
This turkey is visually stunning and loaded with subtle, layered flavors. Here’s how to serve it for best impact:
- Slice Before Serving: Carve the breast meat against the grain in thin slices for the most tender texture. Separate the thighs and legs for guests who prefer dark meat.
- Drizzle with Extra Glaze: Rewarm a bit of the reserved glaze or pan juices and lightly spoon over the carved meat for moisture and shine.
- Garnish the Platter: Arrange sliced turkey on a large serving dish and garnish with:
- Fresh thyme sprigs
- Pomegranate seeds or fresh cranberries (for color)
- Lemon wedges or orange slices
- Roasted garlic bulbs or whole roasted shallots
Ideal Side Dishes
This turkey pairs well with both traditional and contemporary sides. Consider:
- Creamy mashed potatoes
- Maple roasted carrots
- Apple-sausage stuffing
- Cranberry-orange sauce
- Buttery green beans
Storing Maple Butter Glazed Turkey
Leftovers
- Refrigerator: Store leftover turkey in airtight containers in the fridge for up to 4 days.
- Freezer: Turkey can be frozen (sliced or whole parts) for up to 3 months. Wrap in foil and store in freezer-safe bags.
- Reheating: Gently reheat in the oven at 300°F covered with foil to avoid drying, or microwave on low with a splash of broth.
Make-Ahead Tips
- You can make the glaze up to 3 days in advance. Store in the fridge and reheat gently before use.
- Dry brine the turkey 1 to 2 days ahead, which also frees up time on cooking day.
Tips and Tricks for Success
- Dry the Skin Well: Before brining and roasting, moisture is the enemy of crispy skin. Pat the turkey thoroughly dry.
- Use a Rack: Lifting the turkey helps hot air circulate evenly, ensuring even browning.
- Don’t Rush the Rest: Resting after roasting is crucial. It keeps the turkey juicy.
- Monitor with a Thermometer: Rely on temperature—not guesswork—for perfectly cooked meat.
- Glaze Late: Apply glaze in the final hour of cooking so it doesn’t burn or become bitter.
Nutrition (Per Serving)
| Nutrient | Approx. Amount |
|---|---|
| Calories | 390–450 kcal |
| Protein | 35g |
| Fat | 24g |
| Carbohydrates | 6–8g |
| Sugars | 5g |
| Fiber | 0g |
| Sodium | 540mg |
| Cholesterol | 105mg |
Note: These values are based on 1 serving of roasted turkey with glaze, assuming 12 servings from a 12–14 lb bird. Exact values will vary based on portion size and skin-on/off serving.
Maple Butter Glazed Turkey (Oven Roasted)
Course: Breakfast u0026amp; Brunch30
minutes40
minutes390
kcalIngredients
For the Turkey
1 whole turkey (12–14 lb), neck and giblets removed
⅔ cup kosher salt (or 6 tbsp + ½ tsp Morton salt)
1 tbsp coarse black pepper
2 tbsp garlic powder
2 tbsp light brown sugar
1 tbsp olive or vegetable oil
1 cup waterFor the Maple Butter Glaze
½ cup (1 stick) unsalted butter
¼ cup pure maple syrup
2 tbsp soy sauce or tamari
2 tbsp unseasoned rice or white wine vinegar
1 tbsp Worcestershire sauce
2 sprigs fresh thyme
Directions
- Dry Brine: Pat the turkey dry. Mix salt, pepper, garlic powder, and brown sugar. Rub all over and under the skin. Chill uncovered for 12–24 hours.
Prep for Roasting: Bring to room temp for 1 hour. Rub lightly with oil. Preheat oven to 325°F. Set turkey on a rack in a roasting pan with water in the bottom.
Roast: Roast for 2.5–3 hours until internal temp reaches 135°F. Tent loosely with foil if skin browns too quickly.
Make the Glaze: Simmer butter, maple syrup, soy sauce, vinegar, Worcestershire, and thyme in a saucepan for 5–7 minutes. Discard thyme.
Glaze & Finish: Brush turkey with glaze every 20 minutes until fully cooked (165°F in thigh). Total cook time is 3.5–4.5 hours.
Rest & Carve: Let turkey rest 20–30 minutes, tented. Carve and serve with extra glaze or pan drippings.
Maple Butter Glazed Turkey FAQs
Q: Can I skip the dry brine?
Technically yes, but it’s highly recommended. The dry brine seasons the meat throughout and helps retain moisture. Without it, the meat may be bland or dry, especially in the breast.
Q: What kind of maple syrup should I use?
Always use 100% pure maple syrup, preferably Grade A dark or amber. It has the deep, robust flavor needed for this glaze. Avoid pancake syrup or artificial blends.
Q: My turkey is smaller/larger than 12–14 lbs. Can I still use this recipe?
Yes. For a smaller turkey, reduce cook time (about 13–15 minutes per pound). For a larger bird, extend the cooking and possibly double the glaze recipe.
Q: What can I substitute for soy sauce?
Tamari is a great gluten-free alternative. If avoiding soy entirely, coconut aminos will also work, though slightly sweeter.
Q: Can I glaze the turkey earlier in the roasting process?
It’s best to wait until the last hour. If you glaze too early, the sugars in the syrup may burn before the turkey is fully cooked.
Q: Can I make this with turkey parts instead of a whole bird?
Absolutely. You can use turkey breasts, thighs, or legs. Reduce roasting time accordingly, and glaze as you would the whole bird.
Conclusion
This Maple Butter Glazed Turkey recipe brings together the warmth of maple syrup, the richness of butter, and the brightness of a few simple pantry ingredients. It’s deeply flavorful without being overly complex, making it ideal for both holiday gatherings and special weekend dinners.
The process of dry brining, glazing, and slow roasting might feel a bit involved, but it pays off in every bite—tender, juicy meat under a golden, glossy skin. With a handful of tips and clear timing, even first-time turkey cooks can pull this off confidently.
This recipe doesn’t rely on trends or gimmicks—just time-tested methods and honest ingredients. It’s the kind of dish that draws people to the table and encourages them to linger a little longer.