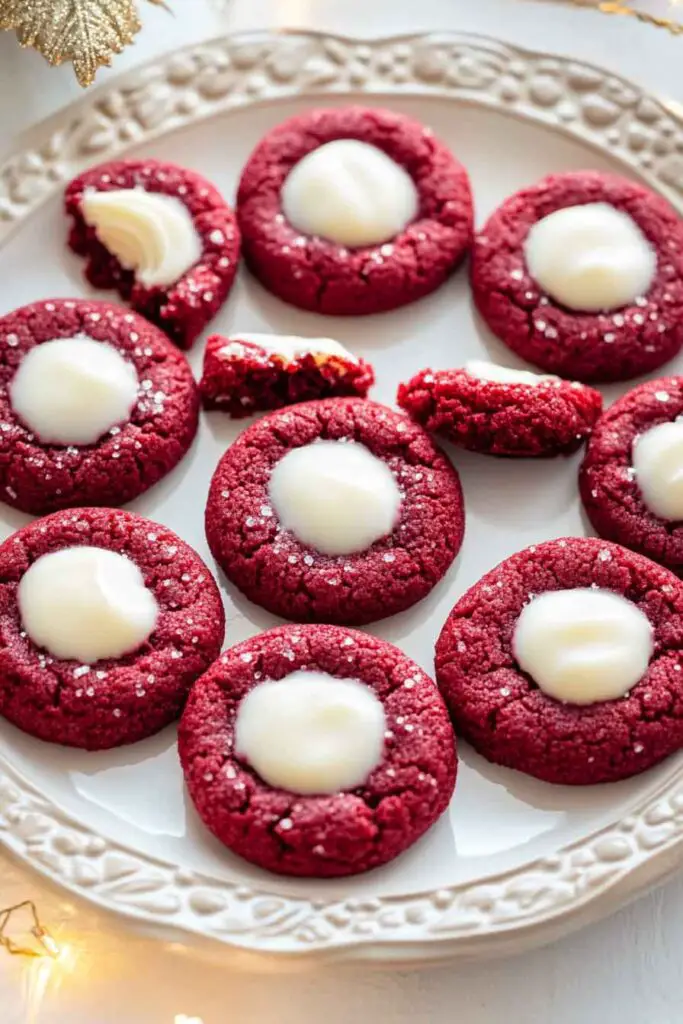
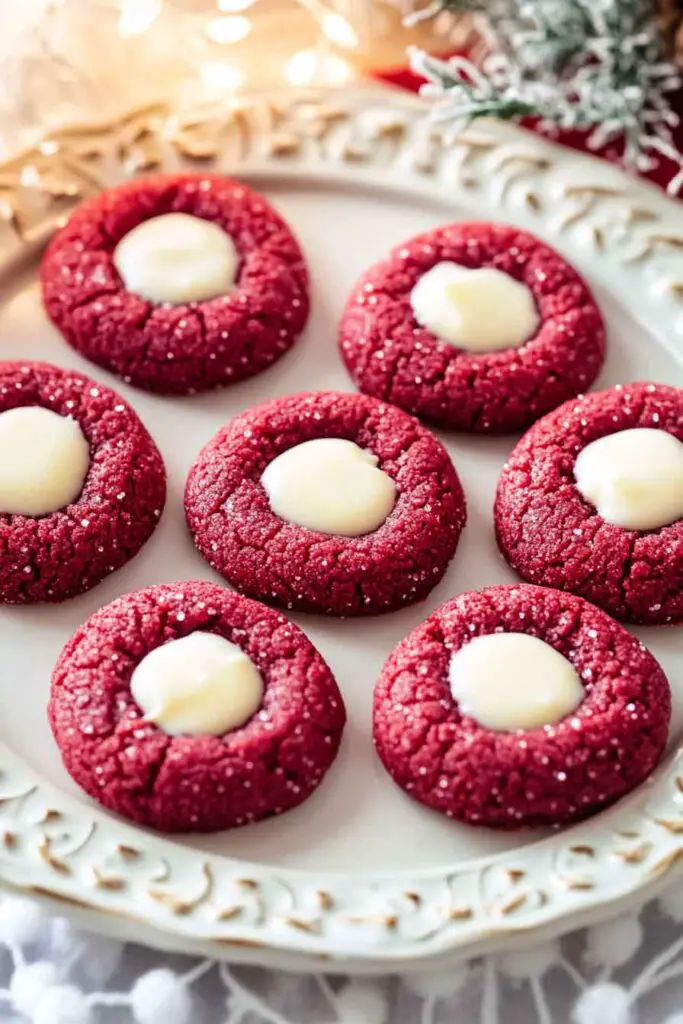
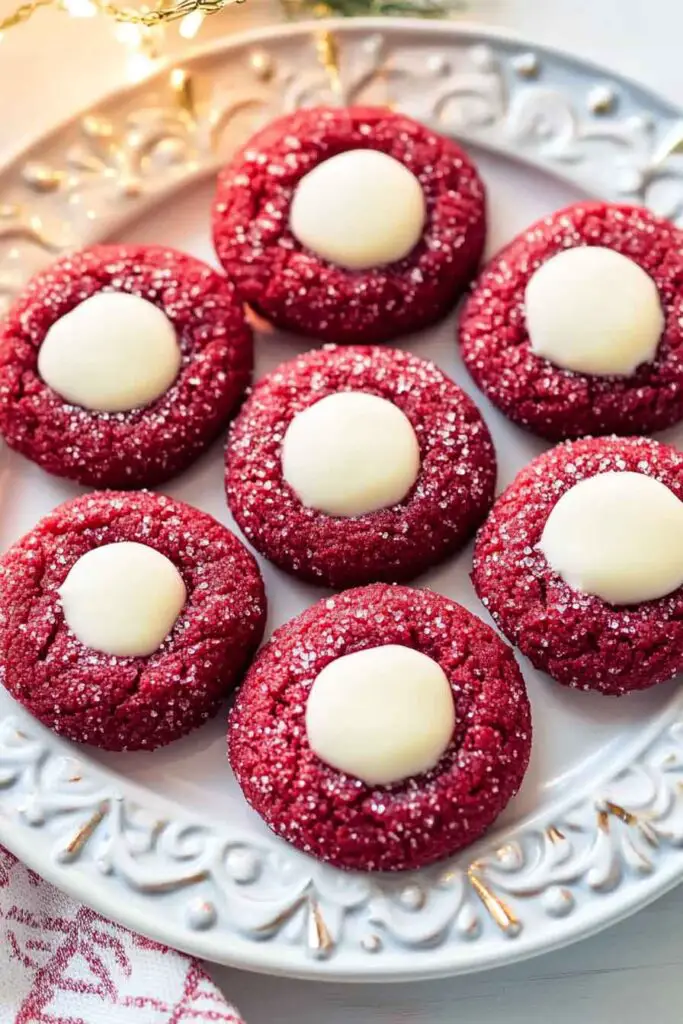
Red Velvet Thumbprint Cookies
Okay, these Red Velvet Thumbprint Cookies? They’re soft, chocolatey, and filled with a creamy center that makes every bite extra special. Rich red velvet flavor and that little sweet surprise in the middle? So fun and festive.
I made them for a holiday treat, and they looked just as good as they tasted. That soft cookie with the creamy filling? Total win.
They’re easy to make—no stress at all. Just mix, press, and bake. Let’s make a batch together—you’re gonna love how cute (and delicious) they are!

Why You’ll Love This Recipe
- Classic Meets Creative: This cookie takes inspiration from traditional red velvet cake and transforms it into a bite-sized treat with a playful thumbprint twist.
- Perfect Texture: Soft, tender cookie edges with a delicate chew in the center and a rich, creamy filling that melts on your tongue.
- Balanced Flavor: A mild cocoa base, enhanced with vanilla and that signature red hue, pairs effortlessly with the cream cheese filling that adds a gentle tang and sweetness.
- Visually Striking: Their deep red color contrasted with the white center makes them perfect for holiday trays, dessert tables, or edible gifts.
- Approachable Yet Impressive: With clear steps and simple ingredients, this recipe works well for beginners while still impressing seasoned bakers and guests alike.
What You Need to Know Before You Start
Prep & Bake Overview
- Prep Time: 25 minutes
- Chill Time: 30 minutes (very important for holding shape)
- Bake Time: 10–12 minutes
- Total Time: Around 1 hour and 15 minutes, including chilling
Servings/Yield
This recipe makes approximately 24 cookies, depending on the size of each dough ball. They are ideal for sharing or storing for later enjoyment.
Difficulty Level
This recipe is easy to moderate. The dough is straightforward, but care must be taken to chill the dough before baking, and not to overbake. The cream cheese filling is easy to prepare and spoon into the cookies, even without a piping bag.
Flavor Profile
Think of these as red velvet cake meets cheesecake in cookie form: subtle cocoa, a light vanilla note, and a creamy, sweet-tangy filling that complements the cookie base.
Required Kitchen Tools
You don’t need fancy equipment to make these cookies, but having the right tools helps with ease and consistency:
- Mixing Bowls – Medium and large, for dry and wet ingredients
- Electric Mixer – A hand mixer or stand mixer works well to cream the butter and sugar properly
- Rubber Spatula – For folding and scraping down the bowl
- Measuring Cups and Spoons – Accuracy is key to structure and flavor
- Baking Sheets – Preferably light-colored for even baking
- Parchment Paper – Keeps cookies from sticking and helps with easy cleanup
- Cooling Rack – Allows cookies to cool evenly without steaming
- Teaspoon or Thumb – For making the center indentation before or after baking
Ingredients for Red Velvet Thumbprint Cookies
For the Cookies
Each ingredient plays a specific role in creating the signature red velvet cookie:
- 1 cup (226g) Unsalted Butter, Room Temperature
Butter is the base fat, responsible for the tender texture and subtle richness. Using unsalted allows you to control the overall saltiness. - 1 cup (200g) Granulated Sugar
Sweetens the dough and helps with the golden edges. It also aids in the creaming process to add air. - 1 Large Egg, Room Temperature
Acts as a binder, keeping the dough cohesive and moist. Room temperature eggs incorporate better into the butter-sugar mixture. - 1 teaspoon Pure Vanilla Extract
Enhances the overall flavor and adds warmth to balance the cocoa. - 3 teaspoons Red Velvet Emulsion (or 1–2 teaspoons Red Food Coloring)
Emulsion adds both color and flavor with hints of cocoa and vanilla. If using red food coloring, choose gel for vibrancy without altering consistency. - 2 1/2 cups (312g) All-Purpose Flour
The structural base of the cookie. Measure it properly by spooning and leveling to avoid dry, dense dough. - 1/4 cup (25g) Unsweetened Cocoa Powder
Use natural cocoa for a classic red velvet flavor. Adds a chocolatey undertone without overpowering. - 1 teaspoon Baking Powder
Gently lifts the cookies to prevent them from being too flat or cakey. - 1/2 teaspoon Salt
Balances the sweetness and enhances all the other flavors.
For the Cream Cheese Filling
This simple mixture becomes the luscious center of each cookie:
- 4 ounces (113g) Full-Fat Cream Cheese, Room Temperature
The star of the filling. Smooth, rich, and tangy—be sure it’s fully softened before mixing to avoid lumps. - 2 tablespoons (28g) Unsalted Butter, Room Temperature
Helps smooth the cream cheese and rounds out the flavor. - 1 teaspoon Pure Vanilla Extract
Adds a comforting depth and warmth. - 1/4 teaspoon Salt
Enhances the tang of the cream cheese and balances the sweetness. - 1 1/2 to 2 cups (180–240g) Powdered Sugar
Adjust to taste for desired sweetness and consistency. Sift to avoid lumps. - 1–2 tablespoons Heavy Cream
Loosens the filling just enough to spoon or pipe easily. Add slowly to control consistency. - Optional: Sprinkles or Crushed Candy Canes
For festive flair, add a dash of sprinkles or crushed candies after filling.
Variations for Red Velvet Thumbprint Cookies
These cookies are flexible enough for fun changes while keeping the base flavor intact. Try one of these creative twists:
- Chocolate Ganache Center: Swap the cream cheese filling with a rich chocolate ganache for a fudgier bite.
- Peppermint Swirl: Add a drop of peppermint extract to the filling and sprinkle crushed peppermint candy on top for a holiday-ready version.
- Lemon Cream Cheese Filling: Add a teaspoon of lemon zest and a bit of juice to the cream cheese mixture for a citrusy contrast.
- Sprinkle Surprise: Roll the cookie dough balls in holiday sprinkles or sanding sugar before baking for a colorful crunch.
- Mini Cheesecake Bites: Make smaller cookies and press the center deeper to hold more filling, giving a bite-sized cheesecake feel.
How to Make Red Velvet Thumbprint Cookies: Step-by-Step Instructions
1. Cream the Butter and Sugar
In a large mixing bowl, beat the softened butter and granulated sugar together using a hand or stand mixer. Start on medium speed and mix for about 2–3 minutes until the mixture is light, fluffy, and pale in color. This step adds air to the dough, making the cookies soft.
2. Add Wet Ingredients
Add the egg and vanilla extract. Beat again until fully combined. Then, mix in the red velvet emulsion or red food coloring. Scrape down the sides of the bowl to make sure the color is evenly distributed.
3. Combine Dry Ingredients
In a separate bowl, whisk together the flour, cocoa powder, baking powder, and salt. This ensures that the cocoa and leavening agent are evenly distributed.
4. Mix the Dough
Gradually add the dry mixture to the wet ingredients. Beat on low speed or mix with a spatula until a soft dough forms. The dough should be thick but not sticky. If it feels too sticky, refrigerate it for 15 minutes before shaping.
5. Chill the Dough
Cover the dough with plastic wrap and refrigerate for at least 30 minutes. This helps prevent spreading and keeps the cookies nice and thick.
6. Preheat the Oven and Prepare Pans
Preheat your oven to 350°F (177°C). Line two baking sheets with parchment paper.
7. Shape the Cookies
Scoop about 1.5 tablespoons of dough and roll into balls. Place them 2 inches apart on the baking sheet. Using your thumb or the back of a rounded teaspoon, gently press an indent into the center of each ball. Don’t press all the way through—just enough to hold the filling.
Tip: If the dough cracks while indenting, gently smooth the edges with your fingers.
8. Bake the Cookies
Bake in the preheated oven for 10 to 12 minutes, or until the edges are set but the centers still look soft. If the indent puffed up during baking, press it down again gently with the spoon while the cookies are still warm.
9. Make the Cream Cheese Filling
While the cookies are cooling, prepare the filling. In a bowl, beat the cream cheese and butter together until smooth. Add the vanilla, salt, and powdered sugar. Mix until creamy. If it’s too thick, add 1–2 teaspoons of heavy cream to reach your desired consistency.
10. Fill the Cookies
Once cookies are fully cooled, spoon or pipe the cream cheese mixture into the centers. Use a small spoon or piping bag for neater results.
11. Decorate (Optional)
Add a light sprinkle of festive toppings—sprinkles, crushed candy, or cocoa powder—for a decorative finish.
Serving and Decoration
These cookies shine as part of any dessert spread. The bright red cookie and white filling are already eye-catching, but a little extra attention makes them even more special:
- Holiday Trays: Serve on a platter with other cookies like peppermint bark, shortbread, or chocolate crinkles.
- Sprinkle Finish: Use red, white, or gold sprinkles for a festive touch—especially for Christmas or Valentine’s Day.
- Powdered Sugar Dusting: Lightly dust with powdered sugar after filling for a snowy effect.
- Chocolate Drizzle: For added richness, drizzle melted white or dark chocolate over the tops.
- Mini Muffin Liners: Place each cookie in a mini cupcake liner for an elegant serving option at parties or bake sales.
How to Store Red Velvet Thumbprint Cookies
Proper storage is important for keeping both the cookie texture and cream cheese center just right:
- Refrigerator (Preferred):
Because of the cream cheese filling, store cookies in an airtight container in the fridge for up to 5 days. Let them sit at room temperature for 10–15 minutes before serving for best texture and flavor. - Freezer (For Longer Storage):
You can freeze the unfilled cookies for up to 2 months. Allow them to cool completely before placing in a zip-top freezer bag. Fill after thawing. - Make-Ahead Tip:
Make the dough and store it wrapped in the fridge for up to 2 days before shaping and baking.
Tips and Tricks for Success
- Don’t Skip Chilling: It keeps the dough firm and prevents spreading, helping the cookies hold their thumbprint shape.
- Room Temperature Ingredients: Ensures smooth blending—especially the butter, egg, and cream cheese.
- Use a Cookie Scoop: For even-sized cookies that bake uniformly.
- Indent Gently: Press too deep and the cookies may crack; too shallow and they won’t hold enough filling.
- Cool Completely Before Filling: Otherwise, the cream cheese center will melt and become runny.
- Adjust Filling Sweetness: Taste and adjust powdered sugar to your liking—add more for a sweeter center or less for a tangier profile.
Nutrition
Here’s an estimated nutrition breakdown per cookie (assuming 24 cookies total):
| Nutrient | Amount per Cookie |
|---|---|
| Calories | 160 |
| Total Fat | 9g |
| Saturated Fat | 5g |
| Cholesterol | 30mg |
| Sodium | 70mg |
| Carbohydrates | 18g |
| Sugar | 10g |
| Protein | 2g |
Note: Nutrition may vary slightly depending on exact ingredient brands and portion sizes.
Red Velvet Thumbprint Cookies
Course: Cookie Recipes25
minutes1
minute160
kcal30
miniutesIngredients
For the Cookies:
1 cup (226g) unsalted butter, room temperature
1 cup (200g) granulated sugar
1 large egg, room temperature
1 tsp pure vanilla extract
3 tsp red velvet emulsion or 1–2 tsp red food coloring
2 1/2 cups (312g) all-purpose flour
1/4 cup (25g) unsweetened cocoa powder
1 tsp baking powder
1/2 tsp saltFor the Cream Cheese Filling:
4 oz (113g) cream cheese, softened
2 tbsp (28g) unsalted butter, softened
1 tsp vanilla extract
1/4 tsp salt
1 1/2–2 cups (180–240g) powdered sugar
1–2 tbsp heavy cream
Optional: sprinkles for topping
Directions
- Cream Butter & Sugar: Beat butter and sugar on medium speed until light and fluffy, about 2–3 minutes.
- Add Wet Ingredients: Mix in egg, vanilla, and red velvet emulsion or food coloring until fully combined.
- Mix Dry Ingredients: In a separate bowl, whisk flour, cocoa, baking powder, and salt.
- Combine: Slowly add dry mixture to wet ingredients, mixing just until dough forms.
- Chill: Cover and refrigerate dough for at least 30 minutes.
- Shape: Scoop 1.5 tbsp of dough, roll into balls, and place on lined baking sheets.
- Indent: Gently press a thumbprint or teaspoon into each ball.
- Bake: Bake at 350°F (177°C) for 10–12 minutes, until edges are set. Press centers again if needed. Cool completely.
- Make Filling: Beat cream cheese and butter until smooth. Add vanilla, salt, and powdered sugar. Add cream a little at a time until creamy.
- Fill & Decorate: Spoon or pipe filling into each cooled cookie. Add sprinkles if desired.
- Store: Keep refrigerated in an airtight container for up to 5 days.
Frequently Asked Questions (FAQs)
Q: Can I make these cookies without red velvet emulsion?
Yes. You can use red gel food coloring (1–2 teaspoons) and a splash of vanilla extract. The emulsion adds a more distinct flavor, but the cookies will still taste delicious with coloring alone.
Q: Can I freeze these cookies with the filling?
It’s best to freeze the cookies unfilled. Bake and cool the cookies, then freeze in a sealed container. Prepare and pipe the cream cheese filling after thawing to maintain texture and freshness.
Q: My dough cracked when I made the thumbprint—what should I do?
That’s normal for slightly firm dough. Gently pinch and smooth the cracked edges with your fingers. Chilling the dough helps reduce spreading but can make it a little stiffer to shape.
Q: Can I make them gluten-free?
Yes. Substitute a 1:1 gluten-free all-purpose flour blend. Be sure to chill the dough well, as gluten-free versions may be softer.
Q: How long can I leave them at room temperature?
Since the filling contains cream cheese, keep the cookies at room temperature for no more than 2 hours. After that, store them in the fridge.
Conclusion
Red Velvet Thumbprint Cookies combine nostalgic red velvet flavor with the creamy joy of cheesecake—wrapped in a buttery, bite-sized treat. They’re festive without being fussy, elegant yet easy enough for weeknight baking, and adaptable for any occasion. Whether you’re preparing holiday gifts, party trays, or simply treating yourself, this recipe brings warmth, flavor, and beauty to your kitchen.
Simple ingredients, a little chill time, and a smooth cream cheese center—these cookies are proof that homemade desserts don’t need to be complicated to be memorable. Give them a try, and let the rich color and soft center speak for themselves.