Peanut Butter Spider Cookies (Halloween)
Oh my gosh, you guys have to make these peanut butter spider cookies for Halloween! They’re so spooky and fun to make. Plus, they’re loaded with peanut butter!
I whipped up a batch last weekend, and they were a total hit. The soft, chewy peanut butter cookies are perfect for sticking on those cute little chocolate “spiders.” They look creepy but taste amazing!
If you’re looking for a Halloween treat that’s easy and adorable, this is it. Everyone will love them—kids, grown-ups, even the Halloween monsters! Trust me, they’ll disappear fast.

So grab your peanut butter and chocolate candies. I’ll show you how to make these spooky-cute spider cookies. They’re perfect for your next Halloween bash!
Why You’ll Love This Recipe
- Fun for Halloween: The combination of soft peanut butter cookies and chocolatey spider decorations makes them a festive and creative treat. Perfect for parties or school events.
- Simple and Approachable: With straightforward steps and common ingredients, even beginner bakers can create impressive results.
- Rich Peanut Butter Flavor: The cookies deliver a classic, familiar peanut butter taste, balanced with just the right amount of sweetness.
- Customizable: You can adjust the size of the cookies, the amount of chocolate, or the type of candy eyes to suit your preference.
- Plan-Ahead Friendly: Make the cookies ahead and decorate them later, which is helpful if preparing for a party or event.
What You Need to Know Before You Start
Prep Time & Cook Time:
- Prep Time: 15 minutes
- Bake Time: 10–12 minutes
- Total Time: About 30 minutes
Servings:
- This recipe yields approximately 24 cookies, ideal for gatherings or for sharing with friends and family.
Difficulty:
- The steps are easy to follow, and the decorating part is fun and kid-friendly. Even if you’ve never baked before, you’ll find this recipe simple and rewarding.
Required Kitchen Tools
Here’s a list of tools you’ll need to make these cookies with ease:
- Baking Sheets: Use heavy-duty sheets lined with parchment paper or silicone mats for even baking.
- Mixing Bowls: Medium and large bowls for combining ingredients.
- Hand Mixer or Stand Mixer: Helps cream the butter and sugar to a light, fluffy consistency.
- Measuring Cups and Spoons: For accurate ingredient amounts.
- Rubber Spatula or Wooden Spoon: For folding and mixing.
- Cookie Scoop or Tablespoon: To ensure uniform cookie size.
- Wire Rack: For cooling the cookies completely before decorating.
- Microwave-Safe Bowl: For melting chocolate chips.
- Piping Bag or Zip-Top Bag (Optional): For piping the chocolate legs neatly.
Ingredients for Peanut Butter Spider Cookies
Below is a detailed breakdown of the ingredients you’ll need. They’re simple, but each one plays an important role in the cookie’s flavor and texture:
- Unsalted Butter (Softened): Adds moisture and a rich, creamy base. Using unsalted butter lets you control the saltiness of the dough.
- Brown Sugar (Packed) and Granulated Sugar: Brown sugar contributes to a chewy texture and deeper flavor, while granulated sugar adds crispness to the edges.
- Creamy Peanut Butter (Not Natural): Choose regular creamy peanut butter for the best structure and flavor. Natural varieties can separate and may affect the texture.
- Egg: Provides structure and binds the ingredients together.
- Vanilla Extract: Adds a subtle background flavor to enhance the peanut butter and chocolate.
- All-Purpose Flour: Gives the cookies structure and stability.
- Baking Soda and Baking Powder: Work together to help the cookies rise and develop the perfect texture.
- Salt: Balances the sweetness and enhances the flavor.
- Granulated Sugar (For Rolling): Helps create a slightly crisp exterior on the cookies.
- Mini Reese’s Peanut Butter Cups: These will be pressed into the cookies after baking to form the spider body.
- Semi-Sweet Chocolate Chips: Melted and piped to create spider legs.
- Candy Eye Balls: Fun and edible decorations that bring the spider design to life.
Variations for Peanut Butter Spider Cookies
Here are a few ways to customize your cookies to fit your taste or occasion:
- Chocolate Twist: Swap the mini Reese’s with mini chocolate truffles or chocolate kisses for a slightly different flavor and shape.
- Spooky Colors: Add a drop of food coloring to the melted chocolate for the legs, creating red, green, or even purple spiders.
- Different Eyes: If you can’t find candy eyes, use white chocolate chips with a dot of melted dark chocolate as a substitute.
- Nutty Additions: Add chopped roasted peanuts to the cookie dough for extra crunch and flavor.
- Bigger Spiders: Use full-size Reese’s cups for a more dramatic spider body, adjusting cookie size to match.
How to Make Peanut Butter Spider Cookies (Step-by-Step Instructions)
1. Prepare the Cookie Dough
- In a large bowl, cream the butter, brown sugar, and granulated sugar using a hand mixer or stand mixer until light and fluffy. This should take about 2–3 minutes.
- Add the creamy peanut butter and beat until well combined.
- Crack in the egg and pour in the vanilla extract. Mix on medium speed until everything is smooth and incorporated.
- In a separate bowl, whisk together the flour, baking soda, baking powder, and salt.
- Slowly add the dry ingredients to the wet mixture, mixing on low speed until just combined. Be careful not to overmix, as this can toughen the cookies.
2. Shape and Bake the Cookies
- Preheat your oven to 350°F (175°C). Line baking sheets with parchment paper or silicone mats.
- Scoop the dough into 1.5- to 2-tablespoon-sized portions and roll each ball in granulated sugar for a lightly crisp exterior.
- Place the dough balls about 2 inches apart on the prepared baking sheets.
- Bake for 10–12 minutes or until the edges are set and the tops start to crack slightly. The centers may appear soft but will firm up as they cool.
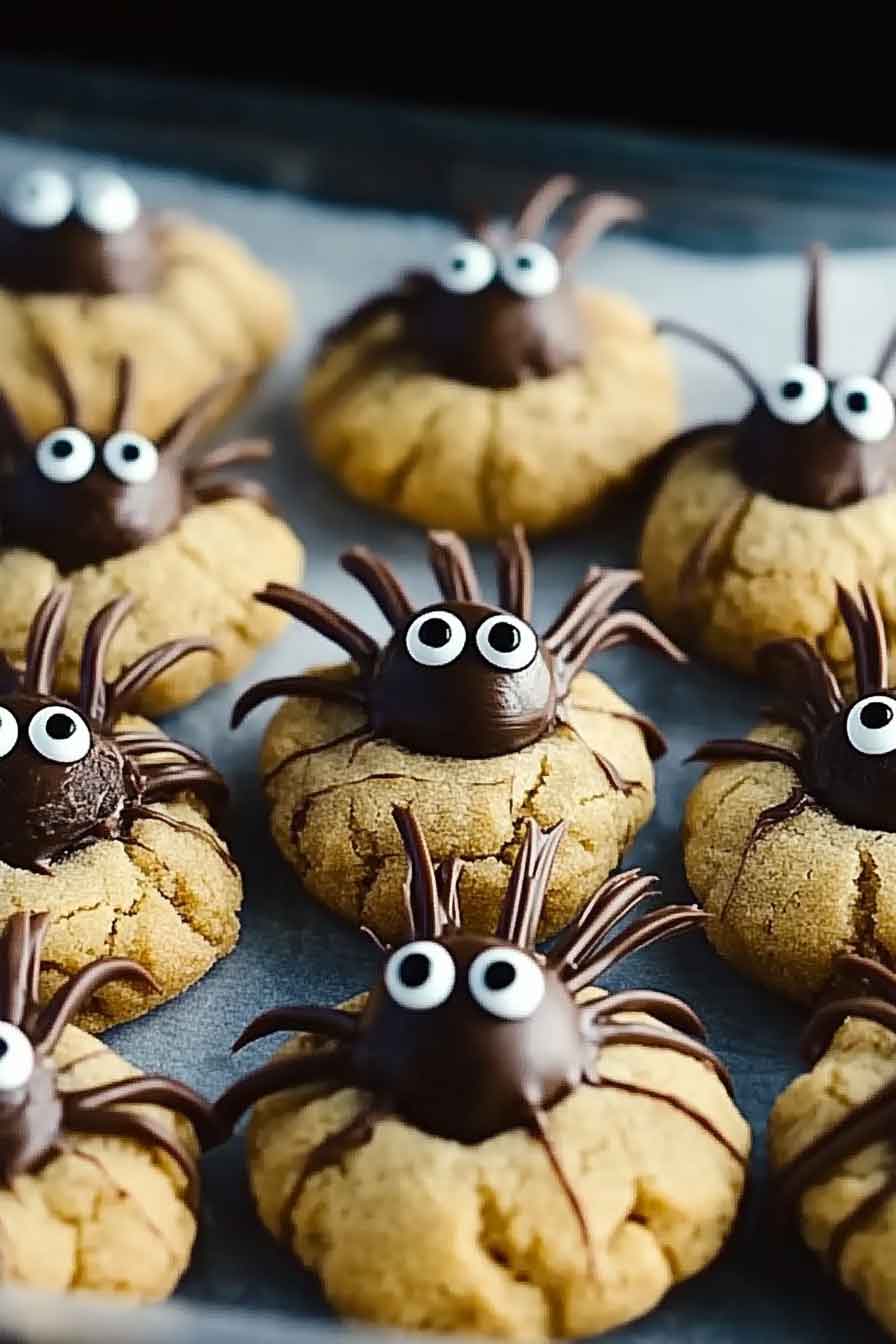
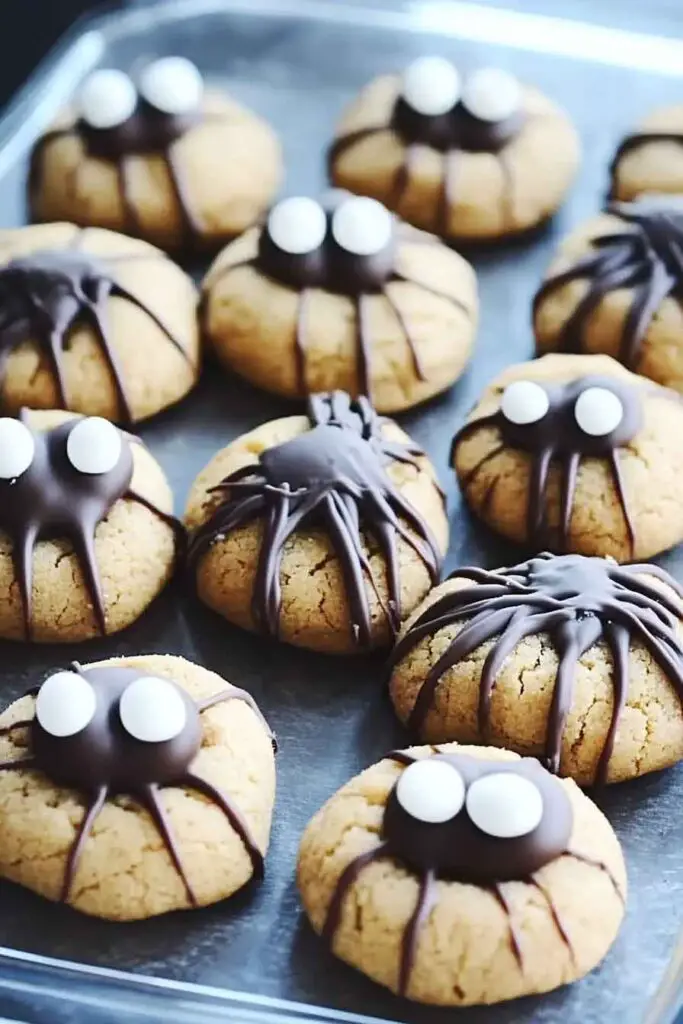
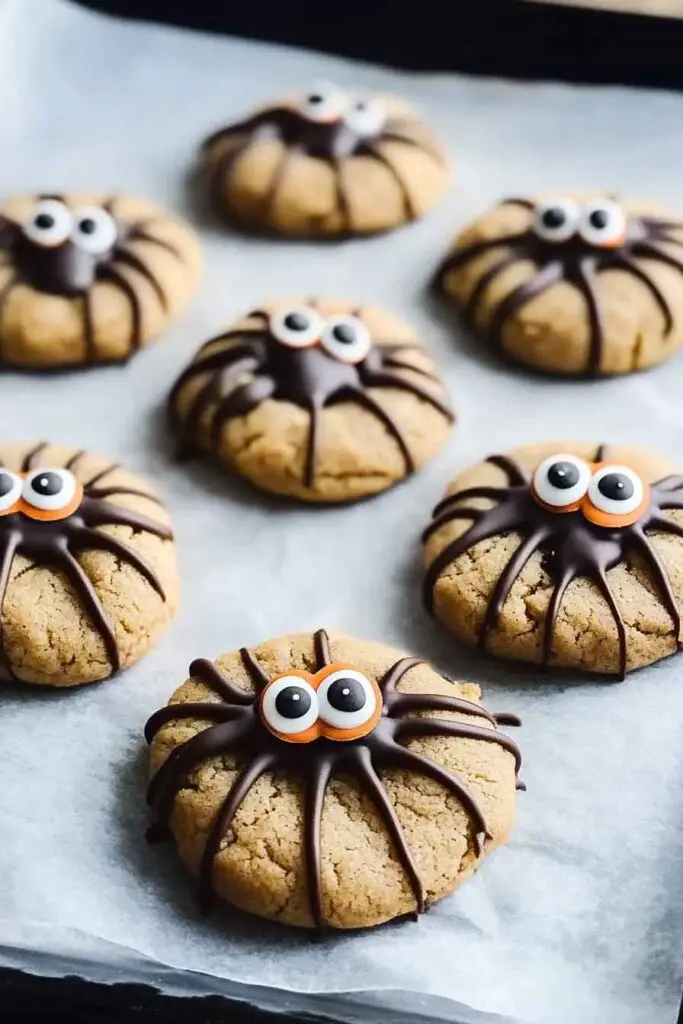
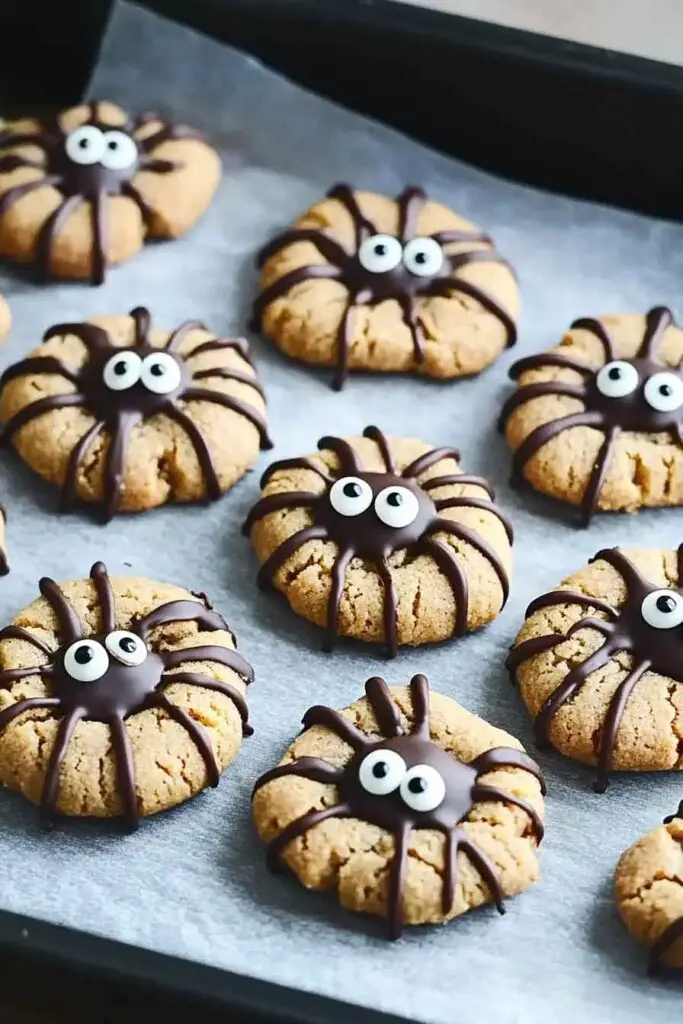
3. Add the Spider Bodies
- While the cookies are still warm, gently press a mini Reese’s peanut butter cup into the center of each one. This creates the “spider body.”
- Let the cookies cool on the baking sheet for about 5 minutes, then transfer them to a wire rack to cool completely.
4. Make and Pipe the Spider Legs
- In a microwave-safe bowl, melt the chocolate chips in 20-second intervals, stirring between each, until smooth and fully melted.
- Transfer the melted chocolate to a piping bag or a zip-top bag with a small corner cut off.
- Pipe eight small legs around each peanut butter cup, creating a spider shape.
5. Finish with Candy Eyes
- While the chocolate legs are still soft, gently press two candy eyes onto each peanut butter cup. Let the chocolate set completely.
How to Serve and Store Peanut Butter Spider Cookies
Serving Suggestions:
- Arrange the cookies on a platter for a Halloween party, or pack them in treat bags for a fun take-home favor.
- Pair them with a glass of milk, hot cocoa, or a simple cup of tea.
- These cookies are also great for bake sales, classroom parties, or just a fun family baking session.
Storing:
- Store the cookies in an airtight container at room temperature for up to 4 days.
- For longer storage, freeze undecorated cookies in a sealed container for up to 3 months. Thaw and decorate when ready to serve.
Tips and Tricks for Success
- Don’t Overmix: Mixing the dough too much can make the cookies tough. Stop as soon as the flour is incorporated.
- Use Room Temperature Ingredients: Softened butter and room-temperature eggs mix more evenly, creating a smoother dough.
- Work Quickly with the Chocolate: Melted chocolate can harden fast, so have your piping setup ready before starting.
- Press in the Reese’s While Warm: Doing this while the cookies are still warm helps the chocolate cups adhere and creates a nice indent for the spider body.
- Chill if Needed: If your kitchen is warm, chill the cookie dough balls before baking to prevent them from spreading too much.
Nutrition Information
| Nutrient | Per Cookie (Approximate) |
|---|---|
| Calories | 210 |
| Total Fat | 12g |
| Saturated Fat | 4.5g |
| Carbohydrates | 23g |
| Sugar | 15g |
| Protein | 4g |
| Sodium | 140mg |
Peanut Butter Spider Cookies (Halloween)
Course: Cookie Recipes15
minutes210
kcalIngredients
½ cup (113g) unsalted butter, softened
½ cup (107g) brown sugar, packed
⅓ cup (66g) granulated sugar, plus extra for rolling
¾ cup (201g) creamy peanut butter (not natural)
1 large egg
1 tsp vanilla extract
1 ½ cups (180g) all-purpose flour
1 tsp baking soda
½ tsp baking powder
½ tsp salt
24 mini Reese’s peanut butter cups
½ cup (85g) semi-sweet chocolate chips (for piping)
Candy eye balls for decoration
Directions
- Preheat oven to 350°F (175°C). Line baking sheets with parchment paper.
- Cream butter and sugars until fluffy. Add peanut butter, egg, and vanilla.
- Combine flour, baking soda, baking powder, and salt. Gradually add to the wet ingredients, mixing just until combined.
- Scoop dough into 1.5-2 tbsp portions, roll in sugar, and place on sheets.
- Bake 10-12 minutes until edges are set. Press a mini Reese’s into each cookie while warm. Cool completely.
- Melt chocolate chips and pipe legs around each Reese’s cup. Press on candy eyes while chocolate is soft.
- Allow the chocolate to set before serving or storing.
Peanut Butter Spider Cookies FAQs
Q1: Can I use chunky peanut butter?
A: It’s best to use creamy peanut butter for a smooth dough. Chunky varieties may affect texture and spread.
Q2: Can I make the dough ahead of time?
A: Yes, the dough can be chilled and stored for up to 2 days before baking.
Q3: What can I use instead of Reese’s?
A: Try mini chocolate truffles, Hershey’s Kisses, or even caramel candies for variety.
Q4: How do I stop the cookies from spreading too much?
A: Chill the dough before baking and use a silicone baking mat for more control.
Q5: How long will the decorated cookies last?
A: They’re best within 4 days but can be stored in an airtight container or frozen undecorated.
Conclusion
These Peanut Butter Spider Cookies bring a playful Halloween twist to a classic peanut butter treat. With their chewy texture, rich flavor, and creative design, they’re a perfect dessert to share with family, friends, or party guests. The combination of easy-to-follow steps and simple ingredients makes them a go-to for any Halloween celebration. Whether you’re baking with kids or impressing a crowd, these cookies are sure to be a hit.


One Comment