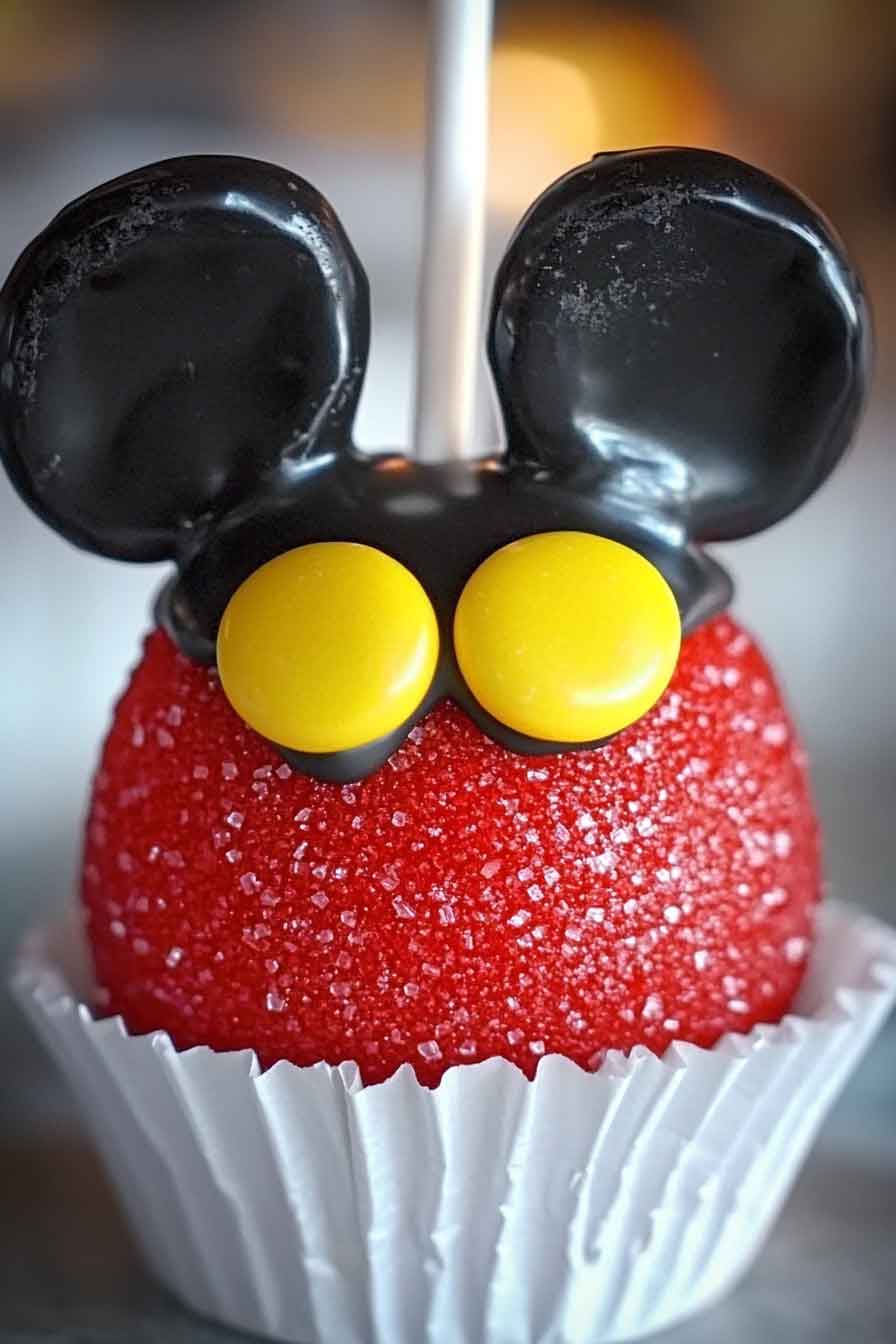
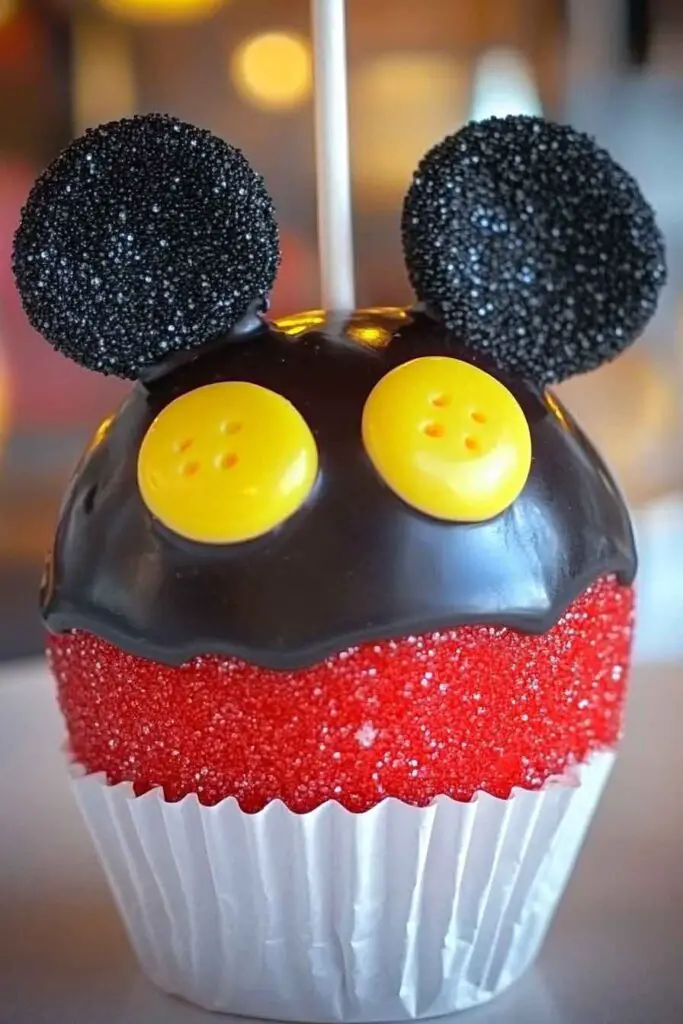
Mickey Mouse Candy Apples
These candy apples are almost too cute to eat. Shiny, sweet, and made to look just like Mickey Mouse. They’re a little Disney magic on a stick!
I made them for a birthday party, and the kids (and grown-ups) went nuts. The crisp apple, glossy candy shell, and those fun chocolate ears? Total crowd-pleaser.
They’re crunchy, colorful, and bring a smile with every bite. Perfect for parties, holidays, or just a fun weekend project. Trust me, these disappear fast.

Let’s get creative in the kitchen! These Mickey Mouse candy apples are fun, simple, and full of magic. Ready to make some Disney joy? Let’s do it!
Why You’ll Love This Recipe
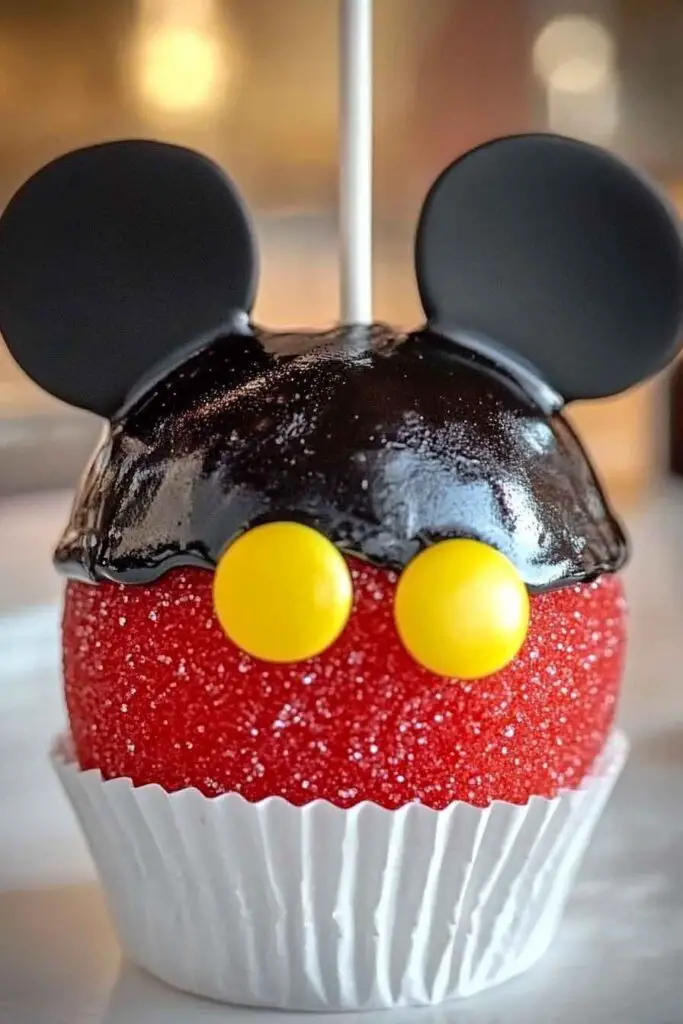
- Visual Appeal: The bright red sprinkles, shiny chocolate top, and fun yellow buttons make this dessert visually pop. It’s a show-stopper.
- Family Activity: From dipping the apples to placing marshmallow ears, this recipe is perfect for little helping hands.
- Tart-Sweet Balance: The crisp, tart bite of green apple balances the creamy caramel and rich chocolate for a satisfying flavor combo.
- No Fancy Equipment Needed: Just a saucepan, some skewers, and your hands—no candy thermometers or molds required.
What You Need to Know Before You Start
Prep Time & Cook Time:
- Prep Time: 30 minutes (including decorating)
- Cook Time: 15 minutes (for melting caramels and chocolate)
- Total Time: About 45–50 minutes (plus cooling time)
Servings:
Makes 6 Mickey Mouse Candy Apples. You can scale this up or down depending on your needs—just adjust the number of apples and ear sets accordingly.
Difficulty Level:
This recipe is beginner-friendly and forgiving. The most important thing is to let each layer cool slightly before moving to the next so things stick well and look neat. Even if the results aren’t perfect, they’ll still taste great and be immediately recognizable as Mickey.
Pro Tip Before You Begin:
Wash and dry the apples very thoroughly. Any wax or moisture on the skin can cause the caramel and chocolate to slip off. You can dip apples quickly in hot water with a splash of vinegar, then scrub them with a towel to remove wax. Let them dry completely before you dip.
Required Kitchen Tools
Before you start, make sure you have everything ready. This makes the process smoother—especially since things like caramel can harden fast once cooled.
- Small saucepan (for melting caramel)
- Microwave-safe bowl or double boiler (for melting chocolate)
- Silicone spatula or spoon (for stirring and spreading)
- Toothpicks (for attaching marshmallow ears if needed)
- Parchment or wax paper (to protect your surface and prevent sticking)
- Cooling rack or tray
- Wooden apple sticks (lollipop or popsicle-style, at least 8”)
Ingredients
Let’s break down each component of the Mickey apple: the base, the “ears,” and the details.
For the Apple Base:
- 6 small tart green apples (Granny Smith works best; they’re crisp and balance the sweetness)
- 6 sturdy wooden sticks (inserted deep into the top of each apple)
For the Caramel Coating:
- 1 (14 oz) bag of soft caramel candies (about 50–55 pieces), unwrapped
- 2 tablespoons heavy cream or milk (to loosen the caramel for dipping)
For the Chocolate Layer:
- ½ cup dark chocolate chips or melting wafers
- 1 teaspoon coconut oil or shortening (optional, for smoother melting)
For the Mickey Decorations:
- 12 white marshmallows (2 per apple, for ears)
- ½ cup vanilla icing (for helping sprinkles and buttons stick)
- ½ cup red sprinkles (nonpareils or fine sanding sugar work best)
- 12 mini yellow jelly beans (for the “pants” buttons—look for lemon flavor)
- 6 white paper cupcake liners (for presentation)
Variations for Mickey Mouse Candy Apples
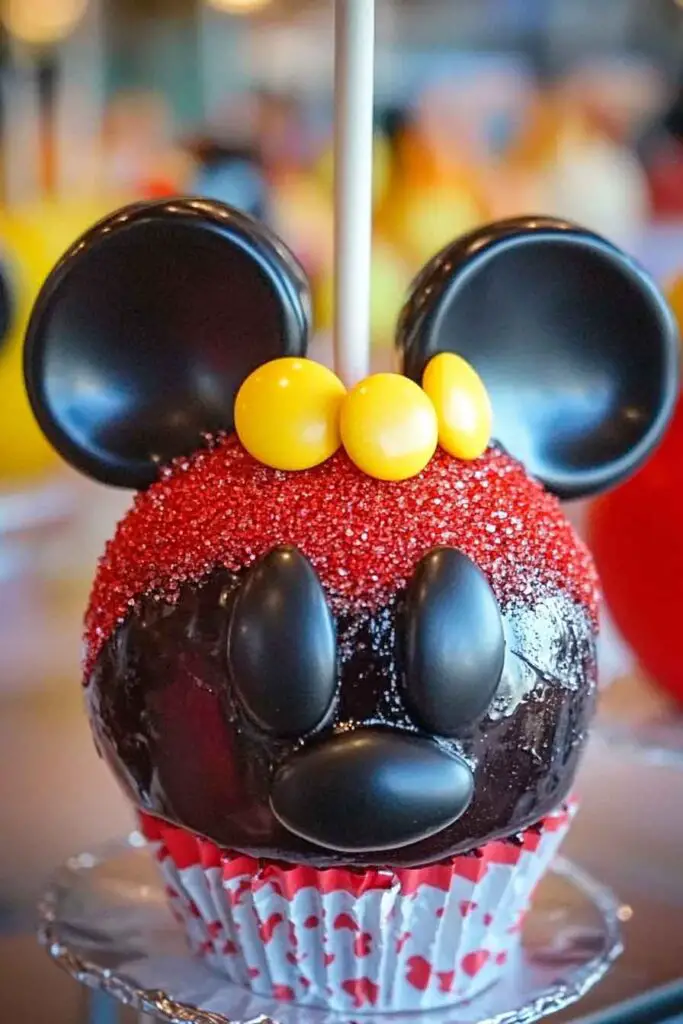
- Minnie Mouse Version: Add a red fondant bow between the ears for a Minnie twist.
- Color Theme Swap: Want different colors? Use blue or pink sprinkles, or even themed seasonal colors.
- Alternative Chocolate: Milk chocolate or white chocolate can be used in place of dark, depending on taste.
- Diet-Friendly Adjustments: Use sugar-free chocolate or fruit leather buttons for a lower-sugar option.
- Vegan Option: Choose dairy-free caramels and chocolate and skip the marshmallows or use vegan ones.
How to Make Mickey Mouse Candy Apples: Step-by-Step Instructions
Step 1: Prepare the Apples
- Wash and dry the apples thoroughly. Remove any wax by dipping apples briefly in hot water with a splash of vinegar, then rub them with a towel.
- Insert the wooden sticks firmly into the center of each apple through the stem area. Push about halfway down so the apples are secure.
- Set apples on a tray lined with parchment or wax paper.
Tip: If your apples are cold from the fridge, let them sit at room temperature for about 30 minutes before dipping to help the caramel set more evenly.
Step 2: Make the Caramel Coating
- In a small saucepan, melt the unwrapped caramels with 2 tablespoons of cream over low heat. Stir continuously until smooth and fully melted.
- Remove from heat and let it cool for about 2–3 minutes so it thickens slightly.
- Dip each apple into the caramel, turning to coat all sides. Let excess drip off. You can use a spoon to help spread it around if needed.
- Place the coated apples back on the parchment. Let the caramel set for 10–15 minutes, or until it’s firm to the touch.
Step 3: Add Mickey’s Pants (Red Sprinkle Section)
- Spread a thin layer of vanilla icing onto the bottom half of each caramel apple using a spatula or small spoon.
- Gently roll or sprinkle red sanding sugar over the icing-covered section until completely coated. Tap gently to remove any loose sprinkles.
- Place the apples back on parchment paper and allow to set for 10 minutes.
Step 4: Make and Apply the Chocolate Layer
- In a microwave-safe bowl, melt the dark chocolate chips in 30-second bursts, stirring between each. Add 1 tsp coconut oil for smoothness if needed.
- Once melted, spoon or spread the chocolate over the top half of the apple (above the red sprinkles), allowing it to meet the icing line cleanly. Use a spoon for control.
- Let chocolate-covered apples sit for another 10–15 minutes until the chocolate begins to firm up but is not fully hardened.
Step 5: Attach the Mickey Ears
- While the chocolate is still tacky, stick one marshmallow on each side of the apple to create ears. Press gently but firmly.
- If they don’t stick easily, use a small dab of melted chocolate or a toothpick inserted into the apple to hold them in place.
- Hold each marshmallow for about 10–15 seconds to set.
Step 6: Add the Yellow Buttons
- Once the icing and sprinkles have set, place two yellow jelly beans near the top edge of the red sprinkle section. These are Mickey’s “buttons.”
- Use a tiny dot of icing or melted chocolate to glue each one in place.
Step 7: Let Them Set Completely
- Allow your apples to sit at room temperature for 20–30 minutes, or until everything is fully set and firm.
- Place each finished apple in a white paper cupcake liner for a polished look and easy serving.
How to Serve Mickey Mouse Candy Apples
These candy apples are meant to be admired and devoured. Here are some ways to make the most of them:
- Party Treats: Arrange them on a themed dessert table with red, black, and yellow accents for birthday parties or Disney movie nights.
- Wrapped Favors: Once fully set, wrap each apple in clear cellophane and tie with a red or yellow ribbon. Perfect as party favors or gifts.
- Kids’ Activity Station: Set up a decorating station where kids can choose their own sprinkle colors, ear styles, or extra candies.
Serving Tip: Use a sharp knife to slice the apples into quarters if serving to younger kids or for easier eating. The layers will stay mostly intact and be easier to chew.
Storing Mickey Mouse Candy Apples
- Room Temperature: Store apples at room temperature in a cool, dry area for up to 24 hours if not yet sliced.
- Refrigeration: If you’re keeping them longer, refrigerate in an airtight container for up to 3 days. Just know the chocolate and caramel may sweat slightly when brought back to room temp.
- Do Not Freeze: Freezing is not recommended—the texture of the apple and coatings will change too much.
Tips and Tricks for Success
- Prep Station: Set up all your ingredients and tools ahead of time to make the process smooth.
- Cool Layers Slightly: Don’t rush from caramel to icing to chocolate. Give each layer a little time to set, so nothing slides off.
- Use Small Apples: Smaller apples are easier to coat and eat—plus, they look more balanced when decorated.
- Work Quickly with Marshmallows: Attach the ears before the chocolate hardens too much. If it does harden, reheat and use as edible “glue.”
Nutrition (per 1 candy apple)
| Nutrient | Amount |
|---|---|
| Calories | ~320 kcal |
| Carbohydrates | ~56 g |
| Sugars | ~44 g |
| Fat | ~9 g |
| Saturated Fat | ~5 g |
| Protein | ~1 g |
| Fiber | ~3 g |
| Sodium | ~60 mg |
Nutrition values are approximate and depend on exact brands and measurements used.
Mickey Mouse Candy Apples
Course: Uncategorized30
minutes15
minutes320
kcalIngredients
6 small tart green apples (washed and dried)
6 wooden sticks (about 8 inches)
12 white marshmallows
1 (14 oz) bag soft caramel candies (about 50–55 pieces)
2 tablespoons heavy cream or milk
½ cup dark chocolate chips or melting wafers
1 teaspoon coconut oil (optional)
½ cup vanilla icing
½ cup red sprinkles
12 mini yellow jelly beans
6 white paper cupcake liners
Directions
- Prepare the Apples
Remove wax and dry apples completely. Insert sticks securely into each apple. - Melt the Caramel
In a saucepan, melt caramels with cream over low heat, stirring until smooth. Cool slightly, then dip apples. Let set 10–15 minutes. - Add Red Sprinkles
Spread icing over bottom half of each apple. Cover icing with red sprinkles. Set aside. - Melt and Add Chocolate
Melt chocolate in microwave-safe bowl with optional coconut oil. Spoon over top half of apples. - Attach Marshmallow Ears
Press two marshmallows into the chocolate on each side of apple before it sets. Use melted chocolate or toothpicks if needed. - Add Yellow Buttons
Use small dots of icing to attach two yellow jelly beans to red sprinkle area. - Set and Serve
Let apples set completely at room temperature (20–30 minutes). Place in cupcake liners to serve.
Mickey Mouse Candy Apples FAQs
Q: Can I make these a day ahead?
Yes! They store well for up to 3 days in the fridge, though they’re best the day of for appearance.
Q: How do I keep the caramel from sliding off?
Make sure apples are completely dry and room temperature. Cool the caramel slightly before dipping to help it cling better.
Q: Can I make a Minnie version?
Absolutely—just add a small fondant bow or piped red icing bow between the ears.
Q: What kind of chocolate works best?
Dark or semi-sweet chocolate chips or melting wafers give the best texture and finish. You can also use milk or white chocolate based on taste preference.
Conclusion
These Mickey Mouse Candy Apples are one of those rare recipes that are just as fun to make as they are to eat. They’re playful, nostalgic, and always crowd-pleasing. Whether you’re prepping for a Disney-themed party or want to add a bit of whimsy to your kitchen, this recipe brings smiles with every bite.