Halloween Cheesecake
When I made this Halloween Cheesecake, the kitchen smelled like vanilla and sugar with a hint of chocolate crust.
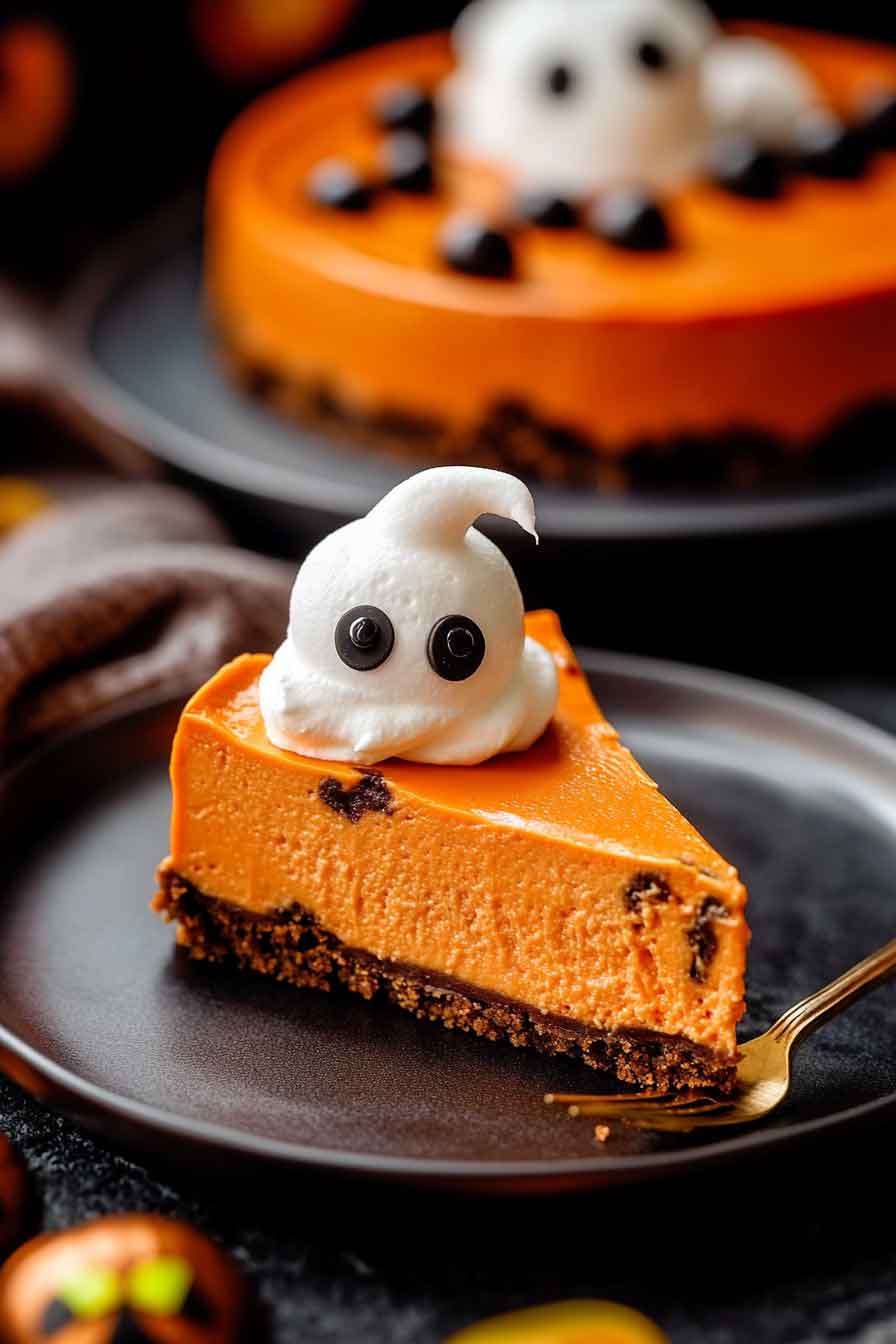
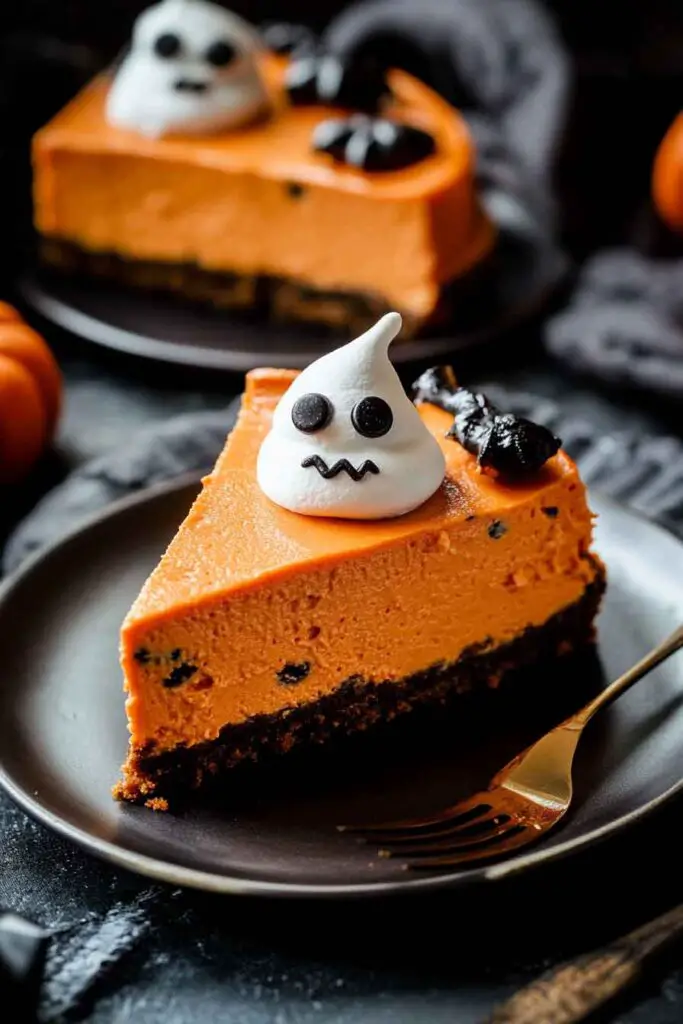
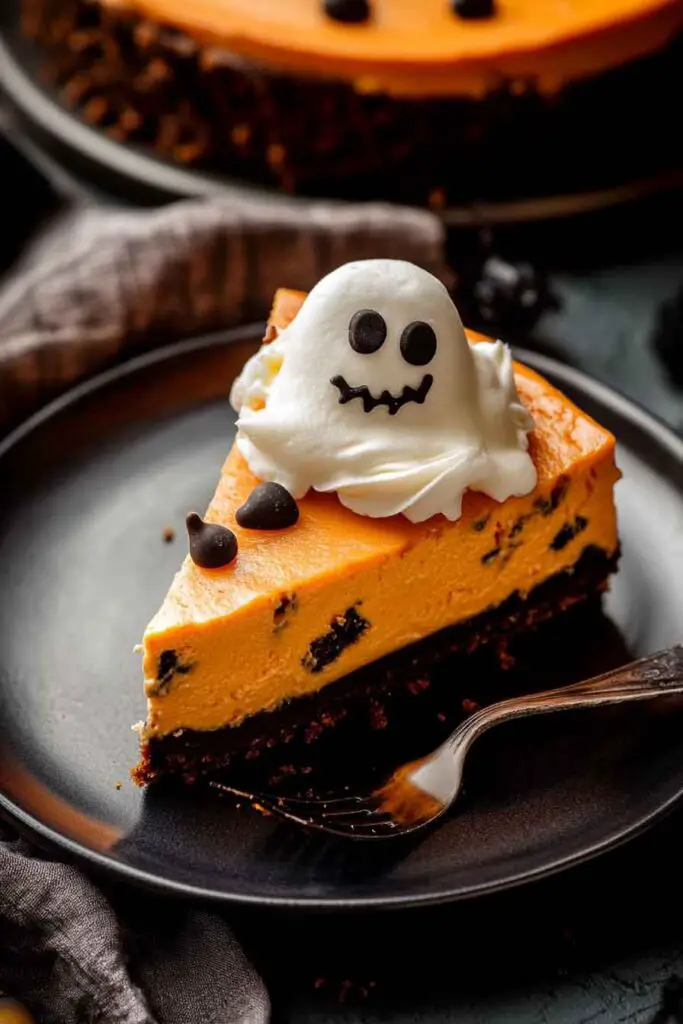
It came out creamy and smooth, with swirls of spooky orange and black that looked almost too pretty to eat.
I remember slicing it slowly, just to admire those fun Halloween colors.
This cheesecake is rich, festive, and perfect for any spooky celebration.
It’s the kind of dessert that makes guests say “wow” before the first bite.
Let’s bake it together—you’ll love how easy it is to turn a classic cheesecake into Halloween magic.

Why You’ll Love This Recipe
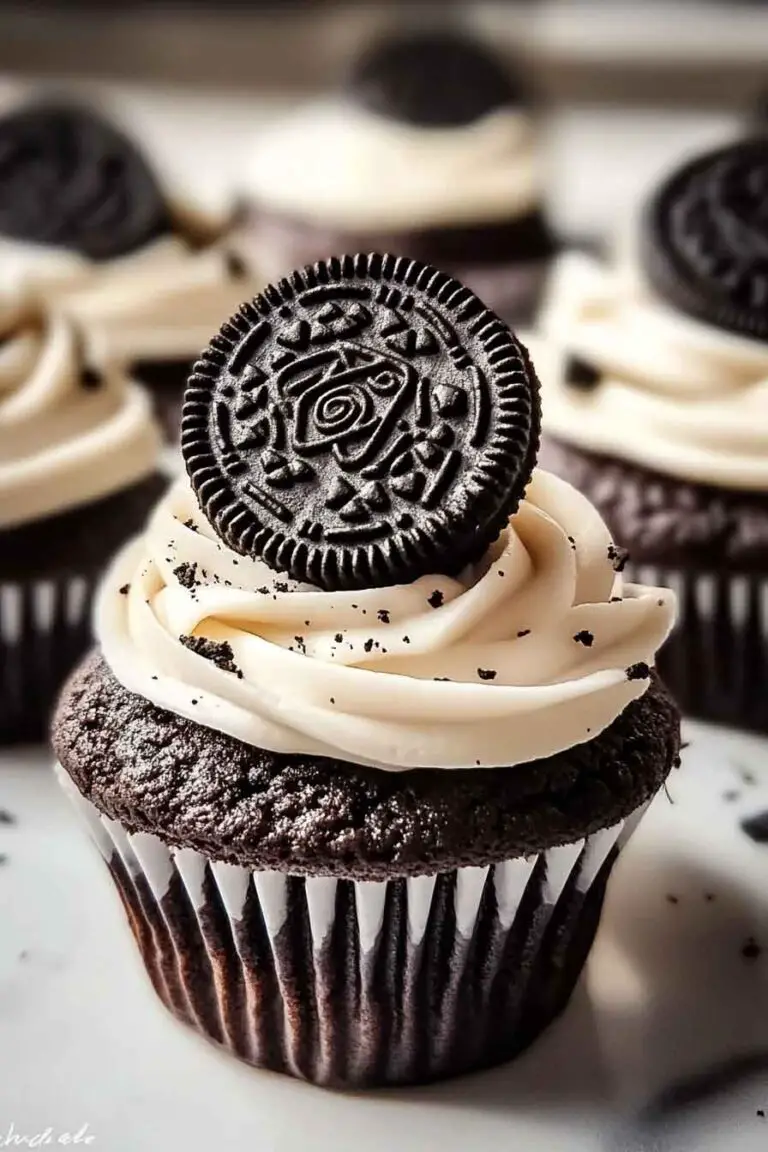
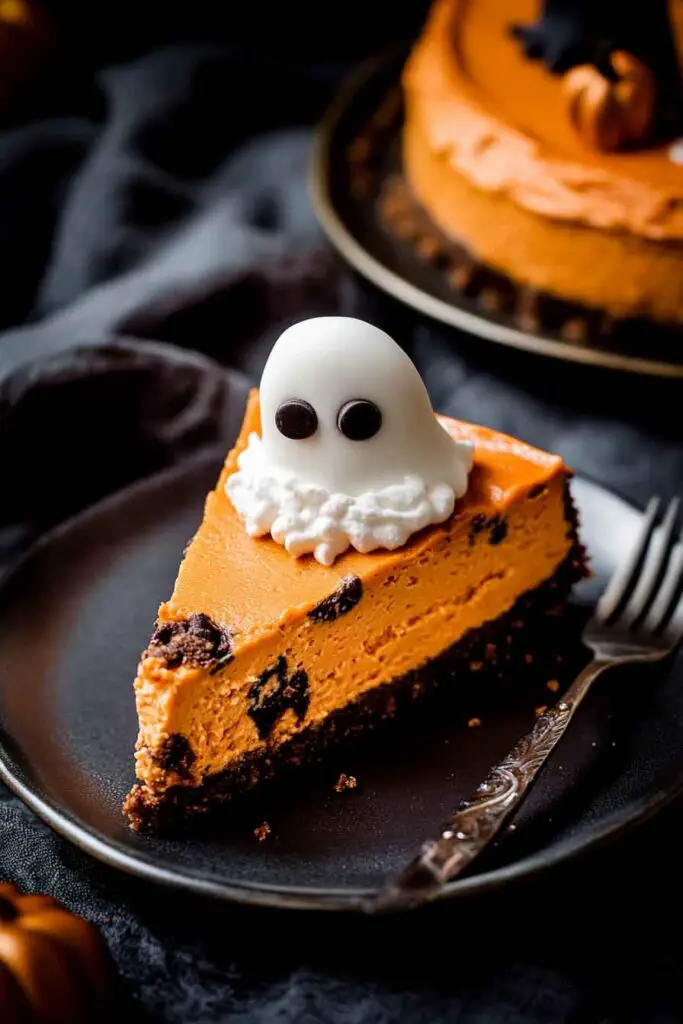
- Bold Halloween Vibes: The orange cheesecake and black cookie base create the perfect color contrast for spooky season. Add candy eyes or M&M’s on top for a fun surprise.
- Rich Texture: We use full-fat cream cheese, Greek yogurt, and heavy cream. This combo makes the cheesecake dense but smooth, never dry or crumbly.
- Beginner Friendly: You don’t need a water bath. No fancy piping. Just layer, bake, chill, and decorate.
- Perfect for Make-Ahead: It’s best made a day ahead, which frees you up for other party prep.
- Decorating Is Kid-Friendly: Let little hands help place candy eyes, Peeps ghosts, or Halloween M&Ms.
What You Need to Know Before You Start
Timing:
- Prep Time: 25 minutes to prep ingredients, make crust, and blend the filling.
- Bake Time: 50–55 minutes in a standard oven.
- Chill Time: At least 4 hours, ideally overnight in the fridge for best texture.
- Total Time: Roughly 6½ hours start to finish (most of that is chilling).
Yields:
- 12 slices of thick, creamy cheesecake.
- Want smaller servings? Slice thinner or make in muffin tins for mini versions.
Difficulty:
- Beginner-Intermediate. No water bath required, but you’ll need to blend the cream cheese until completely smooth. Lumps = bad texture.
- Be patient during the cooling process. Rushing = cracks or soggy centers.
Storage:
- Fridge: Covered, it stays fresh for 4–5 days.
- Freezer: Wrap tightly in foil + plastic wrap. Freeze up to 1 month. Thaw overnight in the fridge before serving.
Required Kitchen Tools
Here’s what you’ll need:
- 9-inch Springform Pan: Essential for easy removal after chilling. Line the bottom with parchment if you’re worried about sticking.
- Electric Mixer: A stand mixer is ideal, but a hand mixer works fine. You need the cream cheese ultra-smooth before baking.
- Mixing Bowls: Medium bowl for the crust; large bowl for the filling.
- Rubber Spatula: Helps scrape down the sides when mixing.
- Measuring Cups & Spoons
- Cooling Rack: For even cooling after baking.
- Piping Bag + Tip (Optional): Use a round tip to pipe whipped cream ghosts on top.
- Toothpicks or Skewer: If you want to swirl in chocolate or food coloring.
Ingredients for Halloween Cheesecake
We’ll build this cheesecake in three layers: the crust, the filling, and the topping.
Oreo Crust
This is your base—a crunchy, chocolate layer that holds everything together.
- 20 whole Oreos (no need to remove filling)
- ¼ cup (57g) unsalted butter, melted – binds the crushed cookies
Tip: Crush the Oreos in a food processor for a fine texture. No processor? Place cookies in a zip-top bag and crush with a rolling pin.
Cheesecake Filling
This is the star: creamy, tangy, sweet, and packed with crushed cookies. All ingredients must be room temperature for a smooth blend.
- 32 oz (900g) full-fat block cream cheese, room temp – do not use whipped or spreadable versions
- 1 cup (200g) granulated sugar – balances the tang of cream cheese
- ¼ cup (60mL) heavy whipping cream – adds silkiness
- 5 oz (153g) Greek yogurt or sour cream, room temp – softens the texture and boosts flavor
- 1 tbsp vanilla extract – rounds out the flavor
- Orange food coloring – gel-based is best for vibrant color without thinning the batter
- 4 large eggs, room temp – binds the filling
- 2 large egg yolks, room temp – adds richness
- 14 Oreos, chopped into chunks – for cookies & cream texture
Tip: Fold in the chopped Oreos gently at the end to keep big cookie chunks in every slice.
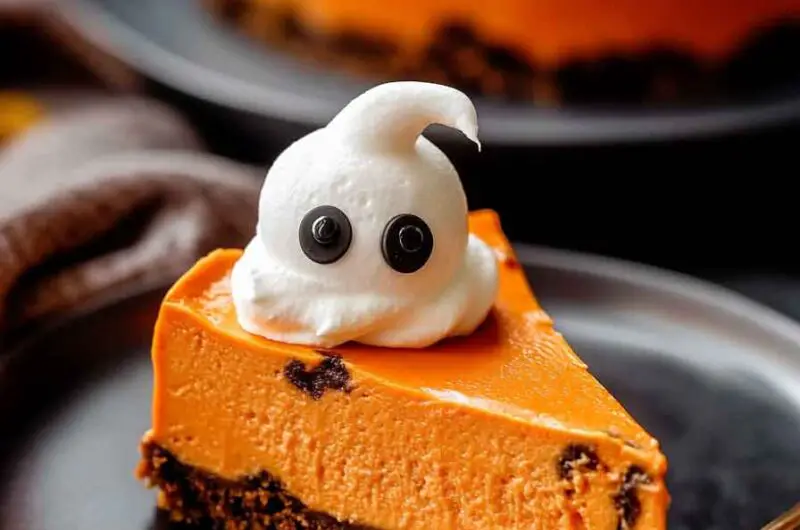
Whipped Cream Ghosts
The cutest part of the whole cake. You can use store-bought whipped cream or make your own.
- 1 cup whipped cream – for piping spooky ghosts
- Candy eyes – stick two on each swirl to make a ghost face
- Optional: Peeps ghosts, Halloween sprinkles, or Mallowcreme Pumpkins for topping
Tip: Pipe ghosts right before serving, or up to 1 hour ahead. They hold their shape best when cold.
How to Make Halloween Cheesecake – Step-by-Step
This cheesecake comes together in three easy parts: crust, filling, and decoration. Here’s how I do it from start to finish.
1. Prepare the Crust
- Crush the Oreos:
Place the 20 whole Oreos in a food processor. Pulse until they become fine crumbs. No food processor? Put them in a zip-top bag and crush with a rolling pin. - Mix with Butter:
Pour in the melted butter. Stir until all the crumbs are coated and resemble wet sand. - Press Into Pan:
Pour the mixture into your 9-inch springform pan. Use the back of a spoon or flat-bottomed cup to press the crumbs evenly into the bottom. Make sure the base is packed tightly. - Prebake the Crust:
Bake at 325°F (163°C) for 8–10 minutes. This helps it set and gives it a bit more crunch. Remove and let cool while you make the filling.
2. Make the Cheesecake Filling
- Beat the Cream Cheese:
In a large bowl, beat the cream cheese on medium speed for 2–3 minutes until smooth and lump-free. - Add Sugar and Vanilla:
Add granulated sugar and vanilla extract. Beat for another 1–2 minutes until creamy. - Mix in Yogurt and Cream:
Add the Greek yogurt (or sour cream) and heavy cream. Mix until fully combined. Scrape down the bowl often. - Add Eggs Slowly:
Add the eggs and yolks one at a time, beating just until incorporated after each. Don’t overmix—this can add too much air. - Color It Orange:
Add orange food coloring and mix gently until evenly distributed. Adjust the amount to reach your preferred Halloween hue. - Fold in Chopped Oreos:
Use a spatula to gently stir in the chopped Oreos. Avoid overmixing so the cookie chunks stay intact.
3. Assemble and Bake
- Pour Into Pan:
Pour the batter over your cooled crust. Tap the pan gently on the counter to release any large air bubbles. - Bake Slowly:
Bake at 325°F (163°C) for 50–55 minutes. The edges should look set, but the center will still jiggle slightly. - Cool Gradually:
Turn off the oven, crack the door slightly, and let the cheesecake sit inside for 30 minutes. This helps prevent cracks. - Cool at Room Temperature:
After removing from the oven, let it cool on a wire rack for 1 hour. - Chill in Fridge:
Cover with foil or plastic wrap and refrigerate for at least 4 hours—preferably overnight.
Serving and Decoration
When your cheesecake is fully chilled, it’s time to decorate.
1. Pipe Whipped Cream Ghosts
- Spoon whipped cream into a piping bag fitted with a large round tip.
- Pipe tall swirls to resemble little ghosts.
- Add 2 candy eyes to each swirl. Done.
Tip: If you don’t have a piping bag, snip the corner off a plastic sandwich bag. It works just fine.
2. Add Halloween Candies
- Press Peeps ghosts or candy pumpkins around the edge.
- Sprinkle crushed Oreos or M&M’s for texture and color.
- Drizzle with chocolate or orange candy melts if you want extra drama.
How to Serve Halloween Cheesecake
- Slice with a warm knife: Run a sharp knife under hot water, then dry before slicing. Repeat between cuts for clean edges.
- Serve chilled: Keep cheesecake cold until ready to eat. It holds shape best when cold.
- Party Tip: Pre-slice and add toothpick flags or edible glitter for individual servings.
Storing Halloween Cheesecake
- Fridge: Store covered in the refrigerator for up to 5 days.
- Freezer: To freeze, wrap the chilled cheesecake (or individual slices) tightly in plastic wrap and foil. Freeze up to 1 month. Thaw overnight in the fridge before serving.
- Avoid decorating early if freezing: Add whipped cream ghosts and candy toppings only after thawing.
Tips and Tricks for Success
- Always Use Room Temperature Ingredients: Cold cream cheese or eggs lead to lumps. Let everything sit out for 1–2 hours before starting.
- Don’t Overbeat the Eggs: Overmixing introduces air, which causes cracks while baking.
- Bake Low and Slow: Cheesecake prefers a gentle bake. 325°F is ideal—don’t rush it.
- Cool Gradually: Sudden temperature changes are cheesecake’s enemy. Always cool slowly before moving to the fridge.
- Use a Springform Pan: It’s the easiest way to get a clean release without damaging the crust.
Nutrition
| Serving Size | 1 slice (1/12 of cheesecake) |
|---|---|
| Calories | 510 |
| Total Fat | 36g |
| Saturated Fat | 20g |
| Cholesterol | 160mg |
| Sodium | 350mg |
| Carbohydrates | 39g |
| Sugar | 29g |
| Protein | 7g |
| Fiber | 1g |
Nutrition is an estimate based on standard ingredients and may vary by brand.
Halloween Cheesecake
Course: Uncategorized12
slices25
minutes55
minutes510
kcal4-6
hourIngredients
- For the Oreo Crust:
20 whole Oreos
¼ cup (57g) unsalted butter, melted
- For the Cheesecake Filling:
32 oz (900g) full-fat block cream cheese, room temp
1 cup (200g) granulated sugar
¼ cup (60mL) heavy whipping cream
5 oz (153g) Greek yogurt or sour cream
1 tbsp vanilla extract
Orange food coloring (gel preferred)
4 large eggs
2 large egg yolks
14 Oreos, chopped
- For the Whipped Cream Ghosts:
1 cup whipped cream
Candy eyes
Optional: Peeps ghosts, M&M’s, candy pumpkins, black gel icing
Directions
- Make Crust: Crush 20 Oreos. Mix with melted butter. Press into a springform pan and bake at 325°F for 8–10 minutes. Cool.
- Mix Filling: Beat cream cheese smooth. Add sugar, vanilla, cream, and yogurt. Mix well. Add eggs one at a time. Stir in food coloring and chopped Oreos.
- Bake: Pour filling onto crust. Bake at 325°F for 50–55 minutes. Turn off oven, crack the door, and rest for 30 minutes. Then cool 1 hour on a rack.
- Chill: Cover and refrigerate 4–6 hours or overnight.
- Decorate: Pipe whipped cream ghosts and add candy eyes. Garnish with Halloween treats if desired.
- Serve: Slice with a hot knife. Keep chilled until serving.
Halloween Cheesecake FAQs
Can I make this cheesecake ahead of time?
Yes. It’s actually better the next day. You can make it up to 2 days ahead and store it covered in the fridge.
What if I don’t have orange food coloring?
You can mix red and yellow gel colors or use purple/green instead for a different spooky vibe.
Can I skip the Oreo chunks inside?
Yes, but they add great texture. You can also swap in crushed chocolate chips, sprinkles, or Halloween candy.
My cheesecake cracked. What happened?
Cracks often happen if eggs were overmixed, or the cheesecake cooled too fast. It’s okay—just cover with whipped cream ghosts!
Can I freeze the whole cheesecake?
Yes. Chill fully, then wrap tightly in plastic wrap and foil. Freeze for up to 1 month. Thaw in the fridge before decorating.
Conclusion
This Halloween Cheesecake is creamy, playful, and full of seasonal charm. The orange filling, Oreo crust, and candy toppings turn a classic dessert into a spooky showstopper. I’ve made it every October since 2021, and it never fails—kids love the ghosts, adults love the flavor.
If you want one Halloween dessert that looks festive and tastes amazing, this is it. From the crunch of the crust to the sweet whipped topping, every bite is worth the wait.