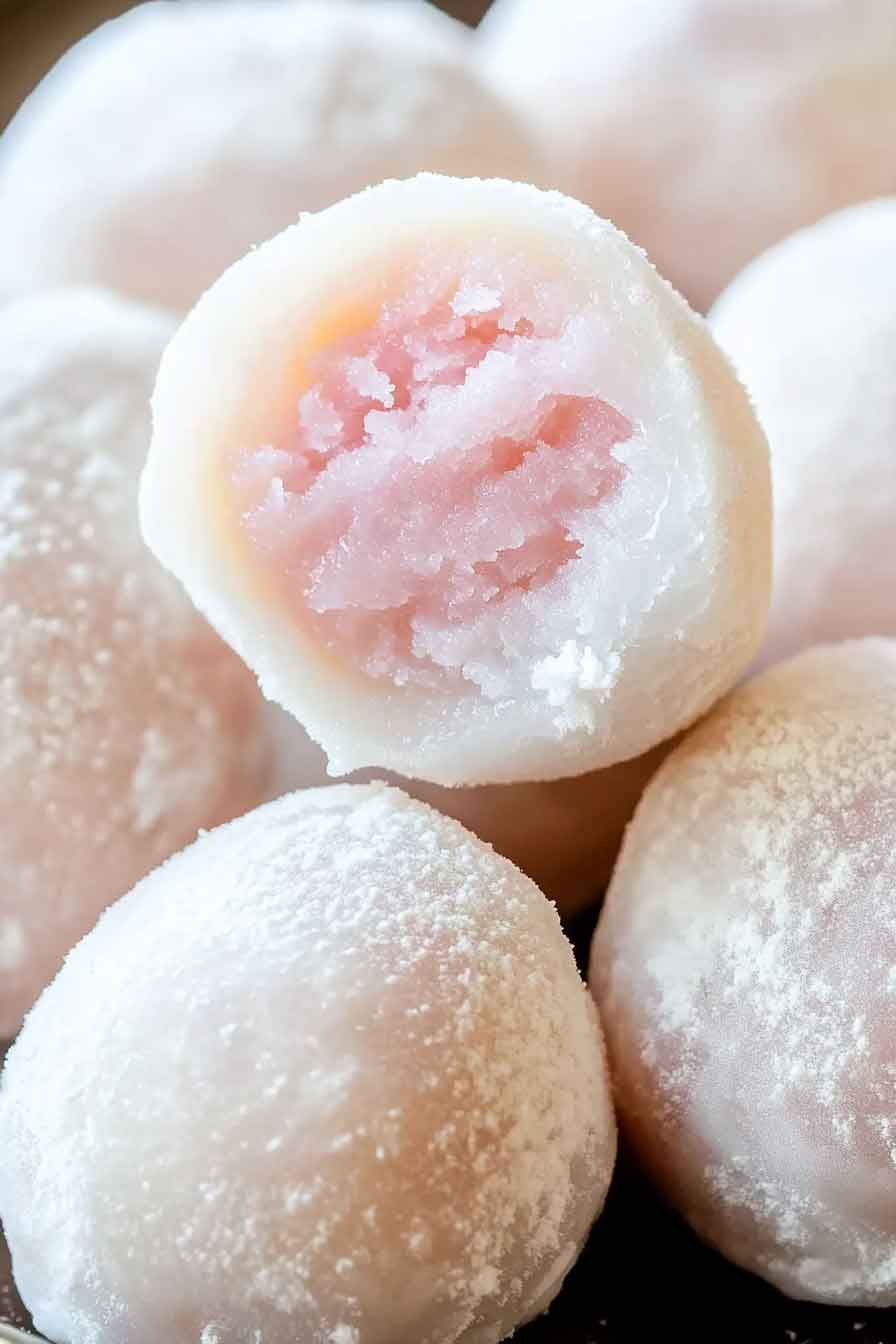
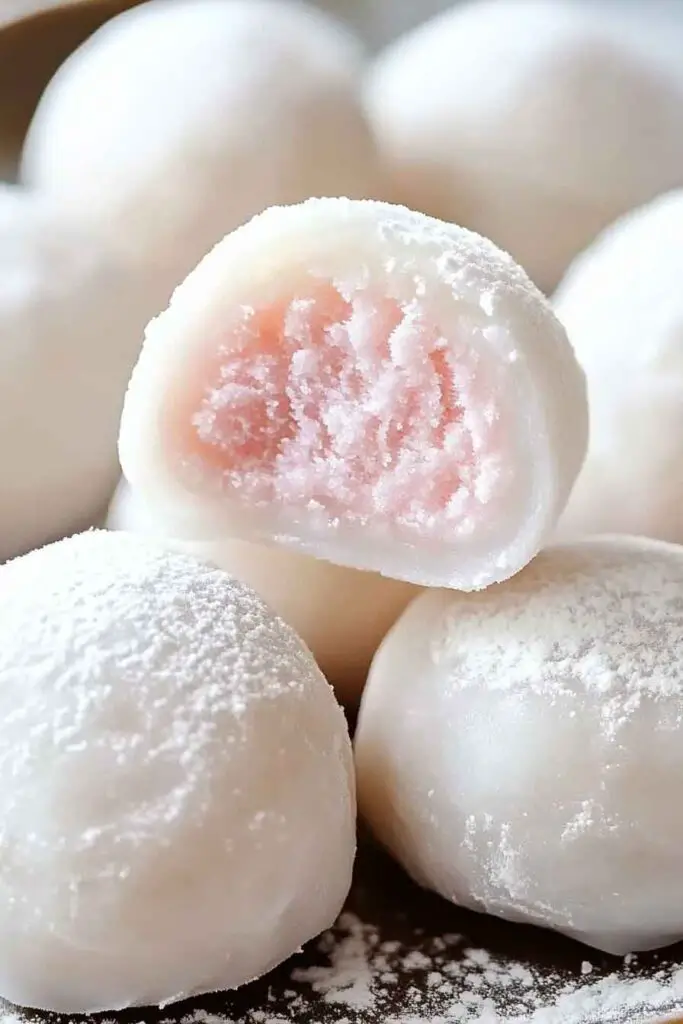
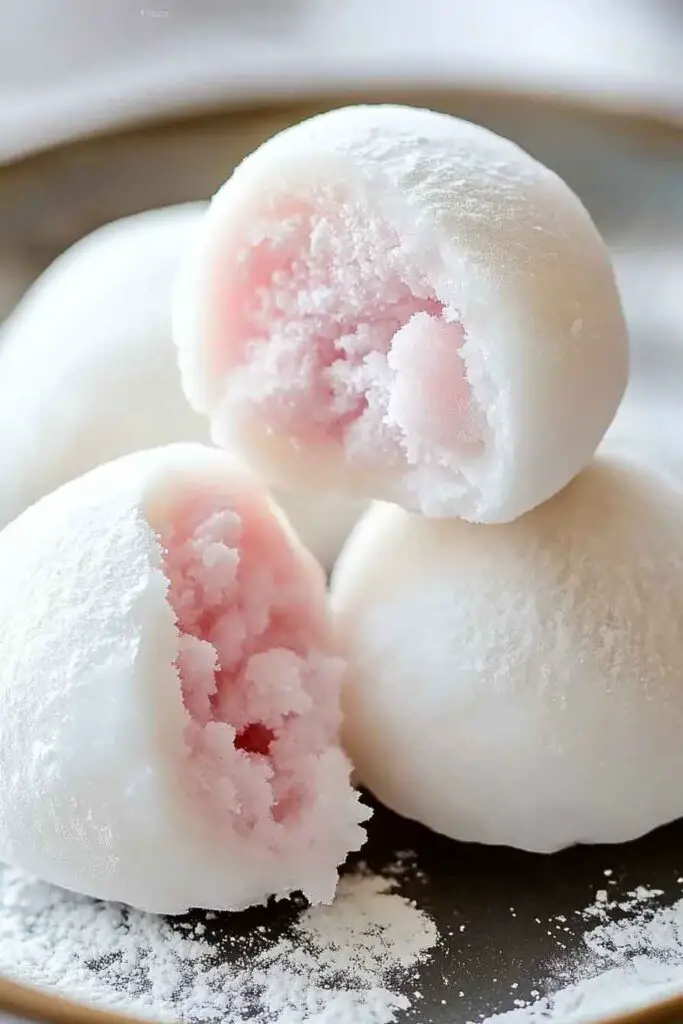
Mochi Ice Cream Delight
Okay, this Mochi Ice Cream Delight? It’s chewy, creamy, and so fun to eat. Sweet rice dough wrapped around your favorite ice cream flavors—soft on the outside, cold and dreamy inside.
I made a batch just for fun, and wow… they were gone in a flash. That stretchy mochi with the ice cream center? Total texture heaven.
It’s easier than it looks—promise. Just freeze, wrap, and chill. Let’s make it together—you’re gonna love every cool, chewy bite!

Why You’ll Love This Recipe
- Visually Impressive but Easy to Make: Mochi ice cream has that wow-factor look, but the steps are straightforward once you understand the process. The dough is cooked quickly, rolled out, and used to wrap frozen ice cream balls.
- Customizable for Any Flavor Preference: Pick a single flavor or create a variety box with different scoops. You can even swirl flavors inside the same ball or use dairy-free ice cream.
- Texture-Forward Dessert: The contrast between the cold, creamy center and soft, elastic mochi coating makes it a sensory treat. It’s light but not bland—chewy, sweet, and cooling all at once.
- Great Make-Ahead Treat: Once wrapped and frozen, mochi ice cream keeps well in the freezer for a week. It’s ready whenever you need a refreshing dessert.
- Kid-Friendly & Fun: Kids can help scoop the ice cream and press the dough. It’s a playful dessert-making experience that teaches basic kitchen skills.

What You Need to Know Before You Start
Prep Time & Cook Time:
- Prep Time: 20 minutes (plus 1 hour to pre-freeze the scooped ice cream)
- Cook Time: 5 minutes (mochi dough cooks fast!)
- Total Time: 2 to 2½ hours (including freezing and assembly)
Servings:
This recipe yields 10 small mochi ice cream pieces (about 2 inches wide). That’s enough for 4 to 5 servings if you offer two per person. You can scale the recipe easily to make a double batch for larger groups or party trays.
Difficulty:
This is a moderate beginner recipe. The steps are easy, but handling the warm mochi dough can be tricky at first—it’s sticky and delicate. Using cornstarch and working quickly makes the process easier with practice.
Flavor Tips:
If you’re using homemade or soft ice cream, make sure it’s frozen hard before wrapping. Otherwise, it will melt during the mochi handling process. Choose smooth, scoopable ice cream without large chunks for easier wrapping.
Texture Tips:
For best results, keep everything cold—your hands, your scooping tools, and the mochi assembly station. A cold surface and chilled scoops prevent melting and help the mochi wrap cleanly around the ice cream.
Required Kitchen Tools
Before you begin, make sure you have these items ready:
- Measuring Cups and Spoons: Accurate measuring is key, especially for the rice flour-to-water ratio.
- Microwave-Safe Bowl or Saucepan: You’ll cook the mochi dough either by steaming or microwaving.
- Whisk or Fork: To blend the dough mixture smoothly before cooking.
- Ice Cream Scoop or Spoon: Helps portion ice cream evenly. A small cookie scoop works well.
- Plastic Wrap or Parchment Paper: Used to shape, wrap, and store individual portions.
- Rolling Pin or Smooth Bottle: For rolling the sticky dough into thin, even rounds.
- Cornstarch-Dusted Surface or Silpat Mat: Prevents sticking when rolling and cutting the dough.
- Muffin Tin or Silicone Cups (optional): Helps hold the mochi in shape while it freezes after wrapping.
Ingredients for the Mochi Dough and Ice Cream Filling
Let’s take a closer look at what each ingredient does:
- Glutinous Rice Flour (also labeled “Sweet Rice Flour”): This is not regular rice flour. It creates that chewy, stretchy mochi texture. Mochiko is a popular brand you can find in Asian markets or online.
- Granulated Sugar: Sweetens the mochi dough just enough to balance the ice cream. It also slightly softens the texture of the cooked mochi.
- Water: Combines with the rice flour to create the mochi batter. The water must be evenly mixed in before heating to avoid lumps.
- Powdered Sugar: After shaping, you’ll dust the mochi with powdered sugar mixed with cornstarch. This prevents sticking and gives each piece a clean, dry finish.
- Cornstarch: Essential for handling. It keeps the dough from sticking to your hands, the board, or the rolling pin. Never skip this step—it’s your best friend for mochi-making.
- Ice Cream (any flavor): Use firm, scoopable ice cream that holds its shape when frozen. Freeze scoops ahead of time on a tray so they’re easy to wrap. Avoid overly chunky or melty varieties, especially for first-time mochi makers.
Variations for Mochi Ice Cream Delight
Mochi ice cream is endlessly flexible. Here are a few fun ways to change it up:
- Flavor the Mochi Dough: Add a few drops of vanilla extract, matcha powder, or cocoa powder to the rice flour mixture before cooking for a flavored outer shell.
- Natural Color: Mix in a pinch of beet powder (for pink), turmeric (for yellow), or butterfly pea flower powder (for blue) to tint the mochi naturally.
- Double Flavors: Wrap complementary flavors—like green tea mochi around strawberry ice cream—for a twist.
- Chocolate Shell: Dust the finished mochi with cocoa powder instead of cornstarch for a chocolatey finish.
- Vegan Version: Use dairy-free ice cream and ensure your sugar and powdered sugar are vegan-certified.
- Mini Mochi Bites: Use smaller scoops of ice cream to make bite-sized treats for parties or kids.
How to Make Mochi Ice Cream Delight: Step-by-Step Instructions
1. Pre-Scoop and Freeze the Ice Cream
- Line a tray with parchment paper.
- Use a small ice cream scoop or spoon to scoop out 10 even portions of your favorite ice cream.
- Place scoops on the tray and freeze for at least 1 hour, or until solid. This step ensures the ice cream won’t melt during wrapping.
Tip: Work quickly and wear gloves if your hands are warm. You can also chill the scoop for cleaner portions.
2. Make the Mochi Dough
You can cook the dough in the microwave or on the stovetop.
Microwave Method:
- In a microwave-safe bowl, combine:
- 1 cup glutinous rice flour
- ¼ cup granulated sugar
- ¾ cup water
- Whisk until smooth. Cover the bowl with plastic wrap or a microwave-safe plate.
- Microwave for 1 minute. Stir. Microwave again in 30-second intervals, stirring in between, until the dough becomes thick, sticky, and slightly translucent—usually 2 to 3 minutes total.
Stovetop Method:
- In a small saucepan, combine the same ingredients above.
- Stir constantly over medium-low heat with a rubber spatula until it thickens into a sticky dough and starts pulling away from the sides—this takes about 5 minutes.
Tip: The dough will be very sticky. This is normal. You’re looking for a tacky, stretchy texture with no raw flour spots.
3. Roll Out the Mochi
- Dust a clean surface (countertop or silicone mat) generously with cornstarch.
- Transfer the cooked dough onto the dusted surface.
- Sprinkle more cornstarch over the top of the dough and on your rolling pin.
- Roll the dough out into a ¼-inch thick sheet. Try to keep it even.
- Use a round cutter (3.5–4 inches wide) or a glass rim to cut 10 circles. Remove excess dough.
Tip: If the dough cools too much and becomes hard to shape, microwave it for 10 seconds to soften slightly.
4. Wrap the Ice Cream
- Working one at a time, place a frozen ice cream scoop in the center of a mochi circle.
- Quickly pull the edges of the mochi up and over the scoop, pinching to seal the seam at the top.
- Place seam-side down on a square of plastic wrap. Wrap tightly and twist to secure.
- Place the wrapped ball into a muffin tin or small bowl to hold its shape, and return it to the freezer immediately.
Tip: Work quickly. If needed, keep half the mochi circles in the fridge while wrapping the others.
5. Freeze Until Firm
- Freeze all wrapped mochi balls for at least 1 hour or until firm.
- When ready to serve, let sit at room temperature for 3–5 minutes to soften slightly before eating.
Serving and Decoration
Mochi ice cream is meant to be served cold, but not rock-hard. Here’s how to serve it beautifully:
- Let it Rest: Remove mochi from the freezer and let sit for about 3–5 minutes before serving. This allows the mochi to soften slightly for a perfect bite.
- Serve on Small Plates: Use dessert or sushi plates for a simple, elegant presentation.
- Dust Before Serving: If desired, lightly dust each mochi with extra cornstarch or powdered sugar for a clean, matte look.
- Garnish Ideas: A sprig of mint, a drizzle of chocolate, or a few fresh fruit slices (like mango, berries, or kiwi) elevate the dessert visually.
- For Kids: Use colorful mini muffin cups or paper liners to make each mochi look festive and fun.
How to Store Mochi Ice Cream
- Freezer Storage: Store each mochi wrapped in plastic wrap inside an airtight container or freezer bag. They will keep well for up to 7 days.
- Prevent Freezer Burn: Wrap them tightly to keep air out and protect the ice cream texture.
- Label Your Flavors: If you’ve made more than one type, use sticky notes or parchment to mark the flavors.
Tips and Tricks for Success
- Use Cornstarch Generously: It’s your best defense against stickiness. Dust your tools, hands, and surfaces well.
- Work in Batches: Only take out 1–2 ice cream scoops at a time to keep them frozen while you work.
- Don’t Overfill: If your ice cream scoop is too large, it will be harder to seal the mochi. Aim for 2 tablespoons per scoop.
- Freeze Twice: First, freeze the scooped ice cream. Second, freeze the wrapped mochi to lock everything in place.
- Smooth Out Seams: Pinch gently and use slightly damp fingers if needed to help the mochi seal.
Nutrition
Here’s a general idea of the nutritional value per mochi ball (based on vanilla ice cream):
| Nutrient | Per Piece (1 mochi) |
|---|---|
| Calories | ~120 kcal |
| Carbohydrates | 22g |
| Sugars | 12g |
| Protein | 1g |
| Fat | 3g |
| Saturated Fat | 2g |
| Fiber | 0g |
| Sodium | 15mg |
Note: Values will vary depending on the ice cream flavor and portion size.
Mochi Ice Cream Delight
Course: Easy Homemade Desserts20
minutes5
minutes120
kcal1
hourIngredients
1 cup glutinous rice flour (sweet rice flour, such as Mochiko)
¼ cup granulated sugar
¾ cup water
½ cup cornstarch (for dusting)
¼ cup powdered sugar (optional, for finishing)
1 pint ice cream (any flavor), pre-scooped and frozen
Directions
- Pre-Scoop Ice Cream:
Line a tray with parchment paper.
Scoop 10 even balls of ice cream (about 2 tbsp each) and freeze until firm (at least 1 hour). - Make the Mochi Dough:
In a microwave-safe bowl, whisk rice flour, sugar, and water until smooth.
Cover and microwave for 1 minute. Stir. Continue microwaving in 30-second bursts until thick and sticky (about 2-3 minutes total). - Roll and Cut:
Dust a surface with cornstarch. Transfer hot mochi dough and roll out to ¼-inch thickness.
Cut 10 circles using a 3.5–4 inch round cutter. - Wrap and Seal:
Place one ice cream scoop in the center of each dough round.
Quickly wrap the mochi over the ice cream, pinching to seal. Place seam-side down on plastic wrap and freeze immediately. - Freeze and Serve:
Let mochi freeze for 1 hour more. When ready to eat, let sit at room temperature for 3–5 minutes before serving.
Mochi Ice Cream FAQs
1. Can I use regular rice flour instead of glutinous rice flour?
No—regular rice flour will not produce the chewy, stretchy texture mochi is known for. You must use glutinous or sweet rice flour (like Mochiko or Shiratamako).
2. Why is my mochi dough too sticky?
Mochi dough is naturally sticky when warm. Use plenty of cornstarch for dusting and work quickly while wrapping. Once cooled and dusted, it becomes much easier to handle.
3. My mochi tore while wrapping—what can I do?
Don’t worry. Lightly pinch the torn area back together with your fingers, or patch it using a small scrap of extra dough. Let the mochi rest seam-side down in a muffin cup to hold shape.
4. Can I make these with dairy-free or vegan ice cream?
Absolutely! Choose a firm, scoopable dairy-free option made with almond, oat, or coconut milk. Just make sure it freezes well and holds shape.
5. How do I keep the mochi from sticking to each other in the freezer?
Wrap each piece in plastic wrap or parchment paper individually before placing them in a container. This keeps them separated and freezer-burn free.
6. Can I freeze them longer than a week?
Technically yes, but the texture may begin to dry out or harden. For best quality, eat within 7 days of wrapping.
Conclusion
Mochi Ice Cream Delight is one of those desserts that checks every box—it’s fun to make, customizable in flavor, kid-friendly, and visually striking. Whether you’re trying it for the first time or looking to master a favorite treat from Japanese cuisine, this homemade version offers freshness and flexibility you just can’t get from store-bought.
The chewy outer mochi layer hugs the cold, creamy center like a soft edible shell, making each bite a refreshing contrast in taste and texture. It’s a great addition to any dessert table, perfect for warm weather, and sure to bring smiles to everyone you serve.