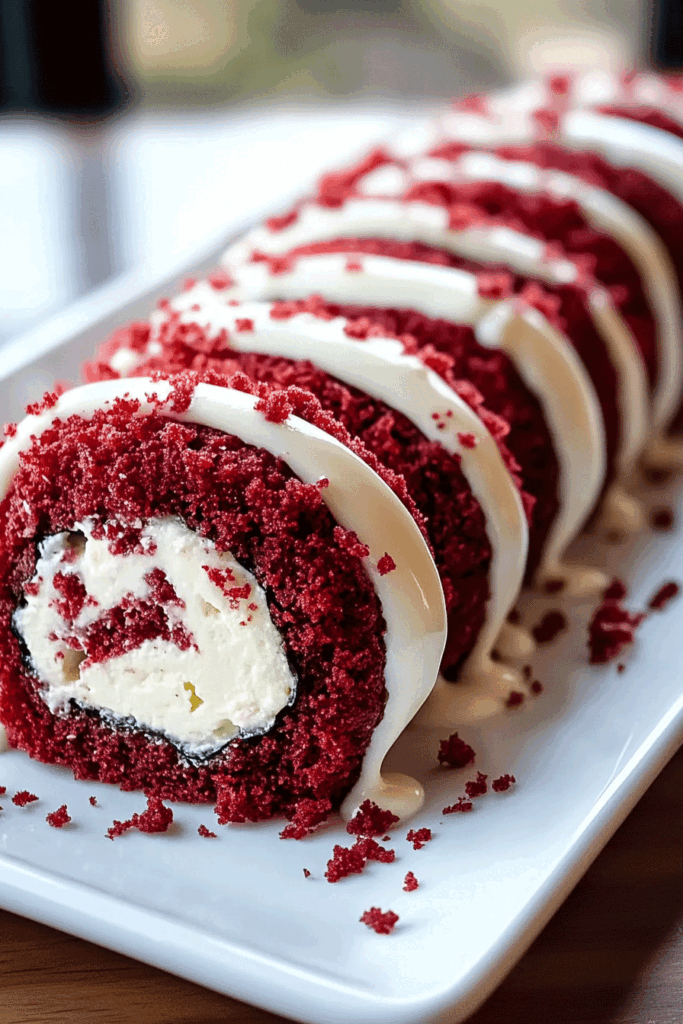
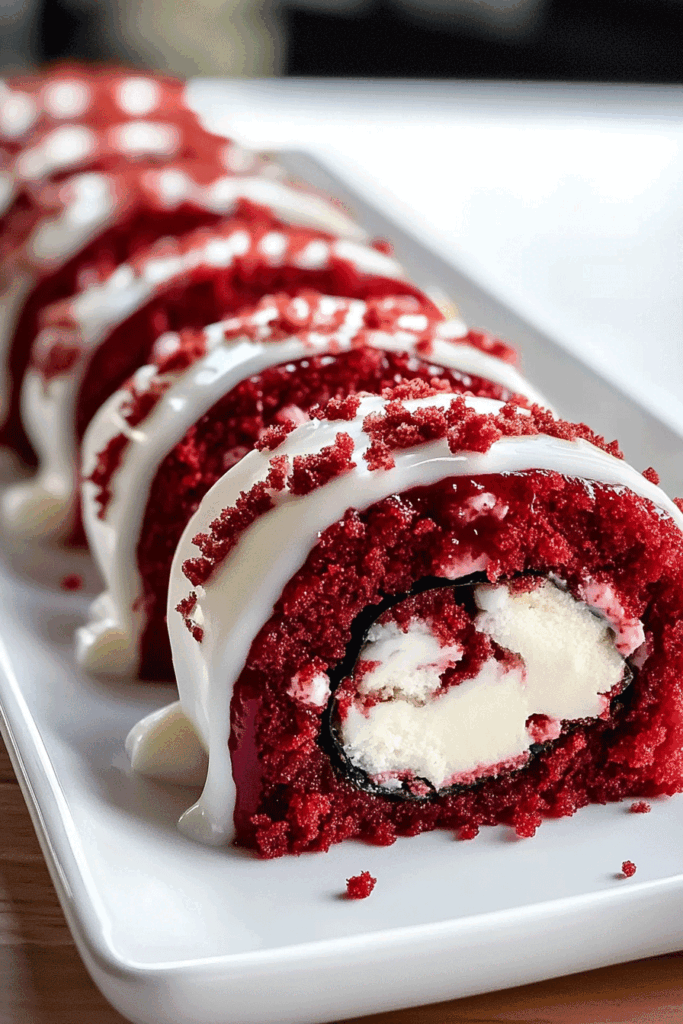
Red Velvet Cheesecake Sushi Roll Dessert
Looking for a fun and creative dessert that’s sure to impress? This Red Velvet Cheesecake Sushi Roll Dessert combines the elegance of sushi with the indulgence of red velvet and cheesecake – a perfect fusion of flavors!
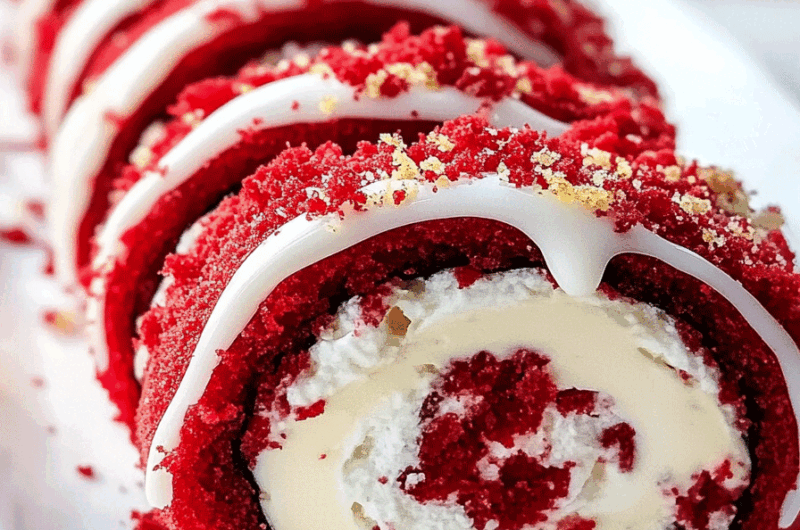
Picture soft red velvet cake rolled up with a creamy cheesecake filling, then cut into sushi-sized pieces for a playful and unique presentation. It’s the dessert that looks as good as it tastes, making it perfect for parties or special occasions!
This dessert is a showstopper – sweet, creamy, and visually stunning. The combination of red velvet and cheesecake will have your guests talking, and each bite is pure indulgence.

Ready to try something truly unique? Let’s roll up this Red Velvet Cheesecake Sushi Roll Dessert and create a treat that’s both delicious and fun to serve!
Why You’ll Love This Recipe
- Fun and Unique: It’s not every day you get to eat cheesecake like sushi. These little rolls are the talk of the dessert table.
- No-Bake Option: You can use a box mix and skip the oven—perfect for hot days or quick prep.
- Crowd-Pleaser: Creamy filling, red velvet cake, sweet glaze… everyone wants seconds.
- Make-Ahead Friendly: Chill them, slice when ready, and serve fresh.
- Kid-Friendly, Too: Easy to eat, no utensils needed, and totally Instagram-worthy.
What You Need to Know Before You Start
Prep Time & Chill Time:
Prep Time: 25 minutes
Chill Time: 1 hour
Total Time: 1 hour 25 minutes
Servings:
Makes about 14–16 rolls depending on the size. Serves 6–8 people.
Difficulty:
Beginner-friendly with basic mixing and rolling. Great for trying something new without a big mess.
Required Kitchen Tools
- 9×13-inch sheet pan or large baking tray (for cake layer)
- Parchment paper
- Offset spatula
- Large mixing bowls
- Electric mixer or hand whisk
- Rolling pin (optional but helpful)
- Plastic wrap or wax paper
- Serrated knife (for slicing)
- Spoon for drizzling sauce
Ingredients for Red Velvet Cheesecake Sushi Rolls
Here’s what you’ll need to make this creamy, rolled treat (full measurements will be in the recipe card at the end):
For the Cake Base:
- 1 box red velvet cake mix (or homemade)
- 3 large eggs
- ½ cup vegetable oil
- 1 cup water
- 1 tsp vanilla extract
For the Cheesecake Filling:
- 8 oz full-fat cream cheese, softened
- ¼ cup unsalted butter, softened
- 1 cup powdered sugar
- 1 tsp vanilla extract
- ¼ cup chopped pecans (optional)
For the Topping:
- ¼ cup melted white chocolate (for drizzle)
- 2 tbsp raspberry or strawberry sauce (optional swirl)
- Extra powdered sugar (for dusting)
Variations for Red Velvet Cheesecake Sushi Rolls
- Nut-Free Version: Omit the pecans if serving anyone with allergies.
- Chocolate Drizzle Swap: Use dark chocolate or milk chocolate instead of white for a richer finish.
- Add Crunch: Sprinkle crushed cookies or graham crackers inside the roll for added texture.
- Festive Swirls: Mix a tiny bit of red food coloring into the cheesecake filling for a marbled effect.
- Fruit Boost: Layer in thin slices of fresh strawberries or raspberries before rolling.
How to Make Red Velvet Cheesecake Sushi Rolls – Step-by-Step
1. Make and Bake the Cake Base
- Preheat oven to 350°F (177°C). Line a 9×13 baking sheet with parchment paper and lightly grease it.
- In a large bowl, whisk together red velvet cake mix, eggs, oil, water, and vanilla until smooth.
- Pour into the lined sheet pan and spread evenly.
- Bake for 14–16 minutes or until a toothpick comes out clean.
- Let cool for 5 minutes, then carefully lift the cake with the parchment and place it on a clean surface to cool completely.
Tip: While still slightly warm, roll the cake (with parchment) into a loose log and let it cool rolled up. This helps prevent cracks when re-rolling with filling.
2. Make the Cheesecake Filling
- In a clean bowl, beat the cream cheese and butter until smooth.
- Add powdered sugar and vanilla, and mix until fluffy and creamy.
- Fold in chopped pecans (optional).
3. Fill and Roll
- Unroll the cooled cake gently if you pre-rolled it.
- Spread the cream cheese filling evenly across the surface using an offset spatula.
- Starting at one short end, roll the cake tightly into a log (like a sushi roll) using the parchment or plastic wrap to help guide the shape.
- Wrap the roll in plastic wrap and chill in the fridge for at least 1 hour to firm up.
Serving and Decoration
How to Serve Red Velvet Cheesecake Sushi Rolls
- Slice the chilled roll into 1-inch pieces using a serrated knife.
- Arrange on a serving tray like sushi.
- Drizzle with melted white chocolate and a swirl of raspberry or strawberry sauce.
- Dust lightly with powdered sugar for a soft finish.
- Optional: Serve with small forks or chopsticks for a fun presentation twist.
Storing Red Velvet Cheesecake Sushi Rolls
- Refrigerator: Store the sliced rolls in an airtight container for up to 3 days. Keep chilled.
- Freezer: You can freeze the entire roll (before slicing) tightly wrapped in plastic for up to 1 month. Thaw overnight in the fridge before slicing and serving.
- Do Not Leave Out: Because of the cream cheese filling, these rolls shouldn’t sit out more than 1–2 hours at room temperature.
Tips and Tricks for Success
- Cool Before Filling: Never spread the filling on a hot cake—it’ll melt and turn runny.
- Use Parchment Paper: It helps lift, roll, and wrap without tearing the cake.
- Chill Before Slicing: This gives the roll time to firm up, making cleaner cuts and better presentation.
- Serrated Knife = Clean Slices: Gently saw through the roll for neat pieces, wiping the knife between cuts.
- Flavor Tweaks: Add a pinch of cinnamon or nutmeg to the filling for extra warmth.

Nutrition (Per Slice, Approx. 1 of 16)
| Nutrient | Amount |
|---|---|
| Calories | 210 kcal |
| Carbohydrates | 24g |
| Sugar | 18g |
| Fat | 12g |
| Saturated Fat | 7g |
| Protein | 2g |
| Fiber | <1g |
| Sodium | 160mg |
| Cholesterol | 40mg |
Red Velvet Cheesecake Sushi Roll Dessert
Course: Easy Homemade Desserts14
rolls25
minutes15
minutes210
kcalIngredients
- For the Cake Base:
1 box red velvet cake mix
3 large eggs
½ cup vegetable oil
1 cup water
1 tsp vanilla extract
- For the Cheesecake Filling:
8 oz full-fat cream cheese, softened¼ cup unsalted butter, softened
1 cup powdered sugar
1 tsp vanilla extract
¼ cup chopped pecans (optional)
- For Topping:
¼ cup white chocolate, melted
2 tbsp raspberry or strawberry sauce (optional)
Powdered sugar, for dusting
Directions
- Bake the Cake Layer:
Preheat oven to 350°F (177°C). Line a 9×13-inch sheet pan with parchment paper and lightly grease it.
In a bowl, combine cake mix, eggs, oil, water, and vanilla. Whisk until smooth.
Pour into pan and spread evenly. Bake for 14–16 minutes.
Let cool 5 minutes, then roll with parchment into a log and let cool completely. - Make the Filling:
Beat cream cheese and butter together until smooth.
Add powdered sugar and vanilla; beat until fluffy.
Fold in pecans if using. - Roll It Up:
Unroll the cooled cake. Spread filling evenly.
Roll the cake tightly using parchment or plastic wrap.
Wrap and chill in the fridge for at least 1 hour. - Slice and Decorate:
Slice into 1-inch pieces.
Drizzle with melted white chocolate and raspberry sauce.
Dust with powdered sugar and serve chilled.
Red Velvet Cheesecake Sushi Roll FAQs
Can I use homemade red velvet cake?
Yes, just make sure the texture is soft and thin enough to roll. Sheet cake works best.
Can I skip the nuts?
Absolutely. Pecans are optional and can be left out for a smoother filling.
What if my cake cracks while rolling?
Don’t worry—just drizzle with chocolate and add powdered sugar. It’ll still look and taste great.
Can I freeze the sushi rolls?
Yes, freeze the whole log before slicing. Wrap well and thaw in the fridge overnight before serving.
Conclusion
These Red Velvet Cheesecake Sushi Rolls are a fun way to serve a classic dessert in a fresh style. They’re simple, eye-catching, and packed with creamy goodness inside every slice. I love making these for birthdays, holidays, or even just when I want something cute and sweet on the table. Try them once, and you’ll see—they roll up fast and disappear even faster.