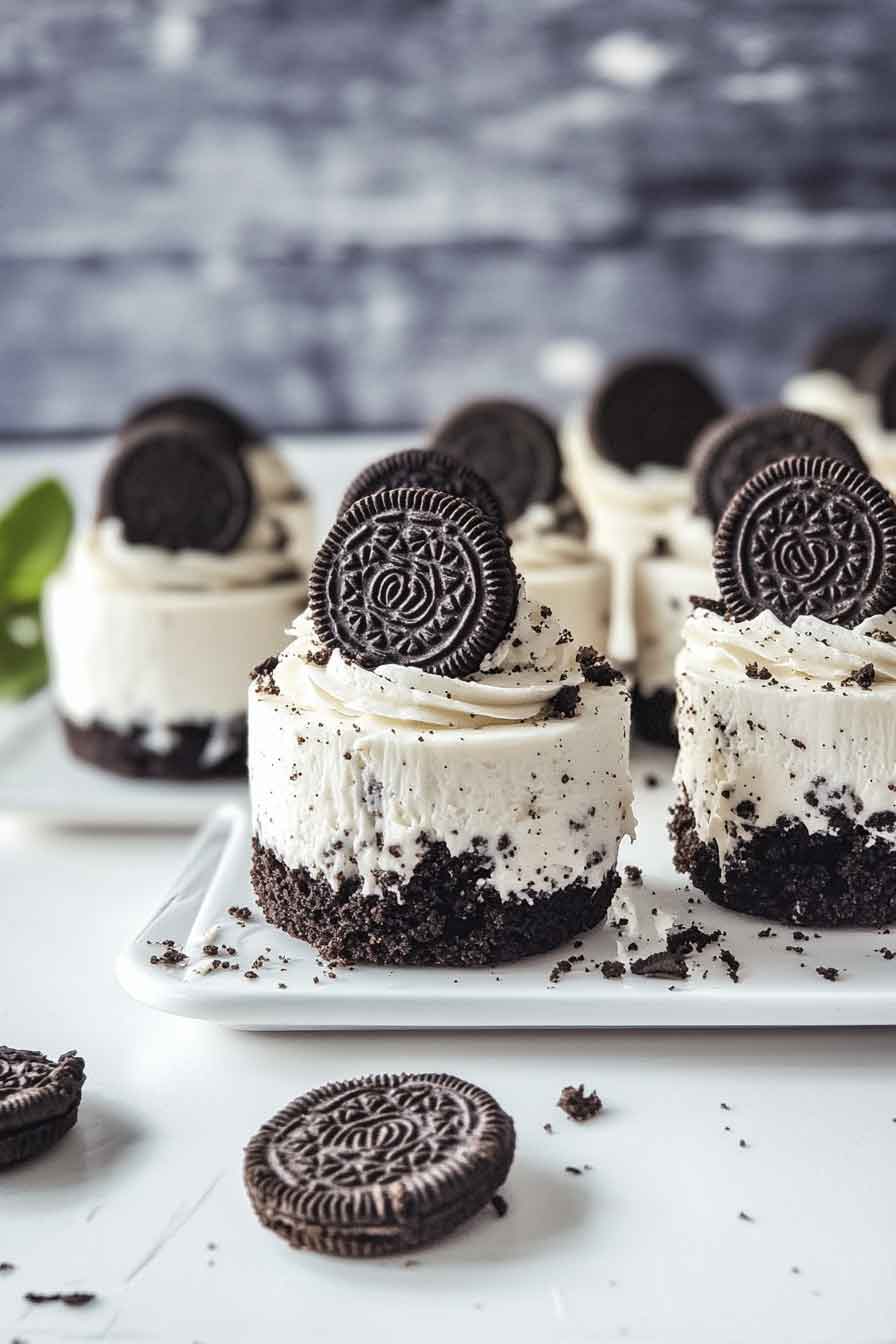
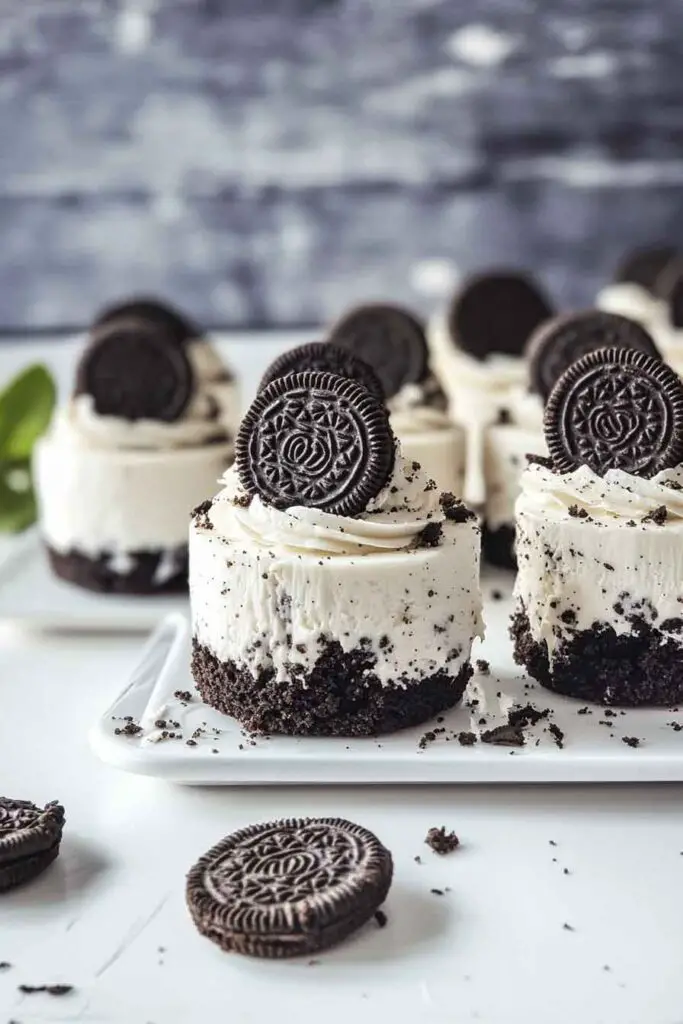
Mini Oreo Cheesecakes
Oh my gosh, have you ever tried mini Oreo cheesecakes? They’re, like, the cutest little treats ever. I just can’t get enough of them! I totally love how each bite is so creamy and sweet. Plus, the Oreo crust is, um, super crunchy. I feel like a baking pro when I make these.
Every time I bake them, my kitchen smells like a yummy dream. They’re my go-to dessert for parties and late-night cravings. I want everyone to taste this amazingness. So, you should, like, grab some Oreos and cream cheese right now. Whip these up and share them with your friends. Trust me, you’ll be the star of snack time!
Why You’ll Love This Recipe
- Perfect Individual Servings: No need to slice — these are ready to serve and enjoy.
- Simple Ingredients: All you need are a few pantry staples and Oreos.
- Creamy and Smooth Texture: Rich cream cheese filling blended with crushed cookies.
- Fun to Decorate: Top with whipped cream, chocolate drizzle, or mini Oreos for a cute finish.
- Make-Ahead Friendly: Prepare these cheesecakes in advance and keep them chilled until serving.
What You Need to Know Before You Start
Prep Time & Bake Time:

- Prep Time: 20 minutes
- Bake Time: 18–20 minutes
- Chill Time: At least 3 hours (for best results)
- Total Time: About 4 hours (including chilling)
Servings:
This recipe makes 12 mini cheesecakes — perfect for a small crowd or for storing extras in the fridge.
Difficulty:
Easy to moderate — Simple steps, great for beginners, but attention to detail makes them look professional.
Required Kitchen Tools
Before getting started, gather these tools:
- 12-Cup Muffin Pan: Standard size for perfect individual cheesecakes.
- Cupcake Liners: For easy removal and serving.
- Mixing Bowls: One for the crust, one for the cheesecake filling.
- Electric Hand Mixer or Stand Mixer: To achieve a smooth, lump-free filling.
- Rubber Spatula: Helpful for scraping the bowl and folding in cookies.
- Measuring Cups and Spoons: For accuracy.
- Knife and Cutting Board: To chop Oreos if needed.
Ingredients for Mini Oreo Cheesecakes
Here’s what you’ll need (exact measurements will be provided in the recipe card):
For the Crust:
- Oreos: Crushed into fine crumbs (no need to remove the filling).
- Unsalted Butter: Melted, to hold the crust together.
For the Cheesecake Filling:
- Cream Cheese: Full-fat, softened to room temperature for a creamy texture.
- Powdered Sugar: To sweeten the cheesecake base without a gritty texture.
- Vanilla Extract: Adds a warm flavor note.
- Heavy Cream: Whipped into the filling for extra lightness.
- Oreos: Chopped and folded into the batter for that cookies-and-cream flavor.
For the Topping (Optional but Recommended):
- Dark Chocolate (Melted): For drizzling on top.
- Whipped Cream: Adds a light, airy finish.
- Mini Oreos: For decoration and added crunch.
Variations for Mini Oreo Cheesecakes
- Minty Twist: Use Mint Oreos and a few drops of mint extract for a fresh flavor.
- Peanut Butter Oreo Cheesecakes: Mix crushed Peanut Butter Oreos into the batter.
- Chocolate Cheesecake Version: Add a tablespoon of cocoa powder to the cheesecake filling for a chocolatey base.
- Fruit Topping: Add a few berries or a drizzle of fruit sauce to balance the richness.
- Gluten-Free Option: Use gluten-free chocolate sandwich cookies if needed.
How to Make Mini Oreo Cheesecakes: Step-by-Step Instructions
Step 1: Prepare the Muffin Pan
Line a 12-cup muffin pan with cupcake liners. This makes it easy to remove the cheesecakes later and keeps them neat for serving. Set aside.
Step 2: Make the Oreo Crust
1. Crush the Oreos:
Place about 12 whole Oreos (filling included) into a food processor or a zip-top bag. Pulse or crush them into fine crumbs. You should have about 1 cup of crumbs.
2. Mix with Butter:
Transfer the crumbs to a mixing bowl. Add melted butter (around 3 tablespoons) and stir until all crumbs are coated and look like wet sand.
3. Press into Liners:
Spoon about 1 tablespoon of the crust mixture into each cupcake liner. Use the back of a spoon or the bottom of a small glass to press the crumbs firmly and evenly into the bottom.
4. Chill the Crust:
Place the pan in the refrigerator to set the crust while you prepare the filling — about 10 minutes is enough.
Step 3: Prepare the Cheesecake Filling
1. Beat the Cream Cheese:
In a large mixing bowl, use a hand mixer or stand mixer to beat 8 ounces (1 package) of softened cream cheese until smooth and creamy — about 2 minutes on medium speed.
2. Add Powdered Sugar and Vanilla:
Add 1/3 cup powdered sugar and 1 teaspoon vanilla extract. Beat again until fully combined, smooth, and fluffy.
3. Fold in Whipped Cream:
In a separate bowl, whip 1/3 cup heavy cream until stiff peaks form (about 2-3 minutes). Gently fold the whipped cream into the cheesecake mixture using a rubber spatula to keep it light and airy.
4. Add Chopped Oreos:
Roughly chop about 6–8 Oreos and fold them into the filling. Make sure the cookies are evenly distributed throughout the batter.
Step 4: Assemble the Mini Cheesecakes
1. Fill the Cups:
Remove the muffin pan from the fridge. Spoon or pipe the cheesecake filling evenly over each crust. Fill each liner almost to the top.
2. Smooth the Tops:
Use the back of a spoon to gently smooth the tops for a neat appearance.
Step 5: Chill Until Set
Place the entire muffin pan in the refrigerator and let the cheesecakes chill for at least 3 hours, or until firm. Overnight chilling is even better for the perfect texture.
Step 6: Add Toppings (Optional but Fun)
Once set and ready to serve:
- Drizzle with melted dark chocolate for extra richness.
- Pipe a swirl of whipped cream on top for a light finish.
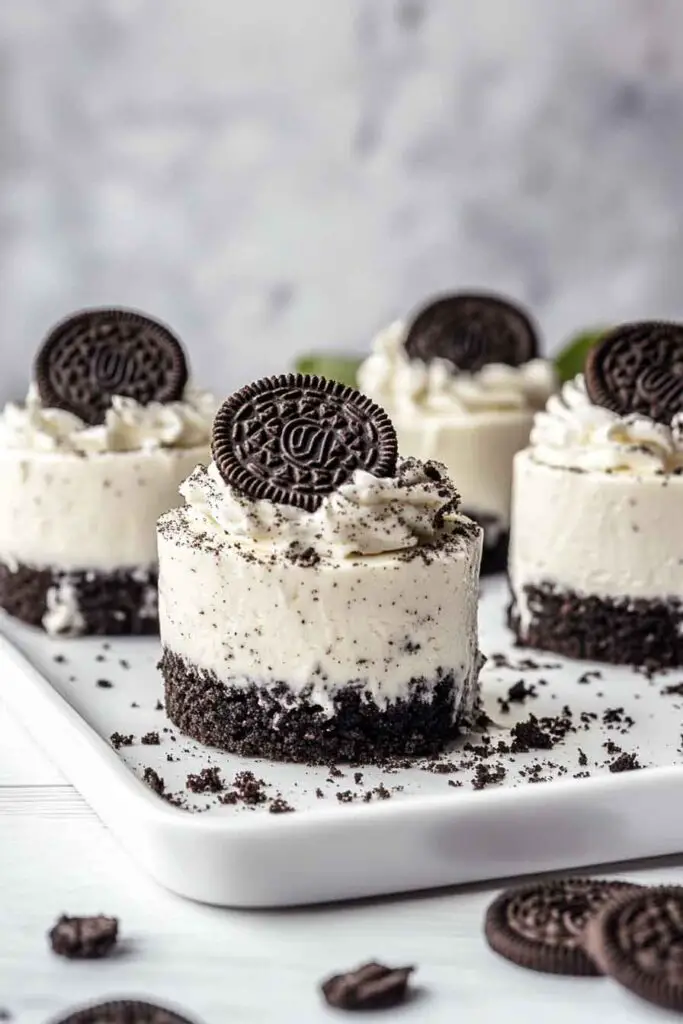
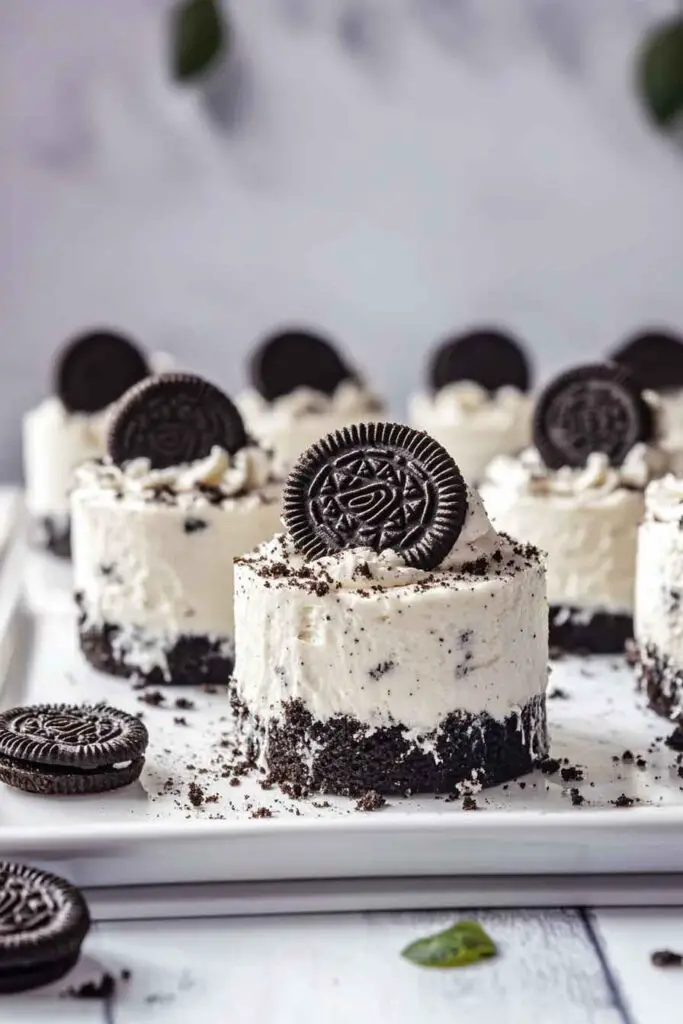
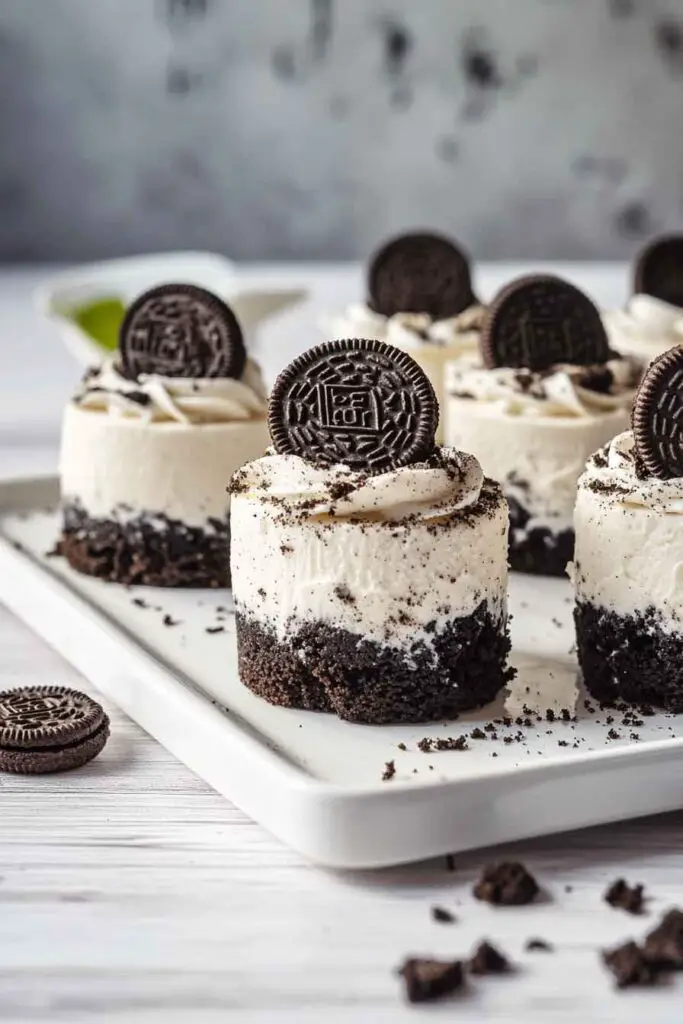
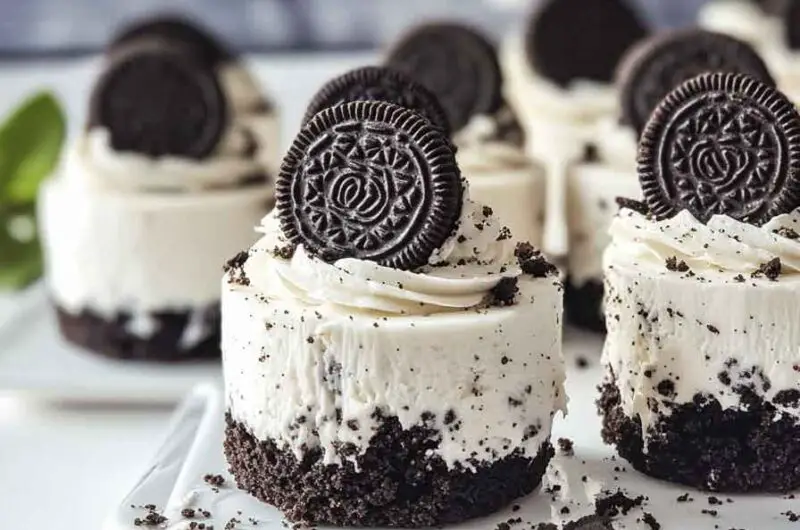
- Add a mini Oreo to each cheesecake for a cute and crunchy decoration.
Serving and Decoration
How to Serve Mini Oreo Cheesecakes
These cheesecakes are easy to serve right from the cupcake liners. Here are a few ideas to make them look as good as they taste:
- Classic and Simple: Leave them plain for a neat, modern look. The Oreo bits inside are decoration enough.
- Whipped Cream: Add a swirl of whipped cream on top just before serving. You can use a piping bag for a fancy touch or a spoon for a casual look.
- Chocolate Drizzle: Drizzle melted dark or milk chocolate over the top to add a rich flavor and elegant finish.
- Mini Oreos: Top each cheesecake with a mini Oreo for an extra crunch and a playful decoration.
- Fresh Fruit: A few raspberries or sliced strawberries can add a pop of color and balance the sweetness.
How to Store Mini Oreo Cheesecakes
To keep them fresh and delicious, follow these tips:
In the Refrigerator:
- Store the cheesecakes in an airtight container in the fridge.
- They will stay fresh for up to 4–5 days.
In the Freezer:
- You can also freeze them if you want to make them ahead of time.
- Place the cheesecakes on a baking sheet and freeze until firm (about 1–2 hours).
- Once frozen, transfer them to a freezer-safe container or bag.
- They will keep well for up to 2 months.
- To serve, thaw overnight in the refrigerator.
Fun Variations for Mini Oreo Cheesecakes
If you want to mix things up, here are some ideas to try:
- Different Oreo Flavors: Swap the classic Oreos for Golden Oreos, Mint Oreos, or Birthday Cake Oreos for a fun twist.
- Chocolate Cheesecake Base: Add 1 tablespoon of cocoa powder to the cheesecake filling for a rich chocolate flavor.
- Peanut Butter Swirl: Mix in 2 tablespoons of creamy peanut butter to the cheesecake batter for a cookies-and-cream peanut butter combo.
- Fruit Topping: Add a dollop of raspberry or strawberry sauce on top to balance the sweetness.
- Crunchy Topping: Sprinkle crushed Oreos or chocolate chips over the whipped cream for extra texture.
Nutrition Information
Here’s an approximate breakdown of the nutrition for one Mini Oreo Cheesecake (without optional toppings like whipped cream or chocolate drizzle):
| Nutrient | Amount per Cheesecake |
|---|---|
| Calories | 240 kcal |
| Carbohydrates | 19 g |
| Protein | 3 g |
| Fat | 17 g |
| Saturated Fat | 9 g |
| Cholesterol | 45 mg |
| Sodium | 135 mg |
| Sugar | 13 g |
| Fiber | 0.5 g |
| Calcium | 35 mg |
Note: Nutrition values are estimates based on standard ingredients and serving sizes. Actual values may vary depending on specific products used and portion sizes.
Mini Oreo Cheesecakes FAQs
Can I make these ahead of time?
Yes! Mini Oreo Cheesecakes are great for making ahead. You can prepare them a day or two in advance and store them in the refrigerator until ready to serve.
Do I need to bake these cheesecakes?
No baking is required for this recipe — it’s a no-bake cheesecake. The filling sets beautifully in the fridge after a few hours of chilling.
Can I freeze them for later?
Absolutely! Once fully set, place them in an airtight container and freeze for up to 2 months. Thaw overnight in the fridge before serving.
What if I don’t have cupcake liners?
Cupcake liners are helpful for easy removal, but if you don’t have them, you can lightly grease each muffin cup. However, liners are recommended for the best results and clean presentation.
Can I make a large cheesecake instead of minis?
Yes! You can press the crust into a 9-inch springform pan and pour in the cheesecake filling. Let it chill overnight for best results. Keep in mind that chilling time might be longer for a larger size.
Can I add more Oreos to the filling?
Definitely. If you love extra cookie bits, feel free to fold in a few more chopped Oreos for a chunkier texture. Just be careful not to overmix and break them down too much.
Mini Oreo Cheesecakes
12
mini cheesecakes20
minutes3
hours240
kcalIngredients
- For the Crust:
12 Oreos (crushed into fine crumbs)
3 tablespoons unsalted butter (melted)
- For the Cheesecake Filling:
8 ounces (226g) full-fat cream cheese, softened to room temperature
1/3 cup (40g) powdered sugar
1 teaspoon vanilla extract
1/3 cup (80ml) heavy cream, whipped to stiff peaks
6–8 Oreos, roughly chopped
- Optional Toppings:
Melted dark chocolate for drizzling
Whipped cream for garnish
Mini Oreos for decoration
Directions
- Prepare the Muffin Pan:
Line a 12-cup muffin pan with cupcake liners. Set aside. - Make the Crust:
Crush Oreos into fine crumbs.
Mix crumbs with melted butter until combined.
Spoon about 1 tablespoon of crust mixture into each liner and press down firmly.
Chill in the fridge while making the filling (about 10 minutes). - Make the Cheesecake Filling:
In a large bowl, beat cream cheese until smooth.
Add powdered sugar and vanilla extract; beat until fully combined and creamy.
In a separate bowl, whip heavy cream to stiff peaks, then gently fold it into the cream cheese mixture.
Fold in chopped Oreos until evenly distributed. - Assemble the Cheesecakes:
Spoon or pipe cheesecake filling evenly over each crust. Smooth the tops. - Chill to Set:
Refrigerate for at least 3 hours or until firm. - Add Toppings (Optional):
Before serving, drizzle with melted chocolate, add whipped cream, and top with mini Oreos if desired. - Serve and Enjoy!
Conclusion
These Mini Oreo Cheesecakes are simple to make, perfectly portioned, and full of cookies-and-cream goodness. Whether you’re planning for a party, a family treat, or just craving something sweet, they’re an easy choice that looks as good as it tastes. The no-bake approach makes them stress-free, and they’re easy to customize with different toppings or Oreo flavors.
Try them once, and they might just become your go-to dessert — simple, delicious, and always a hit.