Pizzicati – Italian Pinch Cookies
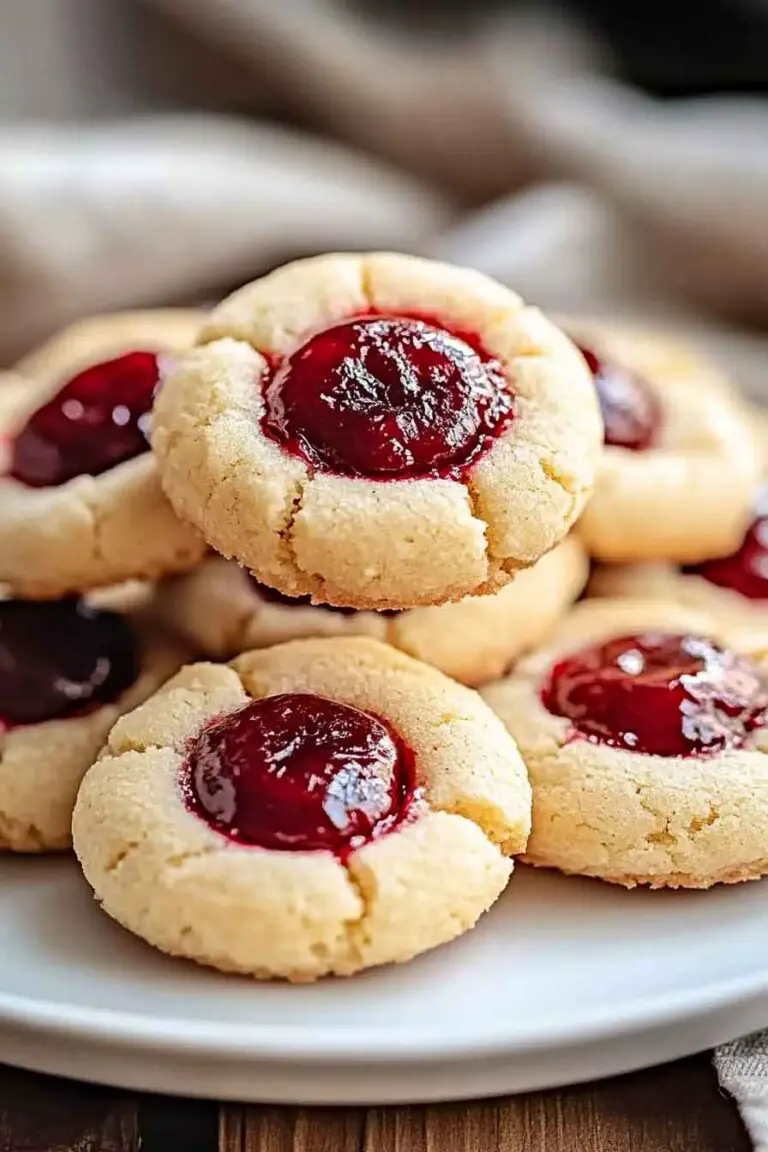
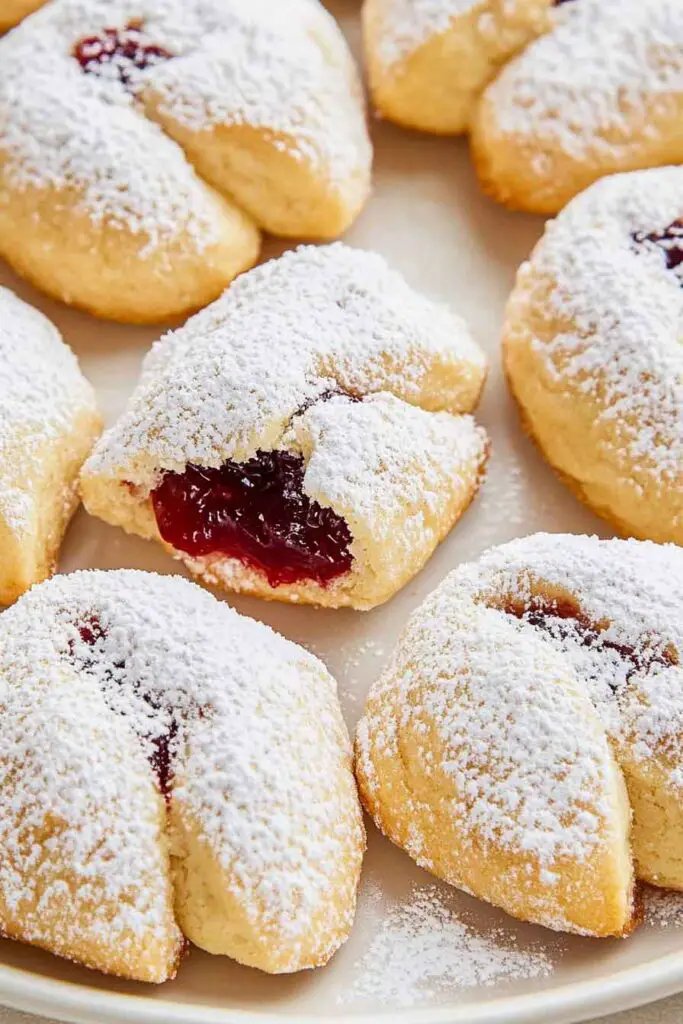
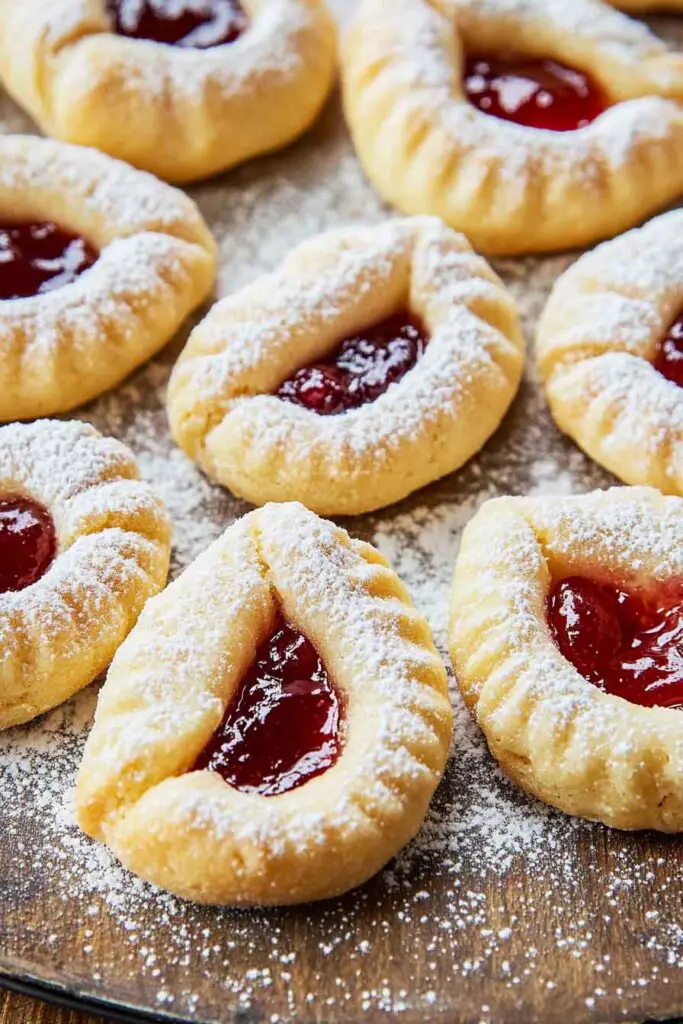
Alright, let’s talk about Pizzicati, also known as Italian Pinch Cookies. These delicate little bites are soft, buttery, and filled with sweet jam—usually raspberry, apricot, or whatever you have on hand. The dough gets gently “pinched” around the filling, giving each cookie its signature bowtie shape.
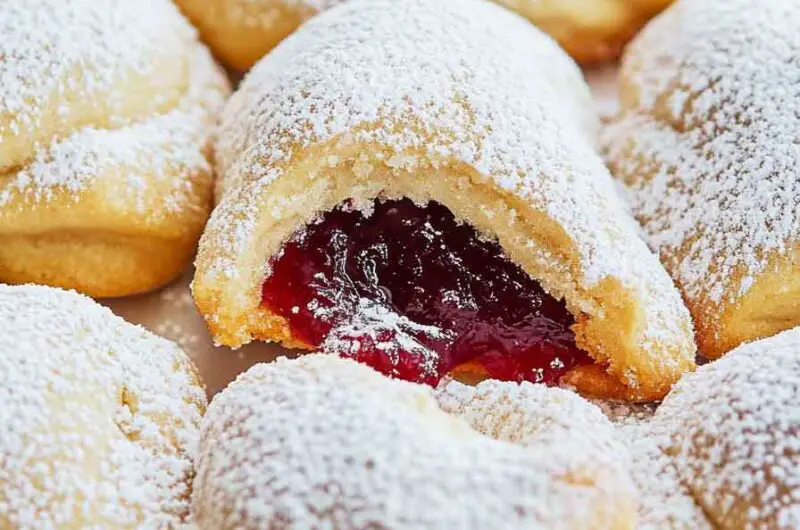
I first made them for a holiday cookie tray, and they instantly became a favorite. They’re not too sweet, melt in your mouth, and look so elegant with just a light dusting of powdered sugar. That mix of tender dough and fruity center? Absolutely perfect with a cup of tea or coffee.
And guess what? They’re surprisingly easy to make. Mix a simple butter-based dough, cut and fill each square with jam, then pinch the edges and bake until lightly golden. Let’s make a batch together—you’ll feel like you’re baking straight from Nonna’s kitchen.

Why You’ll Love This Recipe
- A Traditional Touch from Italy: These cookies are rooted in Italian home baking. They feel nostalgic, warm, and timeless.
- Melt-in-Your-Mouth Texture: Thanks to a blend of cornstarch and butter, the dough bakes into a soft, delicate cookie that isn’t overly sweet.
- Just Sweet Enough: The dough itself is subtly flavored, allowing the jam to shine as the center of attention.
- Customizable: You can fill them with nearly any jam or preserve you have at home—apricot and raspberry are classic, but even fig or orange marmalade works beautifully.
- Visually Charming: Their bow-tie shape gives them a handmade, rustic look that’s lovely on any cookie tray.
- Beginner-Friendly: No fancy techniques here—just roll, cut, spoon, pinch, and bake.
What You Need to Know Before You Start
Prep Time: 20 minutes
Chill Time: 30 minutes (very important for texture and shaping)
Bake Time: 12–14 minutes
Total Time: About 1 hour and 5 minutes

Servings:
This recipe makes approximately 24 cookies, depending on how thin you roll your dough and the size of each square or rectangle. You can easily double the batch for gatherings or gift boxes.
Difficulty Level:
Very beginner-friendly. Shaping the cookies may feel new, but the dough is forgiving and soft. No advanced baking skills needed—just gentle hands and attention to detail.
Texture:
These cookies are soft and crumbly, not chewy or crisp. They have a texture that’s closer to shortbread or butter cookies, with a tender bite and a pleasant contrast from the sticky jam center.
Required Kitchen Tools
Here’s what you’ll need to prepare and bake these cookies:
- Mixing Bowls: One large for the dough, and one medium for dry ingredients.
- Hand Mixer or Stand Mixer: For creaming the butter and egg into a smooth dough.
- Measuring Cups and Spoons: Accurate measuring helps ensure the right dough consistency.
- Zester or Fine Grater: To get the fragrant zest from your lemon.
- Rolling Pin: To roll the dough evenly.
- Sharp Knife or Pastry Cutter: For slicing the dough into neat squares or rectangles.
- Baking Sheet: Preferably light-colored for even baking.
- Parchment Paper: To prevent sticking and ensure easy cleanup.
- Small Spoon or Piping Bag: For adding the jam—too much filling will leak out, so a small tool helps with control.
- Wire Rack: To cool the cookies evenly after baking.
Ingredients for Pizzicati – Italian Pinch Cookies
These cookies use basic pantry staples, but together they create something truly special. Here’s a breakdown of each ingredient and its role:
- 1 1/2 cups (215g) all-purpose flour
The base of the cookie dough. Use the spoon-and-level method when measuring to avoid compacting the flour. - 1/4 cup (30g) powdered sugar
Powdered sugar (also known as icing sugar) makes the cookie more tender than granulated sugar. It dissolves smoothly into the dough. - 1/4 cup (30g) cornstarch
This adds softness and a melt-in-your-mouth texture. It also helps prevent the cookies from spreading too much. - 1/2 teaspoon baking powder
Just a little lift—enough to keep the dough light without puffing it up too much. These cookies are meant to be delicate. - Zest of 1 lemon
Adds a bright, aromatic note to the dough. You can substitute with orange zest if preferred, or leave it out for a more neutral flavor. - 10 tablespoons (140g) unsalted butter, at room temperature
Use good-quality butter. It provides richness and holds the dough together. Make sure it’s soft but not melted. - 1 1/2 teaspoons vanilla extract
Adds warmth and depth. A little goes a long way to enhance the dough’s flavor. - 1 large egg
Binds the ingredients and adds a bit of structure. Make sure it’s at room temperature for easier mixing. - 1/3 cup (80g) strawberry jam
Traditional pizzicati are filled with jam—choose something thick and not overly watery. Strawberry, apricot, or raspberry work well. Avoid jelly or overly runny jams, as they may leak during baking.
Variations for Pizzicati Cookies
Pizzicati are beautifully simple, but there’s plenty of room to add your own twist. Here are some ideas:
- Jam Flavors: Try apricot, raspberry, fig, orange marmalade, blueberry, or even cherry preserves. Just make sure the jam is thick enough to hold its shape during baking.
- Nutella or Chocolate Hazelnut Spread: For a more indulgent version, use a small dollop of Nutella instead of jam.
- Citrus-Flavored Dough: Replace the lemon zest with orange or lime zest to change the flavor profile.
- Add a Dusting of Powdered Sugar: Once cooled, dust the cookies lightly with powdered sugar for a traditional bakery-style finish.
- Add a Touch of Almond: Swap half the vanilla extract for almond extract for a subtle, nutty undertone.
How to Make Pizzicati Cookies (Step-by-Step Instructions)
These cookies come together quickly and easily. The dough is soft and easy to work with, and the shaping process is quite forgiving.
Step 1: Prepare the Dry Ingredients
In a medium mixing bowl, whisk together the flour, powdered sugar, cornstarch, and baking powder. Mixing these dry ingredients first ensures even distribution and prevents clumping in the dough.
Tip: Sift the powdered sugar beforehand if it looks lumpy. It’ll make your dough smoother.
Step 2: Cream the Butter
In a large bowl, add your softened butter and lemon zest. Using a hand mixer or stand mixer, beat the butter for about 1 to 2 minutes until it’s light and creamy. The lemon zest will infuse the butter with a bright fragrance.
Step 3: Add Egg and Vanilla
Crack in the egg and pour in the vanilla extract. Continue beating on medium speed until the mixture becomes pale and fluffy—about another 1 to 2 minutes.
Note: Don’t overmix at this stage. You want the ingredients combined without making the dough too airy.
Step 4: Combine Wet and Dry Mixtures
Slowly add the dry ingredients to the wet mixture in batches. Mix on low speed, just until the dough starts to come together. It will look crumbly at first but should form a soft dough after mixing.
Tip: If the dough feels sticky, lightly dust your hands with flour. If it feels too dry, add a tiny splash of milk—only if necessary.
Step 5: Chill the Dough
Shape the dough into a flattened disk, wrap it tightly in plastic wrap, and refrigerate for 30 minutes. This step is important—it helps the dough firm up, making it easier to roll and shape. It also prevents spreading during baking.
Step 6: Roll Out the Dough
After chilling, place the dough on a lightly floured surface. Roll it out to about 1/8 inch (3 mm) thick. Try to keep the thickness even across the dough.
Tip: If the dough cracks around the edges, just press it back together gently with your fingers.
Step 7: Cut and Fill
Using a knife or pastry cutter, slice the dough into rectangles or squares roughly 2×3 inches in size.
Place a small amount (about 1/2 teaspoon) of jam in the center of each rectangle.
Important: Don’t overfill. Too much jam will leak out during baking.
Step 8: Pinch to Shape
With clean, dry fingers, pinch the two long sides of each rectangle together over the jam to form a bow-tie shape. Press firmly so the dough sticks but be gentle enough not to break it.
Tip: If the dough isn’t sticking, use a tiny dab of water at the pinch point to help seal.
Step 9: Bake
Preheat your oven to 350°F (175°C) and line a baking sheet with parchment paper.
Place the cookies about 1 inch apart on the sheet. Bake for 12 to 14 minutes, or until the edges are just lightly golden. The cookies should not brown too much—they’re meant to be pale and soft.
Step 10: Cool
Allow the cookies to cool on the baking sheet for 5 minutes, then transfer them to a wire rack to cool completely.
Optional: Once cooled, dust with powdered sugar for a classic finish
Serving and Presentation Ideas
Pizzicati cookies are delicate and elegant, which makes them ideal for various occasions. Here’s how you can serve and present them:
- Tea Time or Coffee Breaks: Their light sweetness pairs beautifully with black tea, espresso, or a cappuccino. Serve a small plateful alongside your afternoon beverage.
- Holiday Cookie Platters: Their bow-tie shape adds charm to any dessert spread. Include them with other shortbread or jam-filled cookies.
- Gift Boxes or Tins: These cookies hold their shape well, so they travel nicely. Wrap them in parchment or place them in festive tins for homemade gifts.
- Dust with Powdered Sugar: Just before serving, a light dusting adds a classic, bakery-style look. It also helps elevate their presentation on platters.
Presentation Tip: Group them by jam flavor if using multiple varieties. It makes the display more colorful and organized.
Storing Pizzicati Cookies
These cookies are easy to make ahead and store. Here’s how to keep them fresh:
- Room Temperature: Store cooled cookies in an airtight container for up to 5 days. Keep them in a cool, dry place.
- Refrigeration: You can refrigerate them, but be sure they’re in a sealed container to avoid absorbing odors or moisture.
- Freezing: Unbaked dough can be frozen (wrapped well) for up to 1 month. Thaw in the refrigerator before rolling and shaping. Baked cookies can also be frozen for up to 2 months—layer them between parchment sheets in a sealed container.
Do not dust with powdered sugar before freezing. Do it after thawing for best appearance.
Tips and Tricks for Success
- Use Thick Jam: Thin or watery jam will leak during baking. If your jam is soft, chill it first or stir in a teaspoon of cornstarch.
- Don’t Skip the Chill Time: This step helps the dough roll easily and prevents spreading in the oven.
- Seal the Pinch Firmly: Press the dough edges well to hold the bow-tie shape. A tiny bit of water helps if your dough is dry.
- Handle Dough Gently: If it cracks while shaping, press it back together with clean fingers.
- Don’t Overbake: Watch the edges closely. These cookies are meant to stay pale with just a hint of golden color underneath.
Nutrition
Here’s a general breakdown of the nutritional content per cookie (based on 24 cookies and using strawberry jam). Values may vary based on jam type and actual yield.
| Nutrient | Per Cookie (approx.) |
|---|---|
| Calories | 105 |
| Total Fat | 6g |
| Saturated Fat | 3.5g |
| Cholesterol | 20mg |
| Sodium | 15mg |
| Total Carbohydrates | 12g |
| Sugars | 4g |
| Protein | 1g |
| Fiber | <1g |
These cookies are rich in butter but light on sugar compared to frosted or chocolate-filled alternatives.
Pizzicati – Italian Pinch Cookies
Course: Uncategorized24
cookies2
minutes12
minutes105
kcal30
miniutesIngredients
1 1/2 cups (215g) all-purpose flour
1/4 cup (30g) powdered sugar, plus more for dusting
1/4 cup (30g) cornstarch
1/2 teaspoon baking powder
Zest of 1 lemon
10 tablespoons (140g) unsalted butter, room temperature
1 1/2 teaspoons vanilla extract
1 egg
1/3 cup (80g) strawberry jam (or apricot, raspberry, fig, etc.)
Directions
- Mix Dry Ingredients: In a bowl, whisk flour, powdered sugar, cornstarch, and baking powder. Set aside.
- Cream Butter: In a large bowl, beat softened butter and lemon zest until creamy and light, about 1–2 minutes.
- Add Egg and Vanilla: Mix in the egg and vanilla extract until smooth and fluffy.
- Combine Dough: Gradually add dry ingredients to the wet, mixing just until a soft dough forms.
- Chill: Flatten the dough into a disk, wrap in plastic, and refrigerate for 30 minutes.
- Roll and Cut: Roll dough on a lightly floured surface to 1/8-inch thickness. Cut into 2×3-inch rectangles.
- Fill and Pinch: Place 1/2 tsp jam in the center of each rectangle. Pinch the two long sides together to form a bow-tie shape.
- Bake: Place cookies on a parchment-lined baking sheet and bake at 350°F (175°C) for 12–14 minutes, or until edges are just lightly golden.
- Cool: Let cool for 5 minutes on the sheet, then transfer to a rack. Once cooled, dust with powdered sugar if desired.
Pizzicati Cookie FAQs
Can I make the dough ahead of time?
Yes, the dough can be made up to 2 days in advance. Keep it wrapped in the fridge and allow to soften slightly before rolling.
Can I freeze the cookies?
Yes. Baked cookies can be frozen in an airtight container for up to 2 months. Freeze unbaked dough for later use too.
My cookies lost their shape—what went wrong?
The dough may have been too warm, or the jam too runny. Make sure to chill the dough and use a thick jam.
Is powdered sugar necessary for dusting?
Not at all—it’s optional, but it does enhance the appearance and gives a classic finish.
Can I use gluten-free flour?
Yes, a 1:1 gluten-free flour blend should work. Expect slightly more fragile cookies.
Conclusion
Pizzicati cookies bring a quiet elegance to the dessert table—simple, buttery, and filled with just the right amount of sweetness. Whether you’re baking for a holiday tray or a quiet afternoon treat, they’re a joy to make and even better to share.
Their nostalgic, handmade shape and gentle flavor make them a staple in Italian home baking, and once you’ve tried them, they just might become a favorite in your kitchen too.