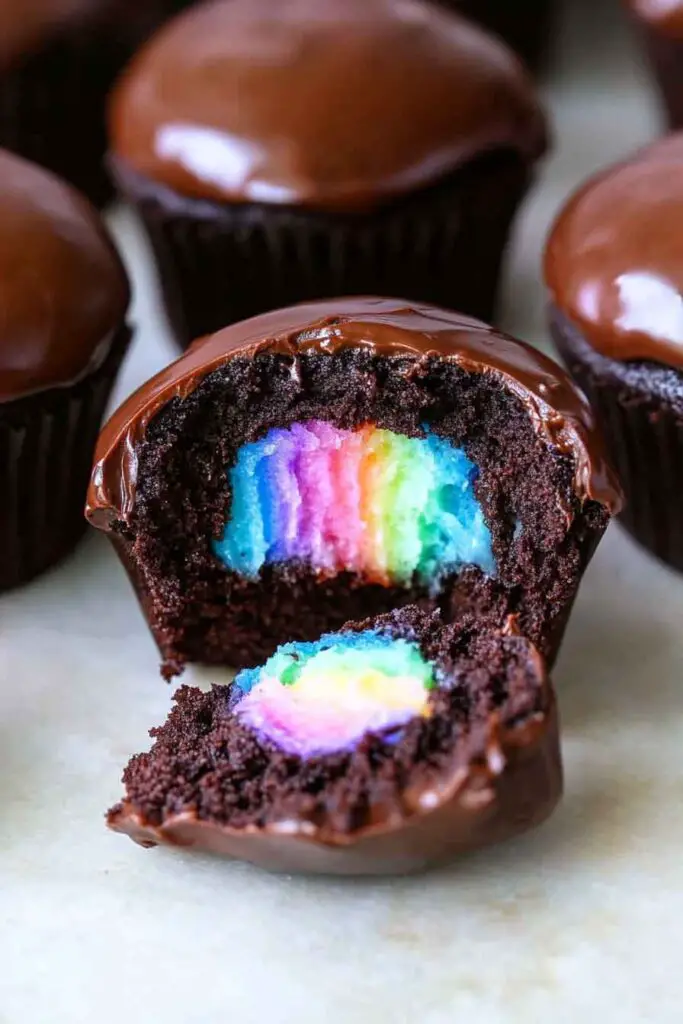
Magical Chocolate Rainbow Cupcakes
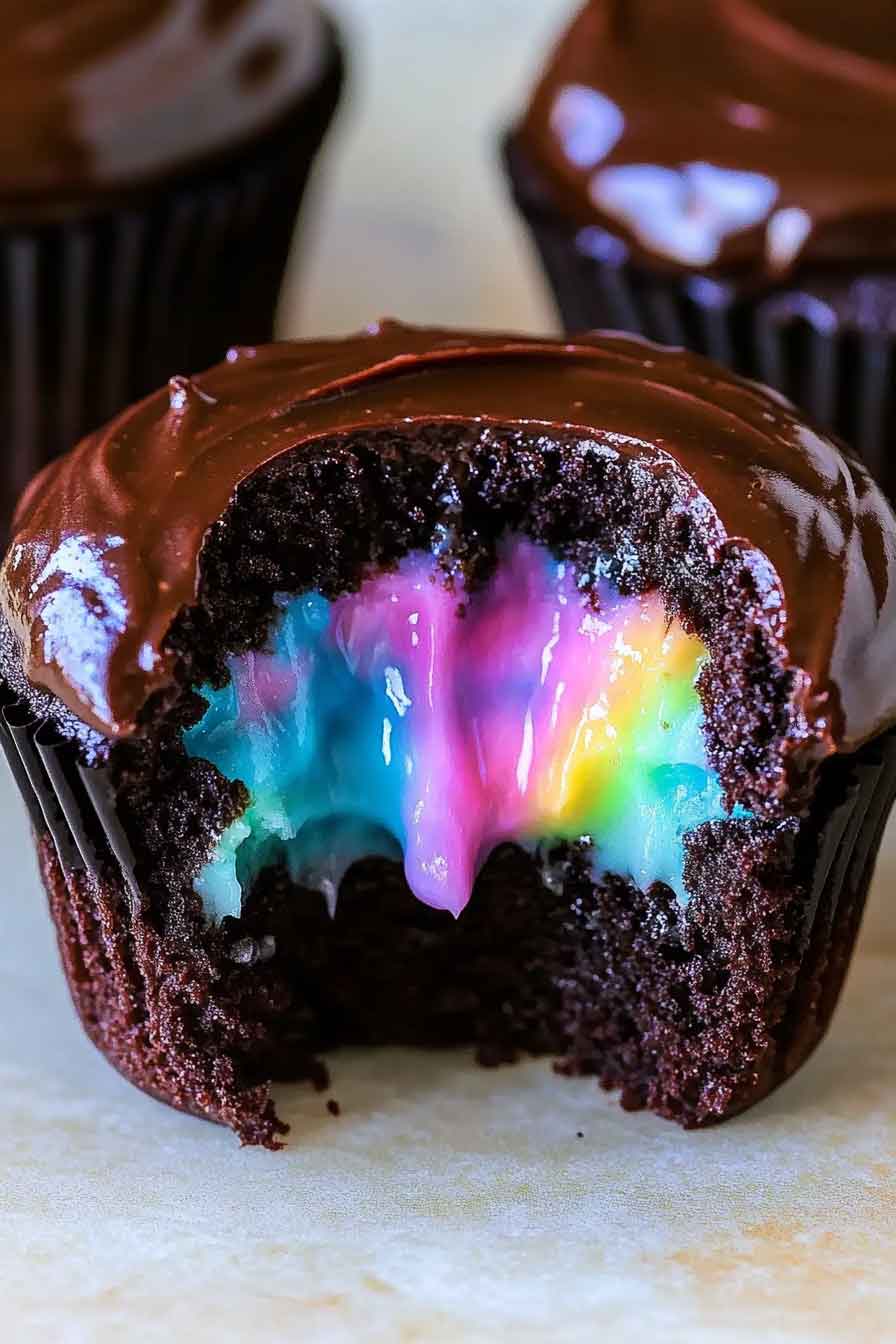
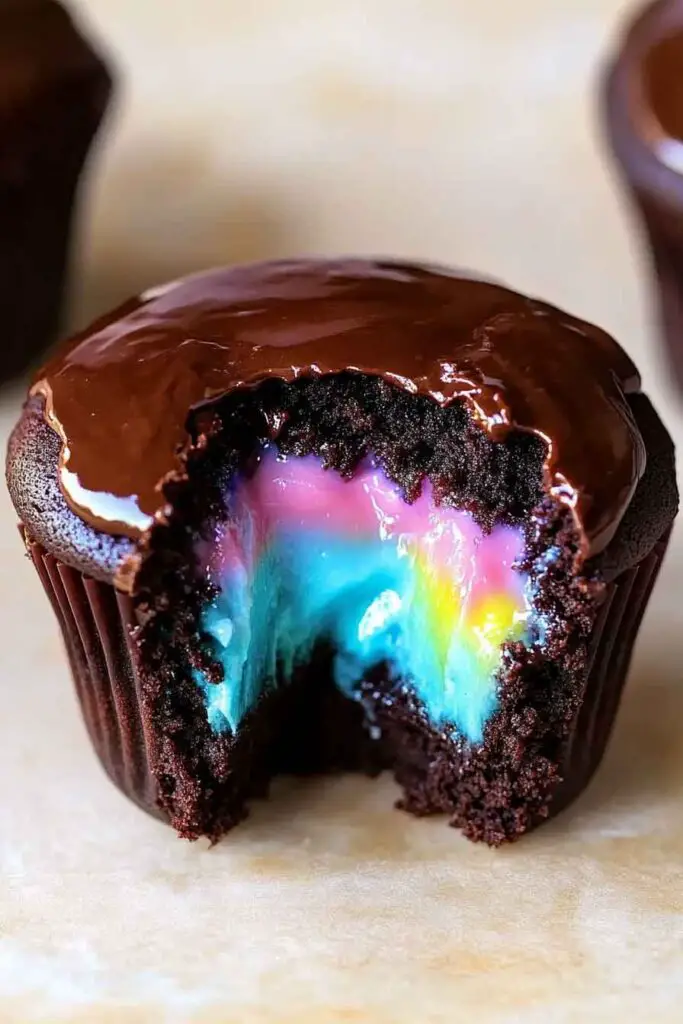
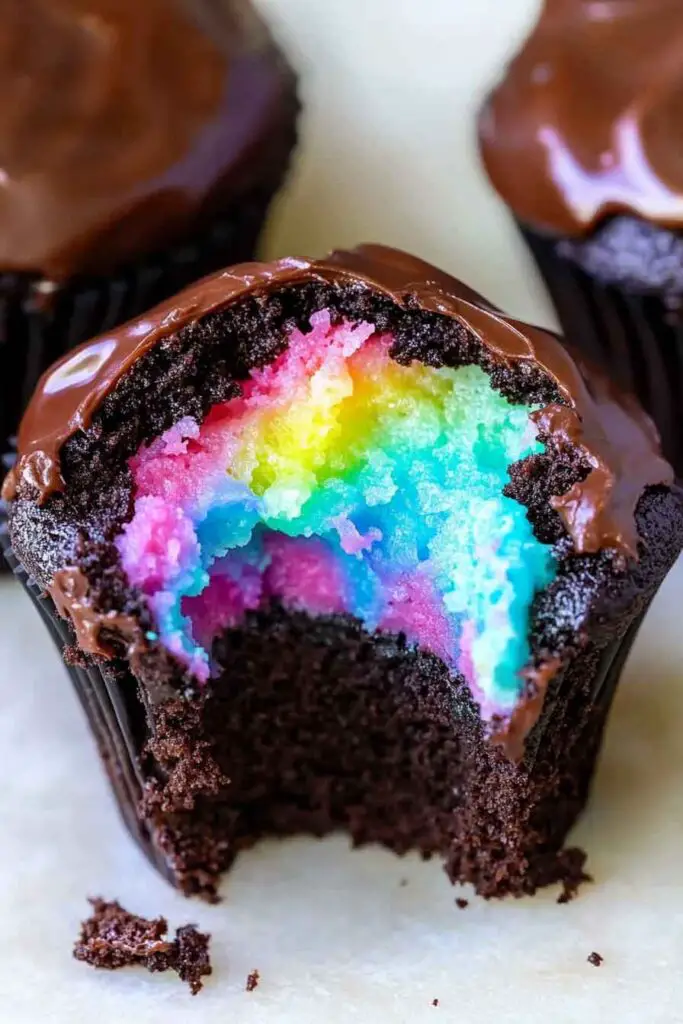
Alright, these Magical Chocolate Rainbow Cupcakes? They’re everything you love about rich, fudgy chocolate cupcakes—with a colorful, cheerful twist that makes them feel extra special. Think moist chocolate cake topped with fluffy rainbow swirls of frosting, finished off with sprinkles and sparkle. Yeah, they’re that fun.
I made them for a birthday party, and everyone’s eyes lit up the second they saw them. The chocolate is deep and decadent, but the rainbow frosting adds that playful vibe that makes them perfect for celebrations, kids’ parties, or honestly, just a good day in need of something sweet.
The best part? They’re simple to make and even more fun to decorate. Bake the cupcakes, tint the frosting with a few bright gel colors, and pipe those beautiful swirls right on top. Let’s bake them together—you’re gonna love how magical they look and taste!

Why You’ll Love This Recipe
- Fun to Make & Eat: Kids and adults alike love the hidden burst of rainbow frosting inside. It’s not just delicious—it’s a joyful surprise.
- Moist Chocolate Cupcake Base: A simple batter with oil and applesauce keeps the cupcakes light and tender without being greasy or dry.
- Minimal Equipment: You don’t need a stand mixer or fancy tools. A whisk, bowls, and a muffin tin will do.
- Great for Parties: These cupcakes are eye-catching, easy to hold, and perfect for events where you want to impress without spending hours in the kitchen.
- Versatile: You can make the frosting from scratch or use your favorite store-bought vanilla frosting and tint it with gel colors. Either way, the effect is delightful.
What You Need to Know Before You Start
Timing
- Prep Time: 20 minutes (including mixing and setting up ingredients)
- Bake Time: 20–22 minutes (depending on your oven)
- Cooling Time: 20 minutes before filling and frosting
- Decorating Time: 20–25 minutes for piping, filling, and decorating
- Total Time: About 1 hour and 10 minutes
Servings
This recipe makes 12 standard cupcakes. You can easily double the recipe for larger gatherings, but don’t overcrowd the oven—bake in batches if needed.
Difficulty Level
This recipe is easy, making it perfect for beginners or even baking with kids. The most fun part is decorating, where creativity shines. The only real technique required is filling the cupcakes using a piping bag or zip-top bag, and even that is very forgiving.
Required Kitchen Tools
Before you begin, make sure you have the following tools ready:
- 2 Mixing Bowls: One large for wet ingredients, one medium for dry ingredients.
- Whisk or Silicone Spatula: To gently mix ingredients without overbeating the batter.
- Measuring Cups and Spoons: Precision matters for baking.
- Standard 12-Cup Muffin Tin: You’ll need this for baking the cupcakes. Line it with cupcake liners.
- Cupcake Liners: Paper or silicone liners help the cupcakes release cleanly.
- Toothpick or Cake Tester: To check if the cupcakes are fully baked.
- Cooling Rack: Essential for letting cupcakes cool without becoming soggy underneath.
- Piping Bags or Zip-Top Bags: For filling the center of the cupcakes with frosting and decorating the tops.
- Small Bowls & Spoons: If you’re coloring your own frosting, you’ll need separate bowls for each color.
- Gel Food Coloring: Preferred over liquid for more vibrant color without thinning the frosting.
Ingredients for the Chocolate Cupcake Base
Each ingredient plays a key role in creating soft, fluffy cupcakes that aren’t too sweet or too dense:
- 3/4 cup water: Warm water helps bloom the cocoa powder, enhancing the chocolate flavor.
- 1/4 cup applesauce or yogurt: Keeps the cupcakes moist without needing a lot of fat. Applesauce gives a more neutral flavor, while yogurt adds a slight tang.
- 1/4 cup oil (vegetable or any neutral oil): Oil gives the cupcakes tenderness and helps them stay soft even after a day or two.
- 2 teaspoons pure vanilla extract: Adds warmth and balances the chocolate.
- 1 teaspoon white or apple cider vinegar: Reacts with baking soda to give the cupcakes lift.
- 1 cup all-purpose flour: Spoon and level to avoid packing too much, which could make cupcakes dense. You can also use a 1:1 gluten-free blend.
- 3/4 cup granulated sugar: Sweetens the batter just right without making it cloying.
- 1/4 cup + 2 tablespoons unsweetened cocoa powder: Choose Dutch-processed for a darker, smoother flavor, or natural cocoa for a lighter, more acidic profile.
- 1/2 cup mini chocolate chips (optional): These melt slightly and create little pockets of gooey richness inside the cupcake.
- 1/2 teaspoon + 1/8 teaspoon salt: Enhances all the flavors and balances sweetness.
- 1/2 teaspoon baking soda: The main leavening agent—activated by vinegar to make the cupcakes rise.
Ingredients for the Rainbow Filling and Decoration
This is where the magic happens. The filling and frosting are colorful, sweet, and endlessly customizable:
- 1/2 cup pre-made rainbow unicorn dip or vanilla frosting: If you want to make your own, a simple buttercream or cream cheese frosting works well too.
- Gel food coloring: You’ll divide the frosting into separate bowls and tint each portion a different color (red, orange, yellow, green, blue, and purple work beautifully).
- Melted chocolate, extra frosting, or sprinkles (for topping): Once the cupcakes are filled, decorate the tops however you like. Kids love rainbow sprinkles, while adults might prefer a drizzle of dark chocolate or a soft frosting swirl.
How to Make Magical Chocolate Rainbow Cupcakes – Step-by-Step Instructions
Let’s break it down into simple, manageable steps so your baking process is smooth and enjoyable from start to finish.
Step 1: Preheat and Prep
Preheat your oven to 350°F (177°C).
Line a standard 12-cup muffin tin with paper or silicone cupcake liners. This helps the cupcakes release easily and makes cleanup a breeze.
Step 2: Mix the Wet Ingredients
In a large mixing bowl, whisk together:
- 3/4 cup warm water
- 1/4 cup applesauce or yogurt
- 1/4 cup oil
- 2 teaspoons vanilla extract
- 1 teaspoon vinegar
Mix until the ingredients are well combined. The mixture will be slightly cloudy and thin—this is completely normal.
Step 3: Combine the Dry Ingredients
In a separate medium bowl, sift or whisk together:
- 1 cup flour
- 3/4 cup sugar
- 1/4 cup + 2 tablespoons cocoa powder
- 1/2 teaspoon baking soda
- 1/2 teaspoon + 1/8 teaspoon salt
You want to break up any clumps in the cocoa powder and ensure even distribution of the leavening agents and salt.
Step 4: Make the Batter
Slowly add the dry ingredients into the bowl with the wet ingredients. Use a whisk or spatula to stir gently until just combined. Be careful not to overmix—this can make the cupcakes tough instead of soft and fluffy.
Optional: Fold in 1/2 cup mini chocolate chips if using.
The batter will be thinner than traditional cake batter. This is normal—it leads to moist, light cupcakes.
Step 5: Fill the Cupcake Liners
Use a spoon or small scoop to divide the batter evenly among the 12 cupcake liners, filling each about 2/3 full. Avoid overfilling or they may overflow while baking.
Step 6: Bake
Place the muffin tin in the center rack of your preheated oven and bake for 20 to 22 minutes.
To check doneness, insert a toothpick into the center of a cupcake. If it comes out clean (or with just a crumb or two), they’re done.
Step 7: Cool the Cupcakes
Remove the cupcakes from the oven and allow them to cool in the pan for 5 minutes. Then transfer them to a wire cooling rack and cool completely before filling or frosting. Warm cupcakes can melt the frosting and make the colors run.
Step 8: Prepare the Rainbow Filling
If using store-bought vanilla frosting or unicorn dip, divide it evenly into 6 small bowls. Add a tiny drop of gel food coloring to each:
- Red
- Orange
- Yellow
- Green
- Blue
- Purple
Mix each bowl well until the color is vibrant and even. For more pastel tones, use just a trace of coloring.
Once mixed, spoon each colored frosting into a piping bag or a zip-top bag, placing them side by side in one larger piping bag to create a rainbow swirl when piped. (Alternatively, spoon small dabs of each color into one bag without mixing for a marbled effect.)
Step 9: Fill the Cupcakes
Once your cupcakes are completely cooled:
- Use a small paring knife or a cupcake corer to cut a shallow circle (about 1 inch wide and 1 inch deep) out of the center of each cupcake.
- Remove the core and set aside (you can snack on these or discard).
- Insert the tip of your rainbow frosting bag into the hole and pipe enough frosting to just fill the center.
Step 10: Decorate the Tops
Now for the final touch—frost and decorate however you like:
- Pipe a simple swirl of rainbow frosting on top using a star tip.
- Add a drizzle of melted chocolate for contrast.
- Finish with rainbow sprinkles, confetti, or edible glitter for sparkle.
Let your creativity shine. Each cupcake will have its own colorful charm.
Serving and Decoration Ideas
These cupcakes are meant to be fun and colorful—perfect for birthdays, parties, or even a cozy afternoon treat. Here are some ideas to serve and present them:
- Birthday-Ready: Top each cupcake with a birthday candle or mini flag.
- Rainbow Party Tray: Arrange cupcakes in rainbow order on a large platter.
- Minimalist Style: Use white frosting on top and let the colorful center be the surprise.
- For Kids’ Events: Add fun toppers like small candy rainbows, marshmallows, or unicorn picks.
Pair these with a glass of cold milk or a warm mug of cocoa for a comforting treat.
How to Store Magical Chocolate Rainbow Cupcakes
To keep cupcakes fresh and fluffy, follow these storage tips:
- Room Temperature: Store in an airtight container for up to 2 days. If it’s warm or humid, refrigerate.
- Refrigeration: Keep in the fridge up to 4–5 days. Let them come to room temperature before serving for the best texture.
- Freezing: Cupcakes (without frosting) can be frozen for up to 2 months. Wrap individually in plastic wrap and place in a freezer-safe container. Thaw before filling and decorating.
If frosting ahead of time, avoid stacking them—place in a single layer in a deep container.
Tips and Tricks for Success
Even simple recipes benefit from a few chef-approved tricks:
- Don’t Overmix: Gently fold the ingredients to keep the texture light and airy.
- Use Gel Food Coloring: It gives vibrant color without watering down the frosting.
- Cool Completely: Always cool cupcakes before decorating—frosting on a warm cupcake can slide right off.
- Even Bake: Rotate the muffin tin halfway through baking if your oven has hot spots.
- Customize Colors: Swap in school/team colors, holiday themes, or pastel shades for Easter.
These cupcakes are very forgiving and open to creativity. Trust your eye and have fun with it.
Nutrition (Per Cupcake, Approximate)
| Nutrient | Amount |
|---|---|
| Calories | 220 kcal |
| Total Fat | 9 g |
| Saturated Fat | 2 g |
| Carbohydrates | 33 g |
| Sugar | 20 g |
| Fiber | 2 g |
| Protein | 2 g |
| Sodium | 180 mg |
| Cholesterol | 0 mg |
Note: Nutritional values may vary slightly based on brand of ingredients used and amount of frosting added.

Magical Chocolate Rainbow Cupcakes
Course: Cake Recipes12
standard cupcakes20
minutes20
minutes220
kcal25
miniutesIngredients
For the Cupcakes:
3/4 cup warm water
1/4 cup unsweetened applesauce or plain yogurt
1/4 cup neutral oil (vegetable, canola, etc.)
2 teaspoons pure vanilla extract
1 teaspoon white or apple cider vinegar
1 cup all-purpose flour (or 1:1 gluten-free blend)
3/4 cup granulated sugar
1/4 cup + 2 tablespoons unsweetened cocoa powder
1/2 cup mini chocolate chips (optional)
1/2 teaspoon + 1/8 teaspoon salt
1/2 teaspoon baking sodaFor the Rainbow Filling & Topping:
1/2 cup pre-made unicorn dip or vanilla frosting
Gel food coloring (6 colors: red, orange, yellow, green, blue, purple)
Melted chocolate, extra frosting, or sprinkles for topping
Directions
- Preheat oven to 350°F (177°C). Line a standard muffin tin with cupcake liners.
- In a large bowl, whisk water, applesauce or yogurt, oil, vanilla, and vinegar until well combined.
- In a separate bowl, sift together flour, sugar, cocoa powder, salt, and baking soda. Gently add to the wet mixture and stir until just combined. Fold in chocolate chips if using.
- Fill each cupcake liner about 2/3 full. Bake for 20–22 minutes or until a toothpick comes out clean.
- Cool for 5 minutes in the pan, then transfer to a wire rack and cool completely.
- Divide frosting into 6 bowls and color each with gel food coloring. Spoon side-by-side into a piping bag or layer by spooning colors one by one.
- Core each cooled cupcake and pipe in a swirl of rainbow frosting. Optionally frost the tops and decorate with chocolate or sprinkles.
Magical Cupcake FAQs
Can I use boxed cake mix?
Yes, you can substitute the cupcake portion with your favorite chocolate cake mix if short on time. Just skip to the filling and decorating steps.
Do I need a cupcake corer?
Not at all. A small spoon or paring knife works just fine to remove the center.
Can I make these gluten-free or vegan?
Yes. Use a 1:1 gluten-free flour blend. For vegan, use applesauce instead of yogurt and ensure all ingredients (including chocolate chips and frosting) are dairy-free.
What if I don’t have piping bags?
A zip-top plastic bag with the corner snipped off works perfectly.
Conclusion
Magical Chocolate Rainbow Cupcakes are the kind of treat that sparks joy the moment you take a bite. They look like a classic chocolate cupcake on the outside—but once you get to the center, a burst of rainbow color surprises and delights. With an easy batter, a soft crumb, and a customizable design, this recipe is perfect for celebrations or rainy days when you want to add a little color to your kitchen.