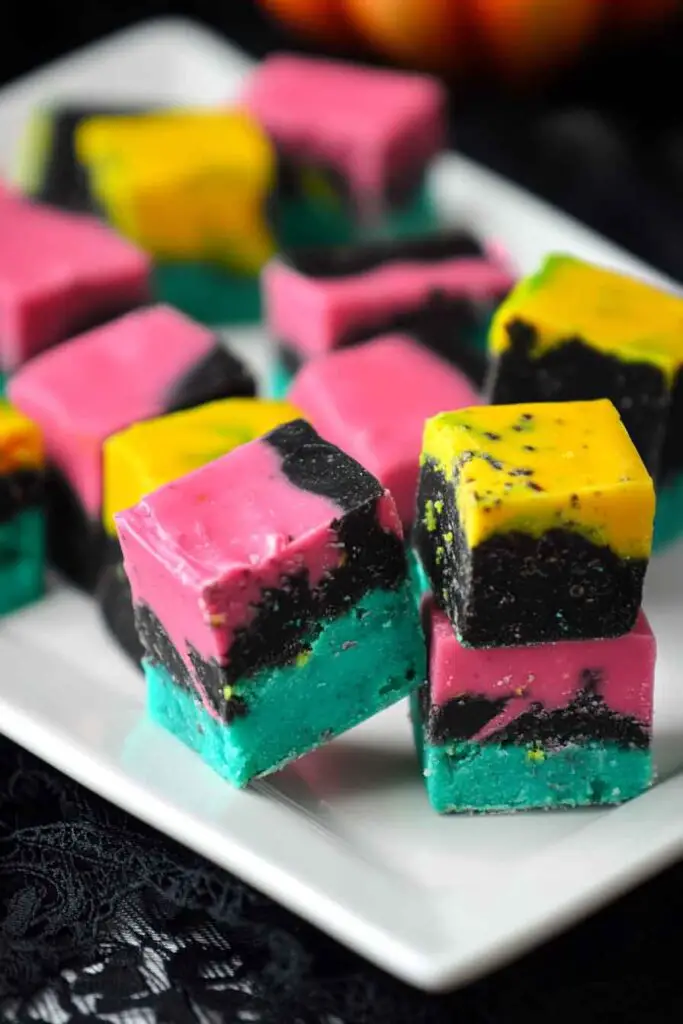
Colorful Halloween Fudge
The first time I made this Colorful Halloween Fudge, the kitchen smelled like vanilla and chocolate magic.
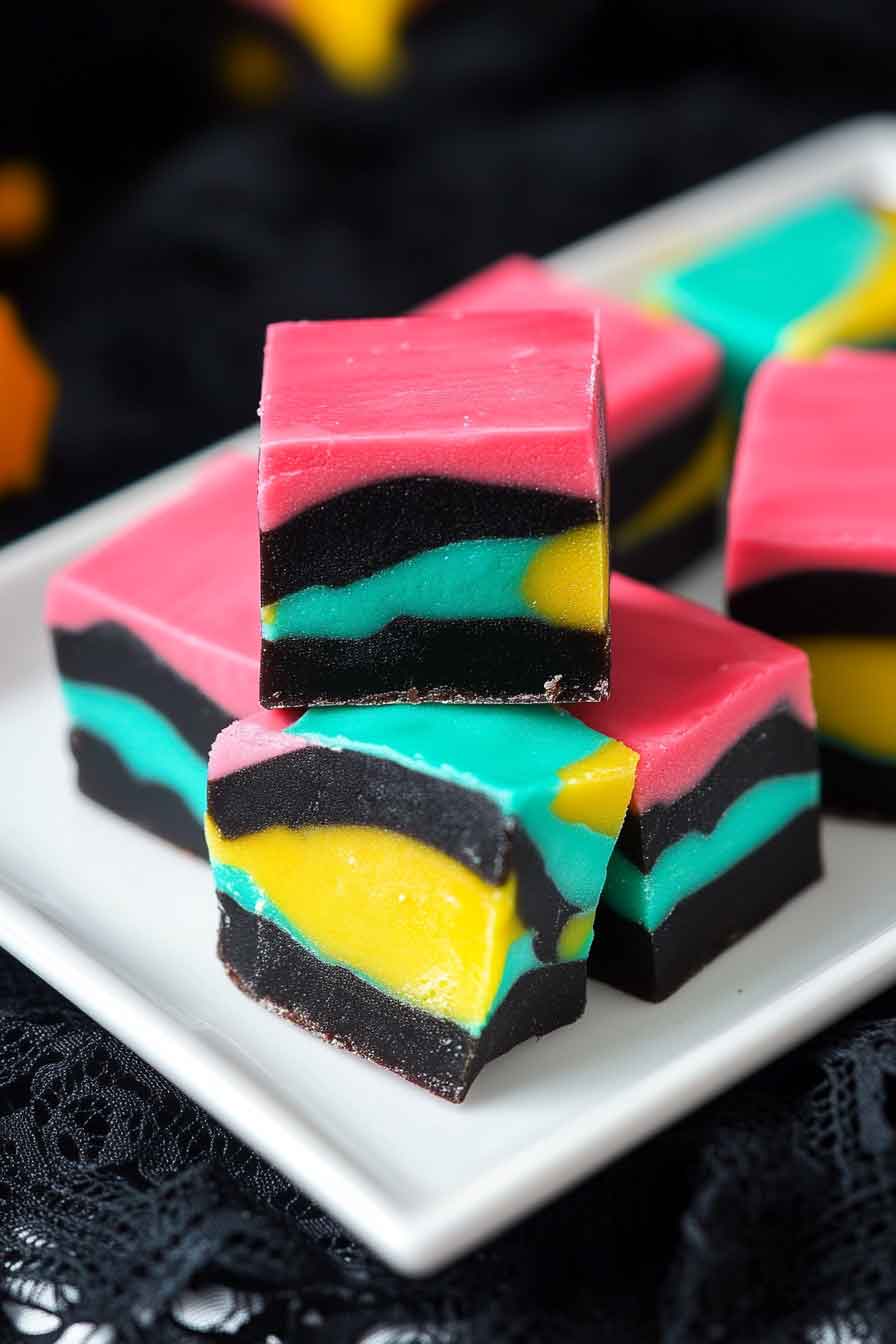
Bright orange, purple, and green swirls danced through the creamy layers—it looked like a party in every bite.
I remember my friends grabbing pieces before it even cooled.
This fudge is soft, sweet, and full of Halloween fun.
It’s the kind of treat that makes your dessert table pop with color and smiles.
Let’s whip it up together—you’ll love how easy and festive it turns out.

Why You’ll Love This Recipe
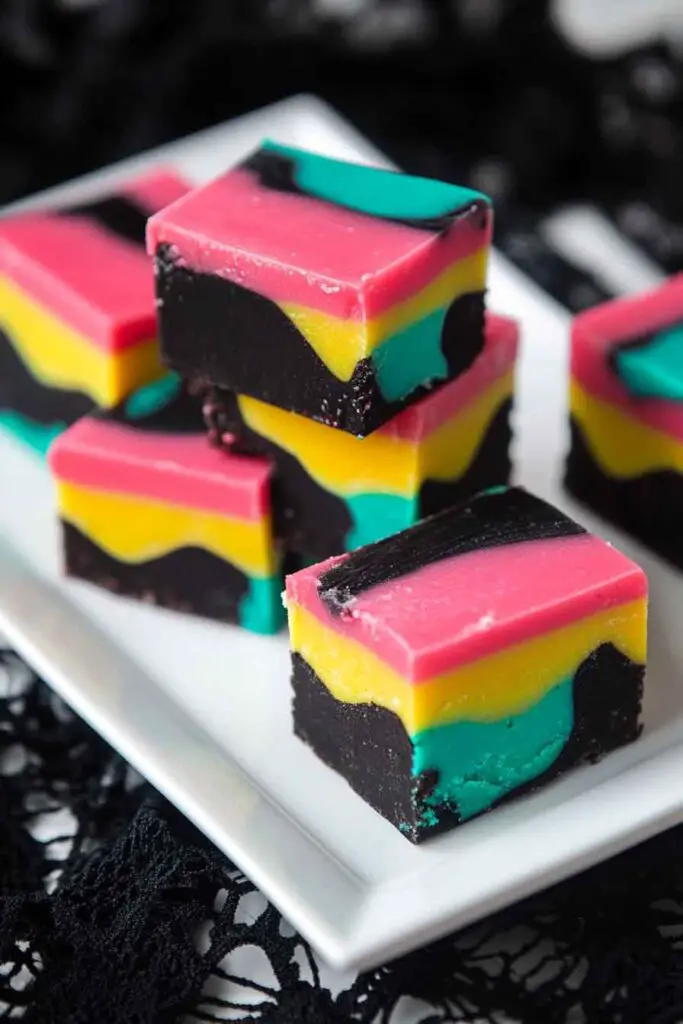
- Halloween-Ready Presentation: The swirling mix of colors makes each square look like it came straight from a candy shop. Kids and guests love the bold, bright layers—no two pieces look the same.
- Beginner-Friendly: No special tools or cooking skills needed. This fudge skips tricky candy thermometers or stovetop boiling. If you can microwave chocolate and stir, you can make this recipe.
- Versatile & Customizable: Change up the colors, add Halloween sprinkles, or tuck in a surprise layer of crushed cookies or marshmallows. This fudge is endlessly adaptable for spooky fun.
- Make-Ahead Magic: Make this fudge several days in advance and keep it in the fridge until party time. It cuts cleanly and stores well, making it a fantastic addition to dessert boards or goodie bags.
- Crowd-Pleaser: Whether you’re serving this to toddlers or adults, it’s a festive, melt-in-your-mouth treat that gets compliments every time.
What You Need to Know Before You Start
Prep Time & Chill Time:
- Prep Time: 20 minutes — this includes melting, mixing, dividing, and swirling
- Chill Time: 3 hours minimum — long enough for the fudge to fully set
- Total Time: About 3 hours 20 minutes (but active work is only 20 minutes)
This fudge sets firm but creamy, and the longer it chills, the easier it is to slice cleanly.
Servings:
This recipe yields 36 small squares when cut from an 8×8-inch pan. Want larger pieces? Cut into 16 or 25 instead. Need more for a crowd? Double the batch and use a 9×13-inch pan.
Difficulty Level:
Very Easy — This is a true beginner’s fudge recipe. It’s safe for kids to help with too (just supervise the microwave). There’s no boiling, tempering, or complicated steps.
Required Kitchen Tools
You likely already have everything you need in your kitchen:
- 8×8 or 9×9 square baking dish – lined with parchment paper for easy lifting
- Microwave-safe bowl – for melting chocolate, butter, and milk
- Heatproof spatula or silicone spoon – to stir and scrape the mixture cleanly
- 4–5 small bowls – for dividing the fudge base and tinting each portion with food coloring
- Toothpicks or wooden skewers – for swirling the colors together
- Offset spatula or back of a spoon – to smooth the top before chilling
Optional but helpful:
- Measuring scale (for precise chocolate chip measurement)
- Gloves for kids to help with coloring
Ingredients for Colorful Halloween Fudge
Here’s what you’ll need to make this simple, eye-catching fudge. All ingredients are pantry staples except for the gel food coloring, which is available in most baking aisles or craft stores.
- 3 cups white chocolate chips (about 540g)
→ Use high-quality chips (like Ghirardelli or Nestlé) for best melting and flavor. - 1 (14 oz) can sweetened condensed milk
→ This gives the fudge its smooth, creamy texture and sweetness. - 4 tablespoons unsalted butter
→ Adds richness and makes the fudge a bit softer and more velvety. - 1 teaspoon pure vanilla extract
→ Enhances the flavor and balances out the sweetness of the white chocolate. - Gel food coloring – Suggested Halloween shades:
- Orange
- Purple
- Teal or Green
- Yellow
- Black
Optional Add-Ins:
- Halloween sprinkles, candy eyeballs, edible glitter
- Crushed cookies, mini marshmallows, or nuts (folded in after coloring)
These extras aren’t necessary, but they can make your fudge more fun and festive depending on your style.
Variations for Colorful Halloween Fudge
- Go Monochrome: Use just 2–3 colors for a more minimalist Halloween look (e.g., black and orange only).
- Add a Surprise Center: Spread half the fudge, sprinkle with crushed Oreos or mini marshmallows, then top with the rest.
- Add Texture: Stir chopped pretzels or peanuts into one color for a salty-sweet crunch.
- Flavor It Differently: Swap vanilla for almond extract, peppermint extract, or even orange oil for something unexpected.
- Holiday Swap: Change the colors and make this recipe for Christmas (red/green), Valentine’s Day (red/pink/white), or Easter (pastels).
How to Make Colorful Halloween Fudge: Step-by-Step Instructions
1. Prep Your Pan
Line an 8×8 or 9×9-inch square baking dish with parchment paper. Let the paper hang over the edges so you can lift the fudge out easily later. Lightly butter or spray the paper if your chocolate tends to stick.
2. Melt the Base
In a large microwave-safe bowl, combine:
- 3 cups white chocolate chips
- 1 (14 oz) can sweetened condensed milk
- 4 tablespoons butter
Microwave in 30-second intervals, stirring well after each. It usually takes about 1½ to 2 minutes total. The mixture should be smooth and creamy with no lumps.
Tip: Don’t overheat the chocolate. Stop when a few chips remain and stir to finish melting.
3. Add Vanilla
Once melted and smooth, stir in:
- 1 teaspoon vanilla extract
Mix until the vanilla is fully incorporated. The base should now be thick and pourable.
4. Divide and Color
Divide the fudge into 4–5 small bowls. Use a spoon to scoop equal amounts into each.
Add a small drop of gel food coloring to each bowl:
- Orange
- Purple
- Teal or green
- Yellow
- Black
Mix each bowl well until the color is vibrant and evenly distributed. Use separate spoons for each color to avoid blending.
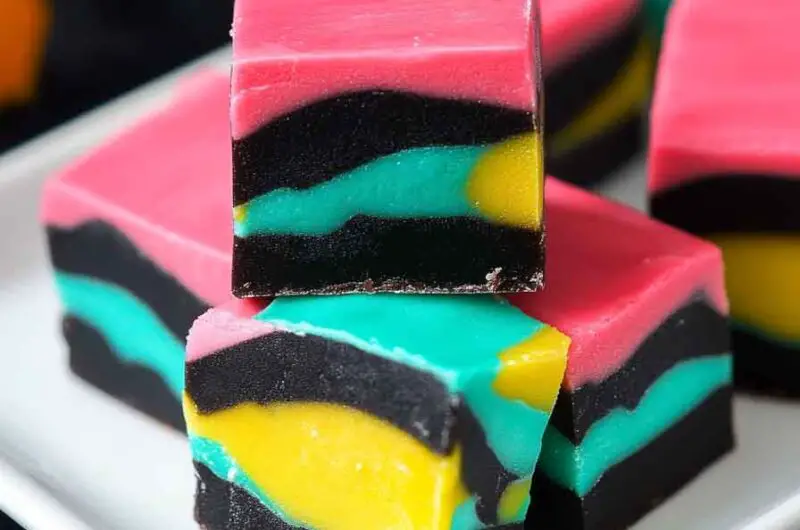
5. Layer and Swirl
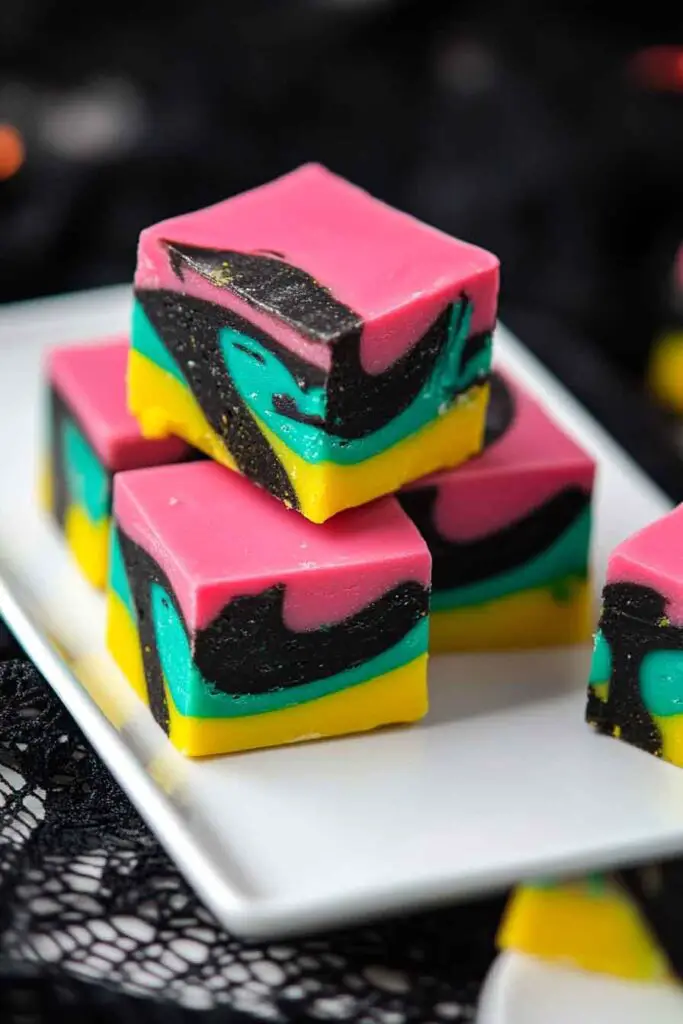
Spoon dollops of each colored fudge randomly into your prepared pan—try layering different colors side by side and on top of each other for dimension.
Once all the fudge is in the pan, use a toothpick or skewer to swirl the colors gently. Drag the tip through the fudge in curvy, looping motions. Don’t overmix—you want distinct swirls, not muddy colors.
Optional: Sprinkle candy eyeballs or Halloween sprinkles on top before chilling.
6. Chill to Set
Place the pan in the refrigerator for at least 3 hours, or until fully set. For best results, chill overnight.
Serving and Decoration
How to Serve Colorful Halloween Fudge
- Classic Squares: Once firm, lift the fudge out using the parchment paper. Cut into 1-inch squares using a sharp knife.
- Mini Bites: Cut smaller pieces and place them in mini cupcake liners for party platters.
- Gift-Ready: Wrap pieces in wax paper or cellophane bags tied with Halloween ribbon.
🎃 Decoration Tips:
- Top each piece with a candy eye for a spooky touch.
- Drizzle with melted dark chocolate for extra contrast.
- Dust with edible glitter for sparkle.
Storing Colorful Halloween Fudge
- Refrigerator: Store in an airtight container for up to 2 weeks. Keep layers separated with wax paper.
- Freezer: Wrap pieces individually in wax paper, then seal in a freezer bag or airtight container. Freeze up to 2 months. Thaw in the fridge before serving.
- Room Temp: Okay for short periods (up to 2 days) if your kitchen is cool.
Tips and Tricks for Success
- Use gel food coloring—not liquid. Gel gives stronger color without messing up texture.
- Avoid over-swizzling. A few gentle swirls give you a prettier result than overmixing.
- Let the fudge sit before swirling. If it’s too warm, the colors can run together too quickly.
- Line your pan properly. It makes cutting and removing fudge much easier.
- Cut with a warm knife. Run your knife under hot water, dry it, then slice clean squares.
Nutrition
Below is an approximate nutrition breakdown per square (based on 36 pieces from one 8×8-inch pan):
| Nutrient | Amount |
|---|---|
| Calories | 140 kcal |
| Total Fat | 7 g |
| Saturated Fat | 4.5 g |
| Carbohydrates | 18 g |
| Sugars | 17 g |
| Protein | 1.5 g |
| Fiber | 0 g |
| Sodium | 25 mg |
| Cholesterol | 8 mg |
Note: Values may vary slightly depending on the specific brands used.
Colorful Halloween Fudge
36
squares20
minutes140
kcal3
hourIngredients
3 cups (540g) white chocolate chips
1 (14 oz) can sweetened condensed milk
4 tablespoons unsalted butter
1 teaspoon vanilla extract
Gel food coloring (orange, purple, teal, yellow, black)
- Optional: Halloween sprinkles, candy eyes, crushed Oreos
Directions
- Prep the Pan:
Line an 8×8-inch square pan with parchment paper. Leave an overhang for easy lifting later. - Melt the Base:
In a large microwave-safe bowl, combine white chocolate chips, condensed milk, and butter. Microwave in 30-second bursts, stirring in between, until smooth (about 1½–2 minutes total). Stir in vanilla. - Color the Fudge:
Divide mixture evenly into 4–5 small bowls. Add gel coloring to each and mix well to create vibrant Halloween colors. - Layer & Swirl:
Drop spoonfuls of each color randomly into the pan. Use a skewer or toothpick to swirl gently. - Decorate (Optional):
Sprinkle with candy eyes, Halloween sprinkles, or edible glitter. - Chill:
Refrigerate for at least 3 hours, or until set. Lift out and slice into 1-inch squares.
Colorful Halloween Fudge FAQs
Can I use food coloring drops instead of gel?
It’s not recommended. Gel food coloring creates bold colors with just a drop or two. Liquid drops can water down the fudge and give weaker color results.
Can I use white chocolate bars instead of chips?
Yes. Just chop them finely so they melt evenly. Use about 540g (or 18 oz) total.
What if my fudge doesn’t set?
Make sure it’s chilled long enough—at least 3 hours. If it still feels soft, try freezing it briefly. Also, using too much liquid (from watery coloring) can affect the texture.
Can kids help make this?
Absolutely. It’s a fun recipe for kids to join in. Let them choose the colors, swirl the fudge, or add sprinkles. Just be sure to handle the hot bowl and melted chocolate for them.
How long does this fudge last?
Stored in the fridge, it’ll keep fresh for up to 2 weeks. You can freeze leftovers for up to 2 months.
Conclusion
Colorful Halloween Fudge is a quick and magical treat that brings the spooky spirit straight to your dessert table. With just 5 basic ingredients and a splash of creativity, you get a soft, creamy, and swirly fudge that looks just as good as it tastes. Whether you’re baking with kids, prepping for a party, or wrapping up homemade Halloween gifts, this recipe fits right in.