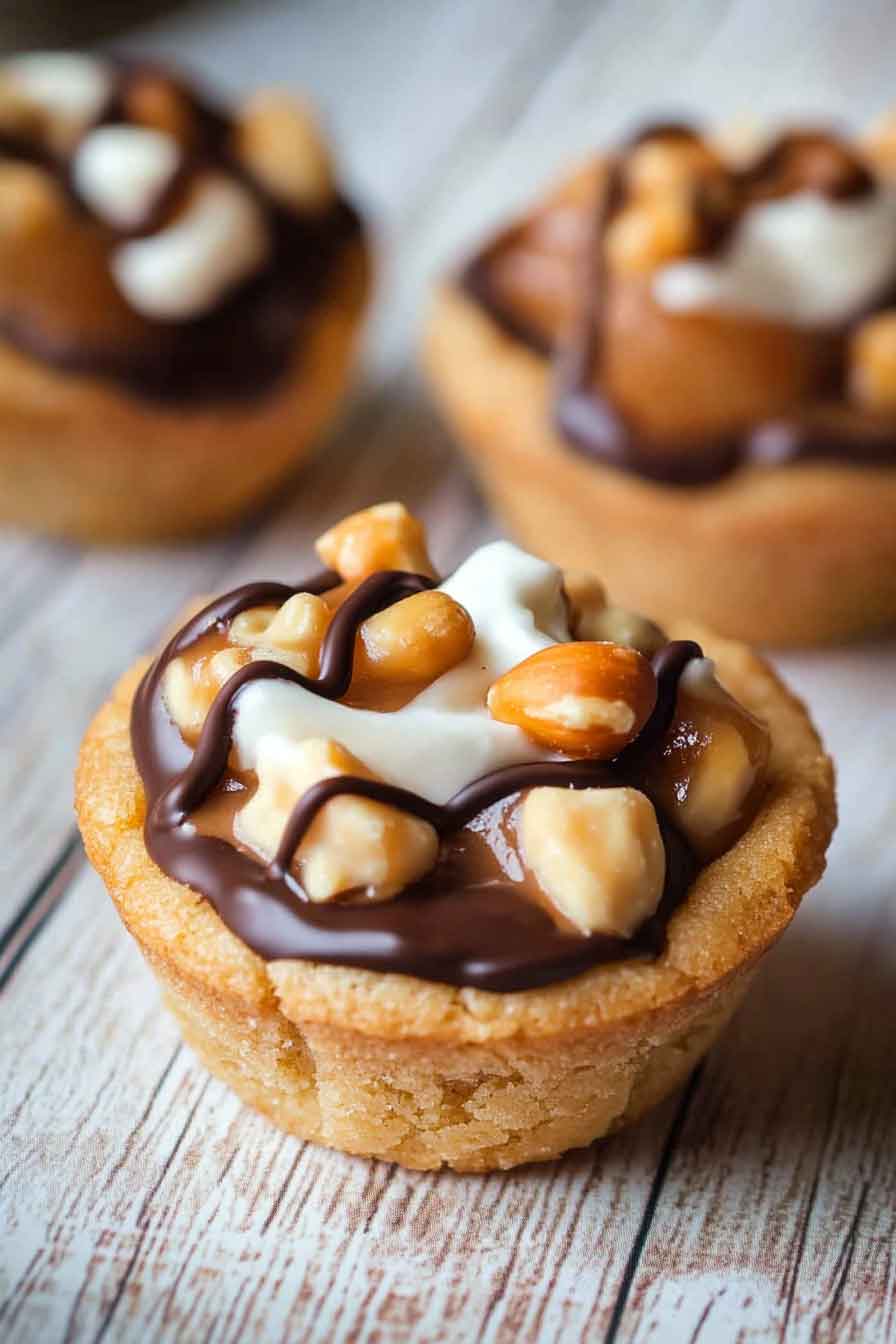
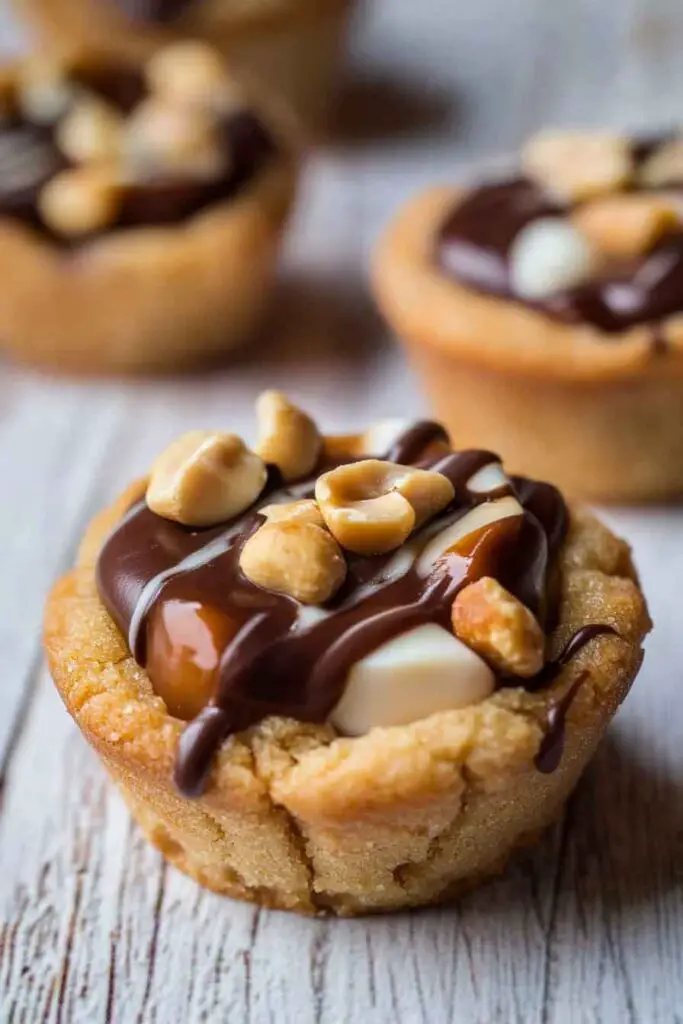
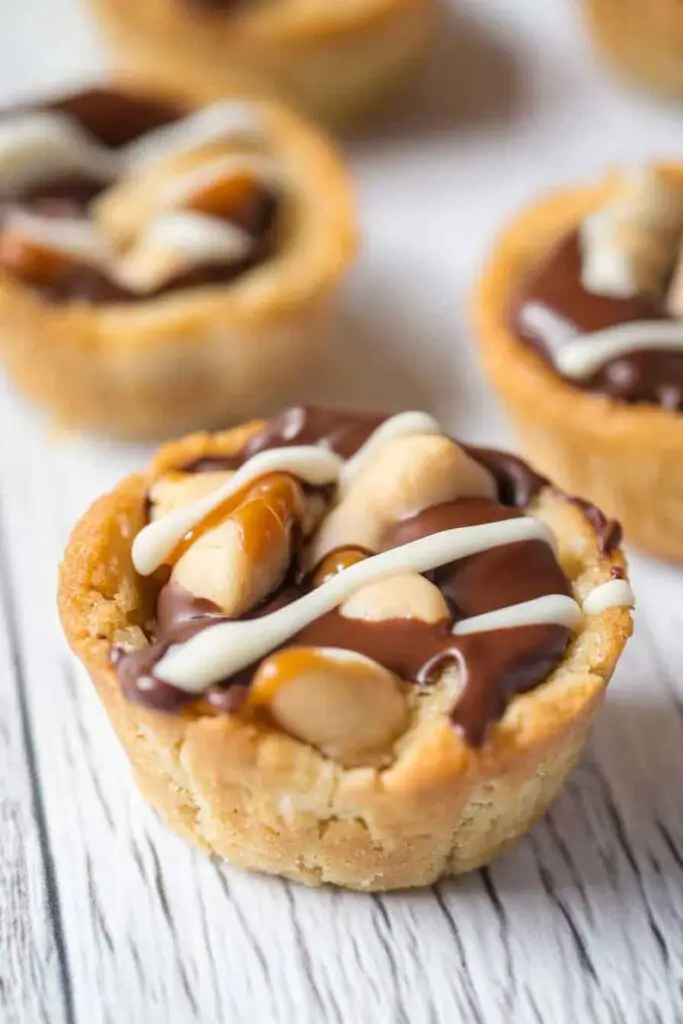
Caramel Peanut Butter Cookie Cups
Oh wow, you guys, you need to try these caramel peanut butter cookie cups! They’re soft, chewy, and filled with sweet, gooey caramel. Plus, they’ve got that perfect peanut butter flavor!
I baked a batch the other day, and oh my goodness, they turned out so good. The peanut butter cookie base is rich and soft, and when you bite in, that caramel just melts in your mouth. Seriously, they’re little bites of heaven.
If you love peanut butter and caramel, these cookie cups are totally for you. They’re fun to make and even more fun to eat. Trust me, you’ll want to make these for every occasion.

So let’s grab some peanut butter and caramel. I’ll show you how to whip up these easy and delicious cookie cups. They’re gonna be your new favorite treat!
Why You’ll Love This Recipe
- Perfect Texture Play: The soft cookie base hugs the caramel center while the peanut butter gives it a creamy richness. Each bite delivers a contrast of chewy, crunchy, and smooth textures.
- A Hit at Gatherings: These cookie cups are portable, easy to serve, and look impressive on dessert trays. They’re great for bake sales, potlucks, or family get-togethers.
- Flexible Flavor Options: You can play with the filling—use Kraft caramels for a classic chewy caramel, or swap them for soft caramel candies or even a homemade caramel sauce. Reese’s mini cups add a chocolaty surprise, and using white chocolate versions offers a subtle, creamy twist.
- Balanced Sweetness: Peanut butter’s natural saltiness tempers the sweetness of caramel and candy, creating a satisfying, not overly sweet bite.
What You Need to Know Before You Start
Prep Time & Cook Time:
- Prep Time: About 20 minutes. You’ll cream the butter and sugars, mix in the dry ingredients, and shape the dough into mini muffin cups.
- Cook Time: 12-15 minutes, just until the edges are golden and set. It’s key not to overbake—this keeps the centers soft enough to hold the caramel.
- Cooling Time: At least 15 minutes in the tin, then transfer to a cooling rack to finish setting.
- Total Time: Around 50 minutes from start to finish.
Servings:
This recipe yields approximately 24 cookie cups, perfect for sharing or freezing extras.
Difficulty:
Easy but Impressive: Even beginners can manage this recipe, but the results will look and taste like something from a bakery. The dough is forgiving, and pressing it into the muffin tin is a simple step. The trick is in timing—bake until just golden, and don’t wait too long to press the caramel into the center.
Required Kitchen Tools
- Mini Muffin Tin (24-count): Essential for shaping the cups and containing the fillings.
- Hand or Stand Mixer: For creaming butter and sugars to achieve a light, fluffy base.
- Mixing Bowls: One for dry ingredients, one for wet.
- Rubber Spatula: Helps fold in ingredients without overmixing.
- Measuring Cups and Spoons: Accuracy matters for the right dough consistency.
- Cooling Rack: Allows the cookie cups to cool evenly, preventing sogginess.
Ingredients for Caramel Peanut Butter Cookie Cups
Each ingredient plays a role in creating a cookie cup that’s indulgent yet balanced:
- Salted Butter (softened): Provides moisture and a buttery flavor. Salted butter cuts the sweetness, especially when paired with caramel.
- Smooth Peanut Butter: The hero of the flavor profile. It brings a creamy, nutty richness that complements the caramel. Stick to regular creamy peanut butter (not natural or chunky) for the best consistency.
- Golden Brown Sugar: Adds a caramelized depth of flavor and helps keep the cookies soft and chewy.
- Granulated Sugar: Enhances sweetness and contributes to the classic cookie texture.
- Eggs (large): Bind the ingredients and add structure to the dough, ensuring the cups hold their shape.
- Vanilla Extract: Rounds out the peanut butter flavor and adds warmth.
- All-Purpose Flour: Forms the structure of the dough. Sift if lumpy to ensure a smooth mix.
- Baking Powder: Helps the cups rise slightly, giving them a tender texture.
- Salt: Balances flavors and enhances the peanut butter and caramel notes.
- Kraft Caramels: The classic choice for a gooey center. Warm them slightly if needed to make pressing easier.
- Reese’s Peanut Butter Cup Minis: Optional but recommended for added indulgence. Press them into the cups along with or instead of the caramels.
- Reese’s White Chocolate Minis (Optional): A creamy, sweeter option if you prefer a white chocolate finish.
- Roasted Salted Peanuts: Crushed and sprinkled on top for a crunchy contrast to the soft caramel and cookie.
Variations for Caramel Peanut Butter Cookie Cups
- Chocolate Lovers’ Twist: Swap out the Kraft caramels for mini chocolate truffles or soft chocolate caramels. This gives a deeper chocolate-caramel flavor.
- Nutty Addition: Fold finely chopped toasted pecans or walnuts into the dough for extra crunch and a hint of bitterness to balance the sweet caramel.
- Salted Caramel Finish: Sprinkle a pinch of flaky sea salt over the caramel while it’s still warm for a luxurious salted caramel version.
- Double Peanut Butter: Use peanut butter-filled candies like mini Reese’s pieces in place of or alongside the caramel for an extra punch of peanut flavor.
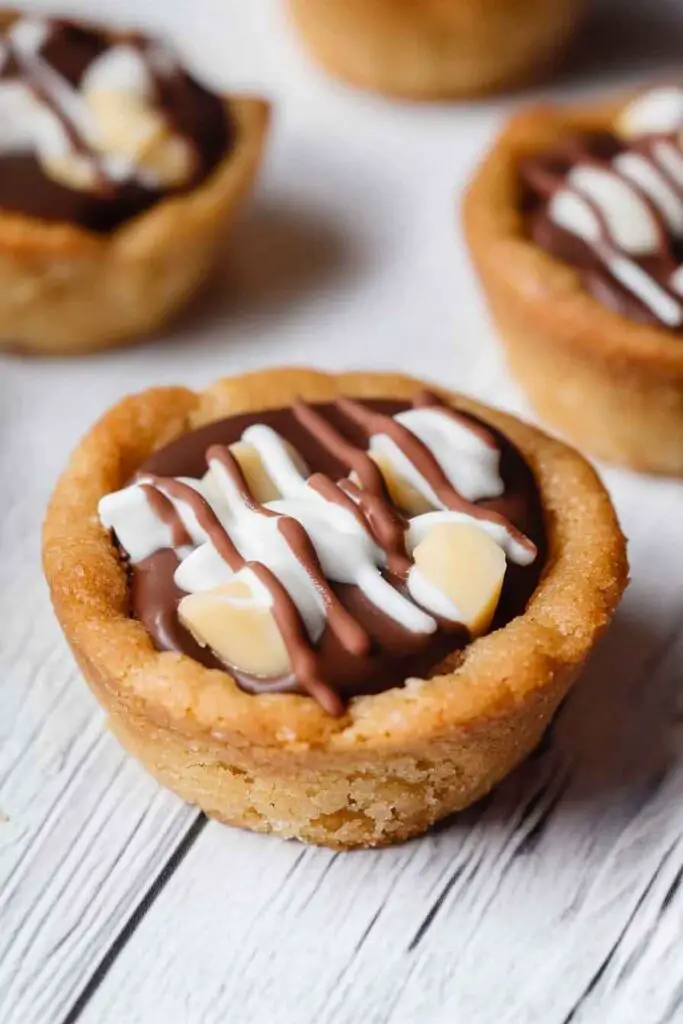
- White Chocolate Swirl: Drizzle melted white chocolate over the cooled cookie cups for a bakery-style finish.
How to Make Caramel Peanut Butter Cookie Cups Step-by-Step
1. Cream the Butter and Sugars
In a large mixing bowl, beat the softened butter, peanut butter, brown sugar, and granulated sugar until the mixture is light and fluffy. This step is essential for a soft texture.
2. Add the Egg and Vanilla
Beat in the egg and vanilla extract until fully combined. This adds moisture and depth of flavor.
3. Mix Dry Ingredients
In a separate bowl, whisk together the flour, baking powder, and salt. Slowly add the dry ingredients to the wet mixture. Mix on low speed or with a spatula just until combined. Overmixing can make the dough tough.
4. Shape and Prepare
Scoop about a tablespoon of dough into each cup of the mini muffin tin. Use your thumb or the back of a spoon to press the dough into a cup shape with a slight well in the center.
5. Bake the Cookie Cups
Bake in a preheated 350°F (175°C) oven for 12-15 minutes, or until the edges are golden and the centers look set but soft.
6. Press in Caramel and Candy
As soon as the cups come out of the oven, press one Kraft caramel into the center of each cup. You can also press in a mini Reese’s cup or both, depending on preference.
7. Cool and Garnish
Let the cups cool in the pan for 10-15 minutes before carefully transferring them to a cooling rack. While still warm, sprinkle with crushed roasted peanuts or drizzle with melted chocolate if desired.
Serving and Decoration
- Serving Suggestions: Arrange on a dessert platter or package in small boxes as gifts. They pair beautifully with coffee or milk.
- Decoration Ideas: Drizzle with chocolate or caramel sauce, sprinkle with crushed peanuts or toffee bits, or add a light dusting of powdered sugar for a simple touch.
Tips and Tricks for Success
- Use Room Temperature Ingredients: This ensures even mixing and a smooth dough texture.
- Don’t Overbake: The cookies should be just set and golden at the edges. Overbaking will make them hard and dry.
- Work Quickly with Caramels: Press the caramels into the cookie cups while they’re still warm so they melt slightly and stick.
- Chill Dough (Optional): If your dough feels too soft or sticky, a 15-minute chill in the refrigerator can make it easier to handle.
- Grease the Pan: Lightly greasing the muffin tin will help the cookie cups release easily after cooling.
Storing Caramel Peanut Butter Cookie Cups
- Room Temperature: Store cooled cookie cups in an airtight container at room temperature for up to 5 days.
- Freezing: Freeze the cookie cups (without decoration) in an airtight container for up to 2 months. Thaw at room temperature before serving.
- Reheat Option: If desired, warm slightly in the microwave (about 10 seconds) to soften the caramel center before serving.
Nutrition
| Nutrient | Per Serving (1 cookie cup) |
|---|---|
| Calories | ~160 kcal |
| Fat | ~9g |
| Saturated Fat | ~3.5g |
| Carbohydrates | ~17g |
| Sugar | ~11g |
| Protein | ~3g |
| Sodium | ~80mg |
| Fiber | ~1g |
Caramel Peanut Butter Cookie Cups
Course: Cookie Recipes24
cookie cups20
minutes12
minutes160
kcalIngredients
1 cup (226g) salted butter, softened
1 cup (250g) smooth peanut butter
1 cup (220g) golden brown sugar
1/2 cup (100g) granulated sugar
2 large eggs
2 tsp vanilla extract
2 1/2 cups (310g) all-purpose flour
2 tsp baking powder
1/2 tsp salt
24 Kraft caramels
24 Reese’s Peanut Butter Cup Minis (optional)
1/4 cup roasted salted peanuts, chopped (for garnish)
Directions
- Preheat oven to 350°F (175°C). Lightly grease a mini muffin tin.
- In a large bowl, beat the butter, peanut butter, brown sugar, and granulated sugar until light and fluffy.
- Add eggs and vanilla extract; beat until combined.
- In a separate bowl, whisk together flour, baking powder, and salt. Gradually add to the wet mixture until just combined.
- Scoop about 1 tablespoon of dough into each muffin cup. Press to form a shallow cup.
- Bake for 12-15 minutes, or until edges are golden and centers are set.
- Immediately press a caramel (and optional Reese’s mini) into each cup’s center.
- Cool in the tin for 10-15 minutes before transferring to a wire rack. Garnish with chopped peanuts if desired.
Caramel Peanut Butter Cookie Cups FAQs
- Can I use natural peanut butter?
It’s best to use regular creamy peanut butter. Natural versions are often too oily or runny, affecting the dough’s texture. - How do I prevent the caramel from hardening too much?
Press the caramel into the cookie cup while it’s still warm from the oven. It will soften slightly and stay chewy. - Can I make these ahead?
Absolutely. You can bake the cups a day in advance and store them covered. Just add the caramel and decorations before serving for the best texture.
Conclusion
These Caramel Peanut Butter Cookie Cups deliver on flavor, texture, and presentation. They’re simple enough for beginners yet impressive enough to wow a crowd. With buttery peanut flavor, melty caramel, and a perfect bite-sized form, they’re destined to become a favorite in any dessert spread.