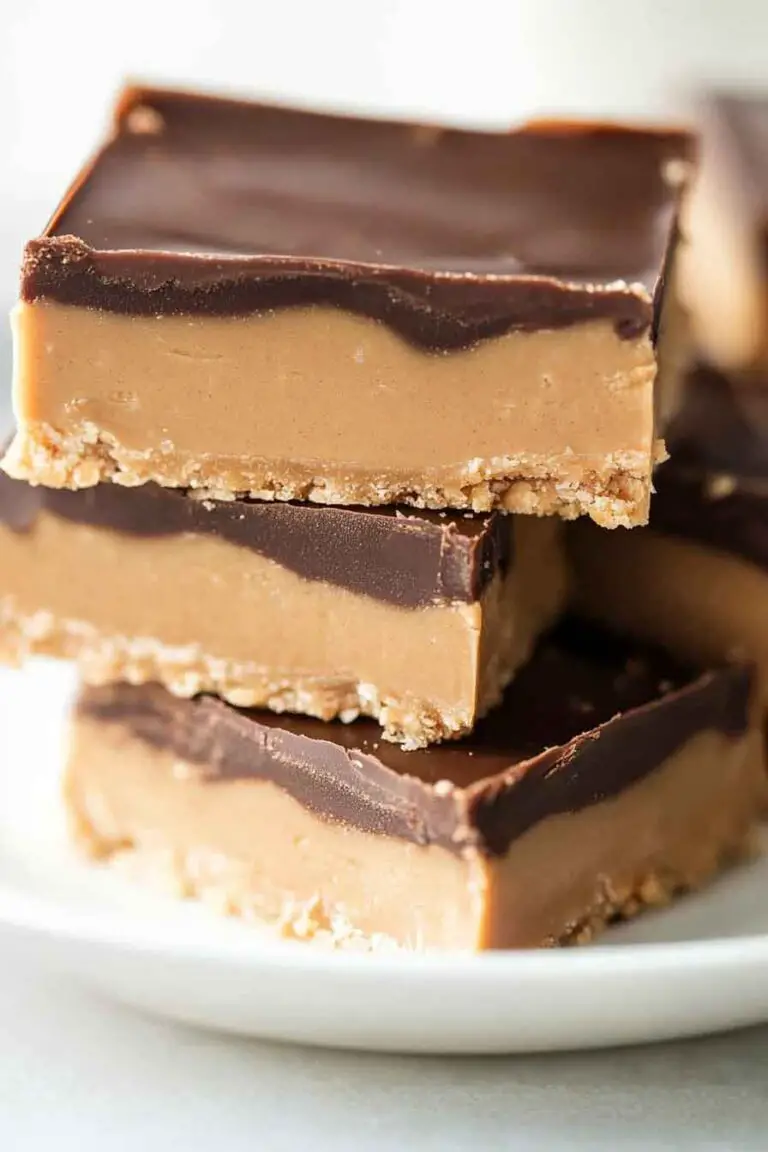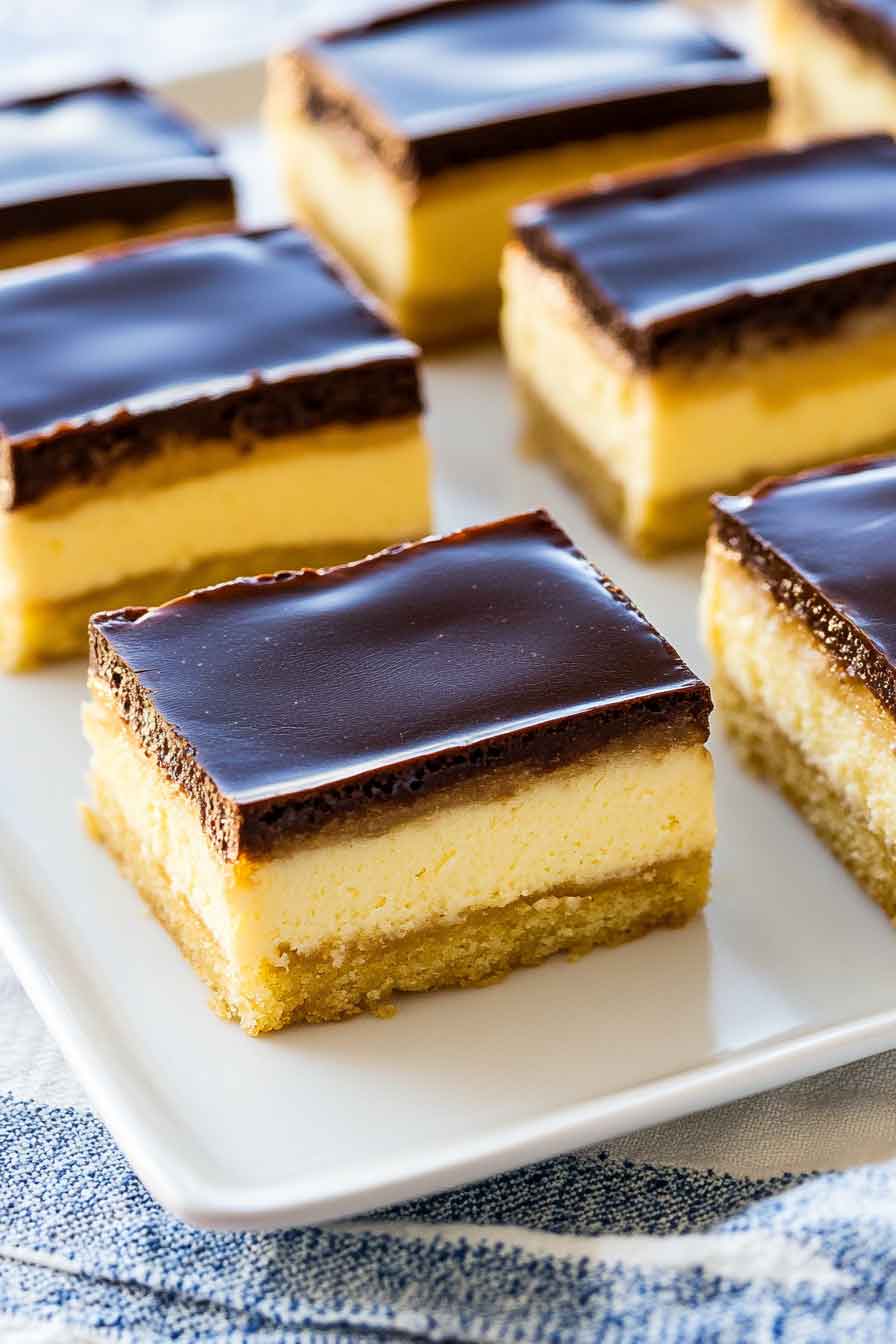
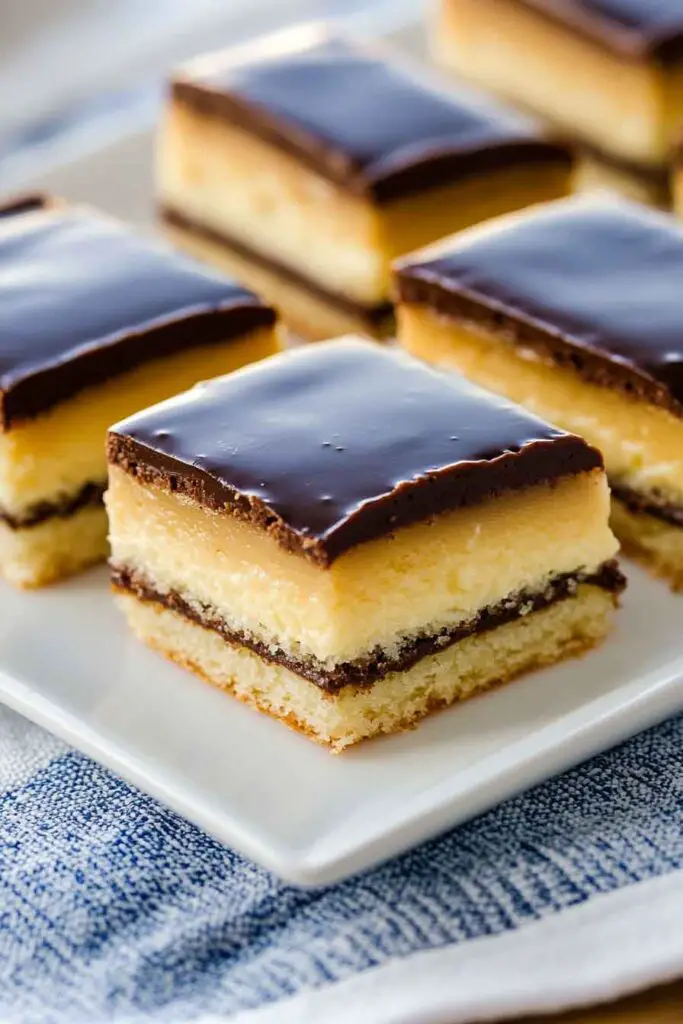
Elegant Boston Cream Dessert Bars
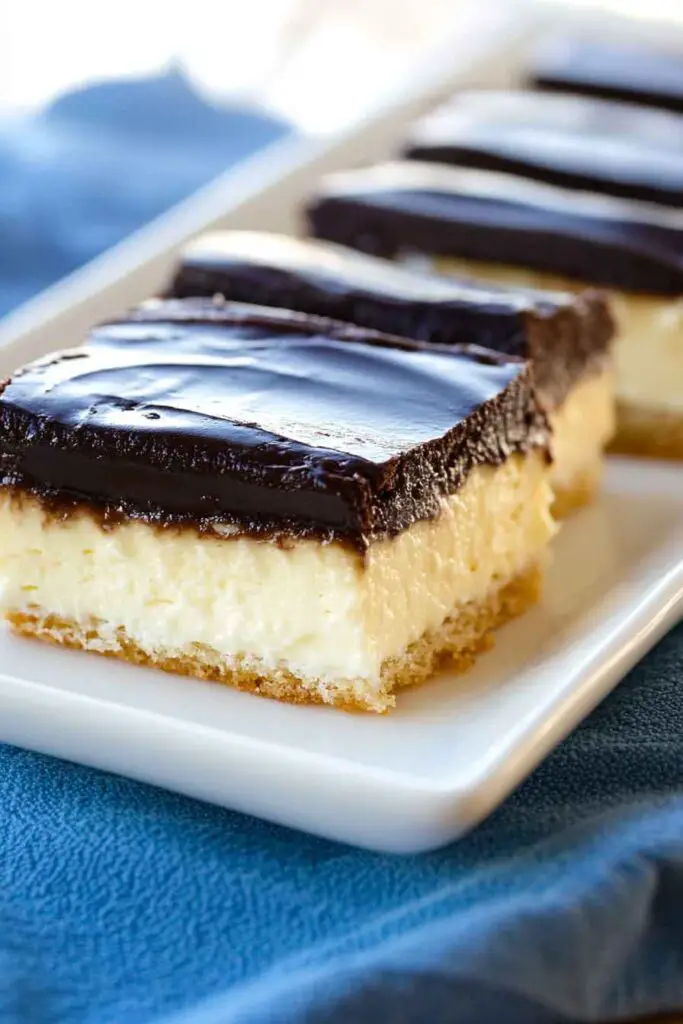
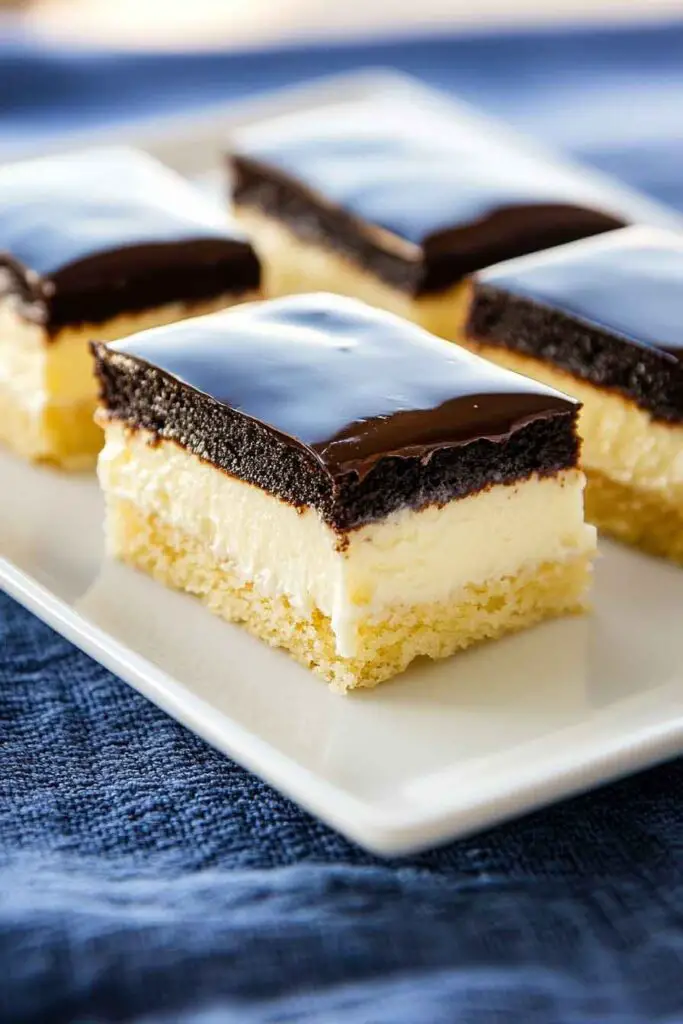
Okay, these dessert bars are everything. Think creamy custard, smooth chocolate ganache, and a buttery crust—all layered into one gorgeous bar. I made them once, and they’re now a staple in my dessert lineup.
They’ve got the classic Boston cream flavor in bar form, with a rich, velvety custard, and a glossy chocolate topping that’s to die for. The crust is buttery and firm, holding everything together perfectly.
If you love indulgent, decadent treats that look as stunning as they taste, these bars are for you. Perfect for holidays, parties, or anytime you want to impress without spending hours in the kitchen. I always cut extra—these go fast.

Let’s bake these beauties together. These elegant Boston cream dessert bars are simple to make and totally worth the effort. You’re going to love every bite.
Why You’ll Love This Recipe
- Reader Favorite: “One of the best desserts I’ve ever made!” as one of our readers says.
- Rich and Creamy: The custard filling is velvety smooth and perfectly complements the soft cake.
- Impressive Yet Easy: Looks like it came from a bakery, but it’s easy enough for any home cook to pull off.
- Make-Ahead Friendly: Prepare in advance and refrigerate for a hassle-free dessert whenever you need it.
- Great for Sharing: This recipe yields 12-16 servings, making it ideal for family gatherings or parties.
What You Need to Know Before You Start
Prep Time & Cook Time:
Prep Time: 25 minutes
Cook Time: 30 minutes
Chill Time: 2 hours
Total Time: 3 hours (including chilling)
Servings:
This recipe makes 12-16 bars, depending on the size you cut them.
Difficulty:
This recipe is easy to follow but has multiple components. It’s beginner-friendly with a little patience.
Required Kitchen Tools
- 9×13-inch baking pan
- Medium saucepan
- Whisk
- Hand mixer or stand mixer
- Cooling rack
- Piping bag (optional for custard filling)
Ingredients for the Dessert Bars
For the Cake Layer:
- 1 ½ cups all-purpose flour
- 1 ½ teaspoons baking powder
- ½ teaspoon salt
- ¾ cup granulated sugar
- ¼ cup unsalted butter (softened)
- 2 large eggs
- ½ cup milk
- 1 teaspoon vanilla extract
For the Custard Filling:
- 2 cups whole milk
- 2 large egg yolks
- ½ cup granulated sugar
- 2 tablespoons cornstarch
- 2 tablespoons unsalted butter
- 1 teaspoon vanilla extract
For the Chocolate Glaze:
- 4 ounces semi-sweet chocolate (chopped)
- ¼ cup heavy cream
- 1 tablespoon unsalted butter
- 1 tablespoon corn syrup (optional for shine)
Variations for Boston Cream Dessert Bars
- Add Fruit: Try adding fresh berries or sliced bananas between the layers for a fresh twist.
- Gluten-Free Option: Swap all-purpose flour for a gluten-free flour blend to make this recipe gluten-free.
- Coconut Twist: Top the custard layer with toasted coconut for a fun flavor variation.
- Caramel Glaze: Swap out the chocolate glaze for a rich caramel sauce for a different sweet topping.
How to Make Elegant Boston Cream Dessert Bars: Step-by-Step Instructions
1. Prepare the Cake Layer
Preheat the oven to 350°F (177°C). Grease a 9×13-inch baking pan with butter or cooking spray. In a medium bowl, combine the flour, baking powder, and salt. In a separate bowl, beat the butter and sugar with a hand mixer until light and fluffy. Add the eggs one at a time, beating well after each addition. Stir in the milk and vanilla extract. Gradually add the dry ingredients to the wet ingredients, mixing until just combined. Pour the batter into the prepared baking pan and spread it evenly.
2. Bake the Cake
Bake in the preheated oven for 25-30 minutes, or until a toothpick inserted into the center of the cake comes out clean. Remove from the oven and let the cake cool in the pan on a wire rack.
Preparing the Custard and Assembling the Bars
3. Prepare the Custard Filling
While the cake is cooling, it’s time to prepare the rich custard filling. In a medium saucepan, whisk together the milk, egg yolks, sugar, and cornstarch. Cook the mixture over medium heat, whisking constantly, until it thickens, about 5-7 minutes. Once it starts to bubble and coats the back of a spoon, remove it from the heat and stir in the butter and vanilla extract. Allow the custard to cool to room temperature before spreading it on the cake.
4. Assemble the Bars
Once the cake has cooled completely, spread the custard filling evenly over the top. Be gentle so the custard doesn’t disturb the cake too much. Smooth it out with a spatula for an even layer. After the custard is spread, place the cake in the refrigerator and let it chill for at least 2 hours to set.
5. Prepare the Chocolate Glaze
To make the glaze, place the chopped chocolate in a heatproof bowl. In a small saucepan, heat the heavy cream and butter over medium heat until it begins to simmer. Pour the hot cream over the chocolate and let it sit for 1-2 minutes. Then, stir until the chocolate is completely melted and smooth. If you want a shinier glaze, add the corn syrup and stir until well combined.
6. Glaze the Bars
Once the custard has set, pour the chocolate glaze over the top of the dessert, spreading it evenly to cover the custard layer. Be sure to work quickly, as the glaze may begin to set as it cools. Place the dessert back in the refrigerator for another hour to allow the glaze to firm up.
7. Slice and Serve
Once the glaze has set, remove the dessert from the refrigerator. Use a sharp knife to slice the dessert into bars. The smooth custard and chocolate glaze should hold together nicely, making for a clean slice. Serve these bars chilled, and enjoy the perfect balance of cake, custard, and chocolate!
How to Serve Elegant Boston Cream Dessert Bars
These bars make for an elegant dessert at any gathering. Here are a few ideas for serving:
- For a Party: Arrange the bars on a platter and garnish with chocolate shavings or whipped cream for an extra touch of elegance.
- Pair with Coffee: These dessert bars are perfect for serving with a cup of coffee or tea after a meal.
- As a Sweet Treat: Individually wrapped, these bars make great sweet snacks for lunches or as a treat throughout the week.
Storing Elegant Boston Cream Dessert Bars
- In the Refrigerator: Store any leftover bars in an airtight container in the refrigerator for up to 4 days. The bars taste even better after they’ve been chilled overnight, allowing the flavors to meld together.
- Freezing: You can freeze these bars for up to 3 months. Wrap them tightly in plastic wrap and foil before freezing. Thaw in the refrigerator for several hours before serving.
Tips and Tricks for Success
- Let the Cake Cool Completely: Make sure the cake has cooled before adding the custard. This helps the layers set properly without any melting or mixing.
- Smooth Custard Layer: If the custard gets too thick before spreading, warm it up slightly over low heat to loosen it.
- Keep the Chocolate Glaze Smooth: Stir the glaze slowly to keep it glossy and avoid air bubbles.
- Chill Between Steps: Chilling the dessert between layers ensures each component sets firmly, resulting in neat, beautiful bars when sliced.
Nutrition Information
| Serving Size | 1 Dessert Bar (approx. 1/12 of the recipe) |
|---|---|
| Calories | 290 |
| Total Fat | 18g (28%) |
| Saturated Fat | 10g (50%) |
| Cholesterol | 85mg (28%) |
| Sodium | 110mg (5%) |
| Carbohydrates | 30g (10%) |
| Fiber | 1g (4%) |
| Sugar | 20g |
| Protein | 4g |
Elegant Boston Cream Dessert Bars
Course: Easy Homemade Desserts25
minutes30
minutes290
kcal4
hourIngredients
- For the Cake Layer:
1 ½ cups all-purpose flour
1 ½ teaspoons baking powder
½ teaspoon salt
¾ cup granulated sugar
¼ cup unsalted butter (softened)
2 large eggs
½ cup milk
1 teaspoon vanilla extract
- For the Custard Filling:
2 cups whole milk
2 large egg yolks
½ cup granulated sugar
2 tablespoons cornstarch
2 tablespoons unsalted butter
1 teaspoon vanilla extract
- For the Chocolate Glaze:
4 ounces semi-sweet chocolate (chopped)
¼ cup heavy cream
1 tablespoon unsalted butter
1 tablespoon corn syrup (optional for shine)
Directions
- Prepare the cake layer, bake, and let cool.
- Prepare the custard filling, allow it to cool to room temperature.
- Spread custard over the cooled cake and refrigerate.
- Make the chocolate glaze and spread it over the custard.
- Chill the dessert for 1-2 hours before slicing into bars.
- Serve and enjoy!
FAQ – Elegant Boston Cream Dessert Bars
1. Can I make these bars ahead of time?
Yes, these bars are perfect for making ahead! Prepare them the day before your event, and refrigerate them. The flavors will meld together even more, making them even more delicious.
2. Can I use a different type of chocolate for the glaze?
Absolutely! You can use dark chocolate, milk chocolate, or even white chocolate for the glaze. Just keep in mind that the flavor of the glaze will change slightly based on the chocolate you choose.
3. Can I freeze these bars?
Yes, you can freeze the bars. Wrap them tightly in plastic wrap and foil, and they will last up to 3 months in the freezer. Thaw them in the refrigerator before serving.
4. Can I use a store-bought custard instead of making my own?
If you’re short on time, store-bought custard can be used as a shortcut. However, making your own custard gives the bars a richer flavor and texture.
5. How do I store leftover bars?
Store any leftover bars in an airtight container in the refrigerator for up to 4 days. They can also be kept in the freezer for up to 3 months.
Conclusion
Elegant Boston Cream Dessert Bars are the perfect combination of creamy custard, soft cake, and smooth chocolate glaze. Whether you’re serving them for a special occasion or enjoying them as a treat throughout the week, they are sure to impress. This recipe is not only delicious but also easy to make, with the option to prepare in advance for convenience. Enjoy these indulgent bars, and don’t forget to share the love with friends and family!